5. Control your devices in VRM
VRM offers control over some of your Victron devices, straight from the VRM dashboard. With this feature, you can quickly adjust and control the following devices or settings without needing to open the Remote Console:
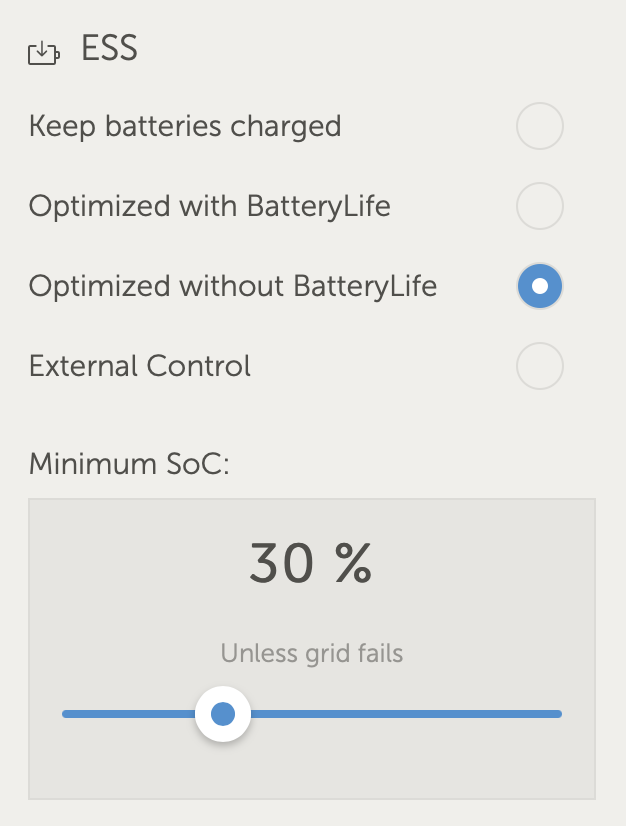
ESS settings: ESS mode, Minimum SoC
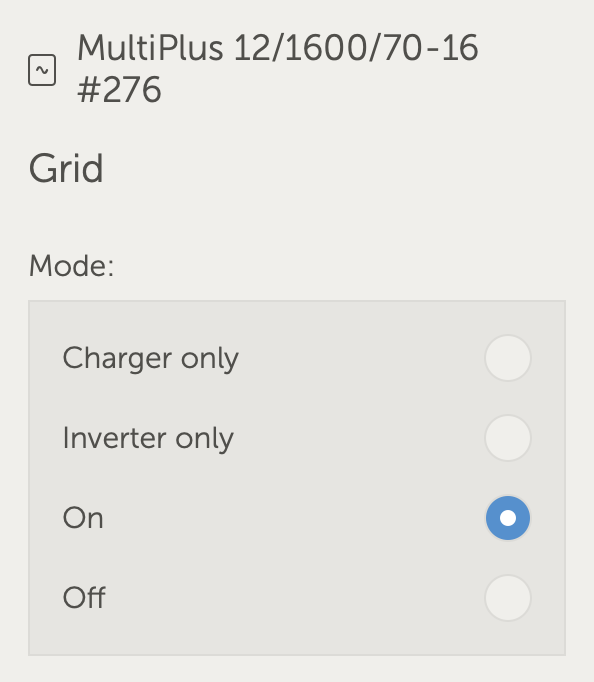
MultiPlus/Quattro: Grid current limit, Mode (Charger only, Inverter only, On, Off)
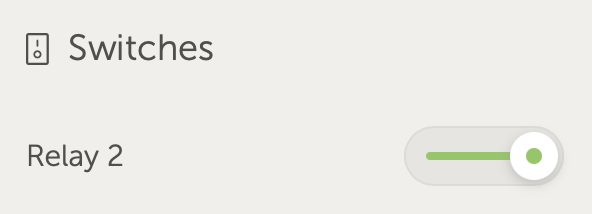
GX device relays: Relay 1, Relay 2 (if available)
EV Charging Station: Auto, Manual, Charge current, Charge on/off
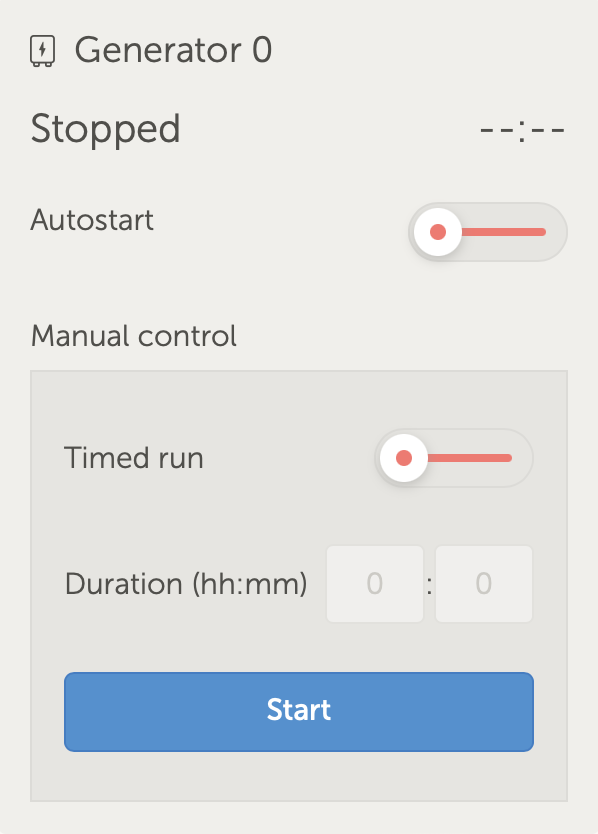
Generator: Autostart, Manual control, Timed run, Start/Stop
To access the Controls, go to your VRM dashboard. The Controls icon is located at the top right of the installation dashboard and the controls will open on the right side of your screen. Note that access to controls requires the real-time data connection to your installation.
5.1. Inverter/Charger controls in VRM
Inverter/Charger controls can be made available on the VRM Dashboard, but require an additional step to enable in the settings for that specific VRM installation. This is to prevent accidentally switching off the system.
Go to the Settings → General tab of the installation.
Scroll down to Inverter/Charger Control.
Toggle Inverter/Charger control for this installation. Enabling this feature will allow you to remotely control your inverter's current limit as well as turn it on/off, and to Charger only or inverter only from the Controls panel on the VRM dashboard.
 |
Warning
It is ONLY recommended to enable this easy system shutdown control for small systems in non-critical environments. It is STRONGLY recommended to leave this feature disabled for large mission critical systems, or where there are multiple users with access to the Controls to prevent accidental powering down of the system.
Note
Note that there is a limitation where these controls are not available when using a Digital Multi Control or VE.Bus BMS V1 in the system.
5.2. ESS controls in VRM
For your ESS system, you can switch your settings between the following ESS modes:
Optimized with BatteryLife
Optimized without BatteryLife
Keep batteries charged
External control
As with the inverter settings, you will have 5 seconds to cancel any change in settings before it is sent to the device.
It is also possible to adjust the minimum state of charge. Note that setting the minimum state of charge will not be possible when the ESS is set to Keep batteries charged as that mode will override and charge the battery to 100% when possible.
 |
5.3. Manual relay controls in VRM
The relays of the GX device can also be switched manually via the control panel. To do this, they must first be set to Manual in the GX device. The hardware relays will not appear here if they are used by another process, such as a generator start stop.
In the GX device go to Settings → Relay.
Set the Function (Relay 1) to Manual.
Repeat step 2 for Relay 2, if present.
With the 5 seconds delay (in which the switching command can still be aborted), the respective relay can now be switched from the Controls panel on the dashboard.
 |
5.4. Generator controls in VRM
A generator that is controlled via the start/stop function of the GX device can also be controlled via the control panel. For setup see the GX - Generator auto start/stop chapter in the GX device manual.
The following control and monitor elements are available:
Autostart: Controls the Auto start functionality as been set in the GX device.
Manually controlled Timed run: Toggle to enable/disable a timed run.
Running: How long has the generator been running in the current period.
Duration: Time span for how long the Timed run should last.
Start/Stop: Start or stop a timed run.
 |
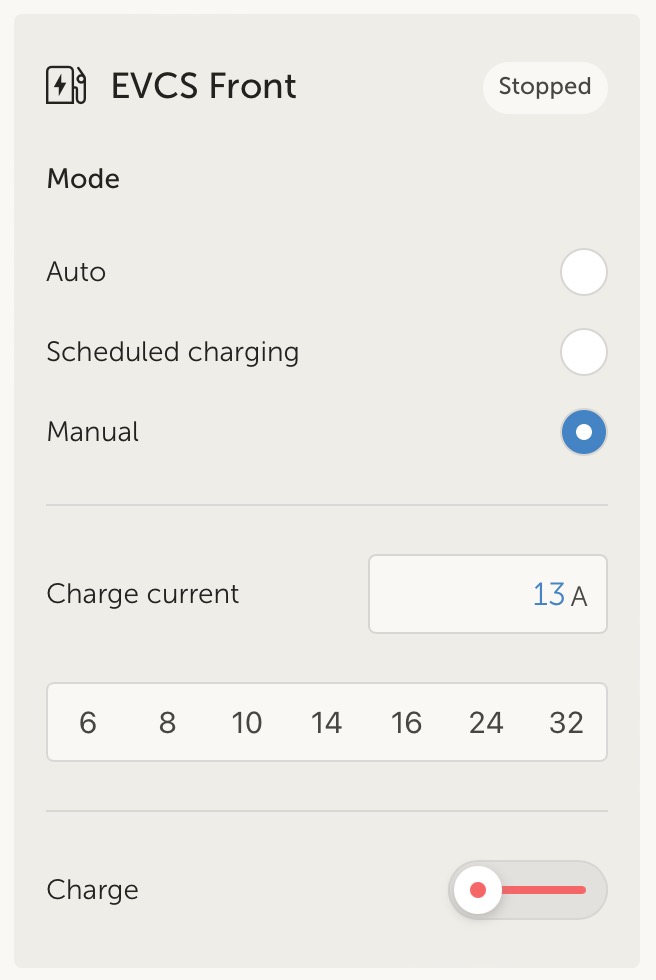
5.5. EV Charging Station controls in VRM
The Victron EV Charging Station can also be controlled via the Controls panel on the dashboard.
The following options are available:
Auto: detects when surplus power is available and uses only this power to charge the vehicle.
Scheduled charging: Charge the EV at certain time intervals, for example during the night hours when grid energy is cheaper.
Manual: Enables the user to turn the vehicle charging ON and OFF manually, using the CHARGE toggle.
Charge current: Set the amount of current the station provides using the Charge current control.
Charge: manually start or stop the charge process.
 |
5.6. Remote Console
Remote Console is a powerful feature that allows access to the GX device interface in real time over the internet.
Remote Console needs to first be enabled on the GX device before it is accessible on VRM.
For further details on how to enable and use Remote Console, please see the Remote Console on VRM section in the GX device manual.