8. Remote VEConfigure
8.1. Introduction
This chapter describes how to remotely change settings in the MultiPlus, MultiPlus-II, Quattro, Quattro-II, and high power Inverters; all power products with a VE.Bus communication port. A feature called Remote VEConfigure.
8.2. Requirements and limitations
This functionality requires a GX device (Cerbo GX or other) to be installed locally on the system.
A GX device running Venus OS v2.17 or later (latest official version is preferred).
The system must be connected to the internet and communicate with the VRM portal.
The Full VRM Portal mode access setting is enabled, which is on the GX device menu → Settings → VRM Online Portal → VRM Portal
The GX device must be powered directly from the battery. Therefore, do not power it with an AC adapter connected to the AC output of the inverter/charger.
Details:
Remote VEConfigure works for both, single-unit systems as well as parallel and three-phase systems.
Remotely changing Assistant configuration is possible.
VE.Bus firmware versions 416 and 417 can not be configured remotely.
Remote configuring firmware version 418 or later requires the GX device to run v2.10 or later.
To Remote VEConfigure a system connected to the GX device via a VE.Bus to VE.Can interface, as was done in old Hub-1 systems, this interface cable needs to run firmware version v2.05 or higher. If necessary, first update that interface cable with the Remote firmware update feature.
This (new) way of Remote VEConfigure replaces the previous mechanism, that used VE.Power Setup. See here for the manual of the old procedure. Note that, once updated to the new Venus version, it is no longer possible to use the old procedure.
In some cases the VE.Bus system is momentarily switched off when the configuration is changed.
8.3. Step-by-step procedure
Check the requirements:
Venus OS v2.17 or later
Two-way communication enabled (see Settings → VRM online portal on the GX device)
Two-way communication up & running: check on the Device list page on VRM
On the VRM Portal, go to Device list and scroll to the bottom to find the Remote VEConfigure button on the VRM Portal.
Click the button and wait.
The system starts with reading all the settings of each inverter/charger in the system. This takes approximately 85 seconds per unit; and in case VEConfigure Assistants are used; then it will take longer: writing an Assistants takes anything between a few and 40 seconds per unit.
Once all data has been gathered; its compiled into a file and uploaded to your computer.
Download/save the .RVSC file to your computers downloads folder - do not 'open in VEConfigure' from your browser.
Modify the configuration by opening the downloaded .RVSC file in VEConfigure.
Save the file using the Close button in VEConfigure on the upper right. You will be asked if you wish to save the changes. Changes can be saved to both the .RVSC file, and also to another seperate .VSC file.
Be Aware - You can only upload the .RVSC file when using Remote VEConfigure. If the file is saved via the File, Save As menu, instead of closing VEConfigure and confirming the changes, it will save to a new .VSC file. This file can be opened, adjusted, and used to update locally with an MK3 adapter, but it cannot be uploaded to update a remote unit. You must use the .RVSC file downloaded from the system that you intend to change the settings of, and then upload that same file once changes are made.
On the VRM Portal, go to Device list and scroll to the bottom to find the Remote VEConfigure button on the VRM Portal.
Click the button and wait.
Click the Upload button, select the .RVSC file and click OK to send it to the system via the VRM.
8.4. System shutdown during reconfiguration
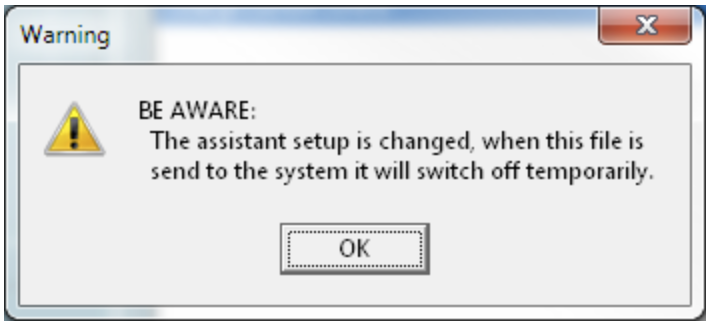
Many settings can be changed without resulting in a shutdown during the reconfiguration. Some settings though, such as a changed Assistants configuration, will cause the inverter/charger to momentarily switch off and back on again. In such situations, VEConfigure will warn when saving the settings:
 |
Known issue: Venus versions v2.23 and below always reset the Multi when the following settings are changed:
Battery Capacity
Start and stop limits for low power AES mode
State of charge when Bulk finished (only resets with Multi firmware versions < 200)
Depending on how the internet communication equipment (i.e. router) is powered, the internet connection might also be temporarily lost at that time.
This is not a problem, as the file is first uploaded to the GX device and only once received and verified it will be written to the VE.Bus system.