 Add this page to your book
  Remove this page from your book
  Manage book (
 Help
Help Table of Contents
VE Power Setup manual
1. Introduction
VE Power Setup is a Windows application that can be used for three things:
- Update the firmware of a VE.Can product connected via USB to your computer (requires a CANUSB adapter, ASS030532000)
- (deprecated) Remotely updating firmware of a VE.Can product (requires an internet connected GX device). Use the new mechanism instead.
- (deprecated) Remotely changing the configuration of VE.Bus system: Remote VEConfigure (requires an internet connected GX device). Use the new new mechanism instead.
Note that even for updating a VE.Can product via USB (first option in above list), its easier to not use VE Power Setup. Instead, use the remote firmware update feature (second option in above list) instead. Its then not necessary to obtain the CANUSB adapter. In conclusion, the only reason to use VE Power Setup is when there is no GX device and no internet available.
Products which can be firmware updated via its VE.Can port are:
- BlueSolar Charger 150/70 CAN-bus
- BlueSolar Charger 150/85 CAN-bus
- All SmartSolar Chargers with VE.Can
- Lynx Shunt VE.Can
- All four Skylla-i Battery Chargers
- Skylla-i Remote Control Panel
- Skylla-IP44
- All our different VE.Can to VE.Bus/VE.Direct and NMEA2000 to VE.Bus/VE.Direct interfaces
- Ion Control
Products that cannot be updated via their VE.Can port are:
- Lynx Ion (update via USB port instead)
- Lynx Ion + Shunt (update via USB port instead)
- VE.Can tank sender adapter (no updates available)
- Color Control GX (update via internet or with an sdcard)
- Venus GX (update via internet or with an sdcard)
Notes:
- Remotely updating firmware in VE.Bus products (Inverters, Multis and Quattros) is not possible and will also not become possible.
- Remotely changing settings is only possible for VE.Bus products.
- Since VE Power Setup version 5.0, the product configuration is preserved during a firmware update. More information in our blogpost about the v5.0 software release.
- Looking for Remote VEConfigure with a “Victron Global Remote 2 (VGR2)”? See. here
2. Updating a VE.Can product via USB
2.1 VE.Can USB update: Instructions
- Download and install VE Power Setup from our Software downloads page.
- Obtain the necessary firmware file on the Victron Professional portal.
- Connect the VE.Can product to the computer, using the CAN-USB Adapter.
- Follow instructions in VE Power Setup.
3.2 VE.Can USB update: Troubleshooting
Check the information behind the Need help connecting? button in VE Power Setup.
3. Remote VE.Can firmware update (DEPRECATED)
Note that this feature is deprecated; and only works for GX devices running old firmware. Instead of following the remote firmware procedure as documented on this page, we recommend to update the GX Device to the latest available firmware version, and then use the procedures documented here.
3.1 Instructions
- Download and install VE Power Setup from our Software downloads page.
- Obtain the necessary firmware file on https://professional.victonenergy.com|the Victron Professional portal]].
- Follow the Two-way communication checklist.
- Start VE Power Setup
- Click “Connected to a Color Control on VRM”, and enter your VRM login credentials
- Choose the required installation. Sites on which you have Admin-rights and that have two-way-communication enabled will be highlighted in blue:
- After selecting the site, VE Power Setup will establish communication to the selected site.
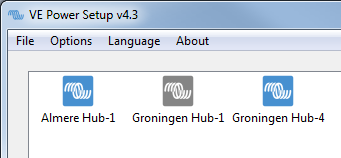
- Once established, it will perform a remote scan, to find all products connected to the Color Control.
3.2 Troubleshooting
- Check the Two-way communication instructions.
4. Remote VEConfigure (DEPRECATED)
Note that this feature is deprecated; and only works for GX devices running v2.16 or earlier. To remotely configure inverter/chargers in system with GX devices running Venus OS v2.17 or later, see the functionality, as documented here: VRM Remote VEConfigure.
4.1 Requirements
- Remote VEConfigure works for both single unit systems as parallel and three phase systems.
- Remotely changing Assistant configuration is possible.
- VE.Bus firmware versions 416 and 417 can not be configured remotely
- Remote configuring firmware version 418 or later requires the CCGX or Venus GX to run v2.10 or later
- The firmware version of the VE.Bus system must stay the same, in between downloading, changing and uploading settings.
Using a VE.Bus to VE.Can interface?
If the VE.Bus device is connected to the CCGX via a VE.Bus to VE.Can interface, as was often the case in a Hub-1 system, this interface cable needs to run firmware version v2.05 or higher. Note that it is possible to first update the firmware in the interface cable, and then remotely configure the VE.Bus system.
4.2 Instructions
- Download and install VE Power Setup from our Software downloads page.
- Obtain the necessary firmware file on https://professional.victonenergy.com|the Victron Professional portal]].
- Follow the Two-way communication checklist.
- Start VE Power Setup
- Click “Connected to a Color Control on VRM”, and enter your VRM login credentials
- Choose the required installation. Sites on which you have Admin-rights and that have two-way-communication enabled will be highlighted in blue:
- After selecting the site, VE Power Setup will establish communication to the selected site.
- Once established, it will perform a remote scan, to find all products connected to the Color Control.
- Now select the product you want to configure:
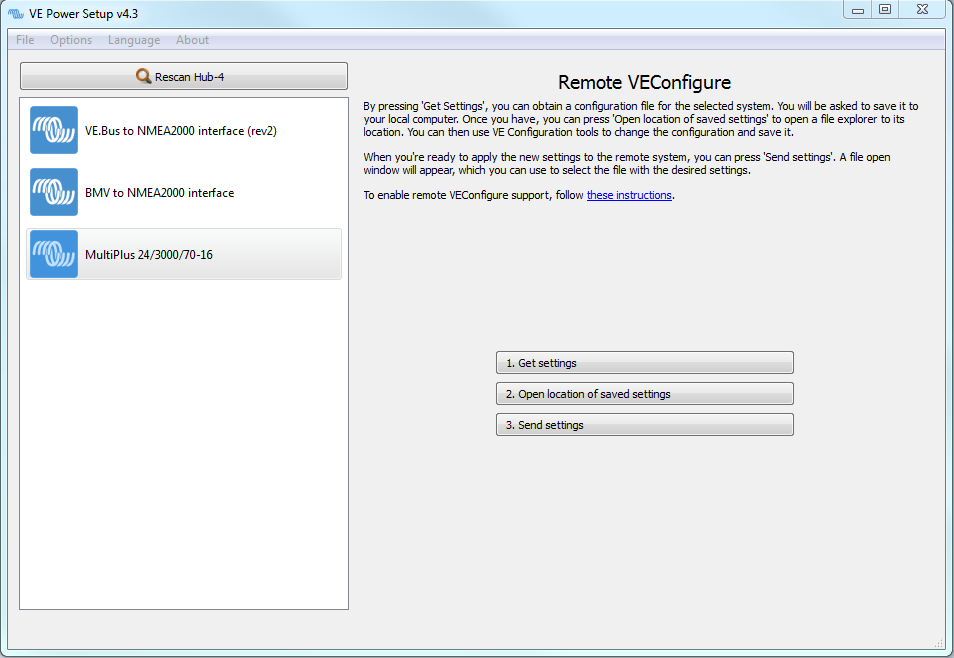
- Choose “Get settings”.
- Save the settings file with an appropriate name.
- Choose “Open location of saved settings”.
- Double click on the settings file. Depending on the system configuration “VE.Bus System Configurator” or “VEConfig” will open.
- Make the required changes.
- Close the configuration tool. The settings file will automatically be saved.
- Go back to VE Power Setup, and choose “Send Settings”.
- Select the modified setting file and wait until done.
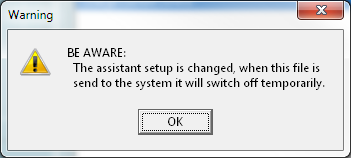
4.3 Inverter restart - short loss of AC power
Changing certain settings, such as Assistants, will cause the inverter/charger to momentarily switch off and back on again. In such situations, VEConfig will warn when saving the settings:
There will be no AC power available during the restart, so in many cases there will also be no internet connection for a short while. This is not a problem, as the file is first sent to the ccgx in full before its written to the unit.
So even though the unit restarts, the writing process should not be effected. It important that the router starts itself when the AC power returns of course.
And it is important that the CCGX (or Venus GX) is powered from DC: it should not lose power during this process.
4.4 Troubleshooting
Problem in the communication link between your computer and the Remote [[venus-os:start|GX device]].
Check the Two-way communication instructions.
Error, remote Color Control gave VEConfig error code 30: MK2 communication error
Verify that both the firmware of the VE.Bus system and the GX device comply to the requirements for Remote VEConfigure.
5. Two-way communication (DEPRECATED)
The information in this chapter describes deprecated functionality. For both remote firmware updates and Remote VEConfigure, we recommend to update the GX device to the latest version, and then use the new functionality:
(old text continues)
Two-way communication is the name of the technology used for the communication link between your computer and the GX device during Remote Firmware updates and Remote VEConfigure.
5.1 Configuration
- Use the latest version of the VE Configuration Tools for VE.Bus products.
- Use the latest version of VE Power Setup.
- Check that the GX device runs the latest available firmware.
- Enable Two-way communication on the GX device.
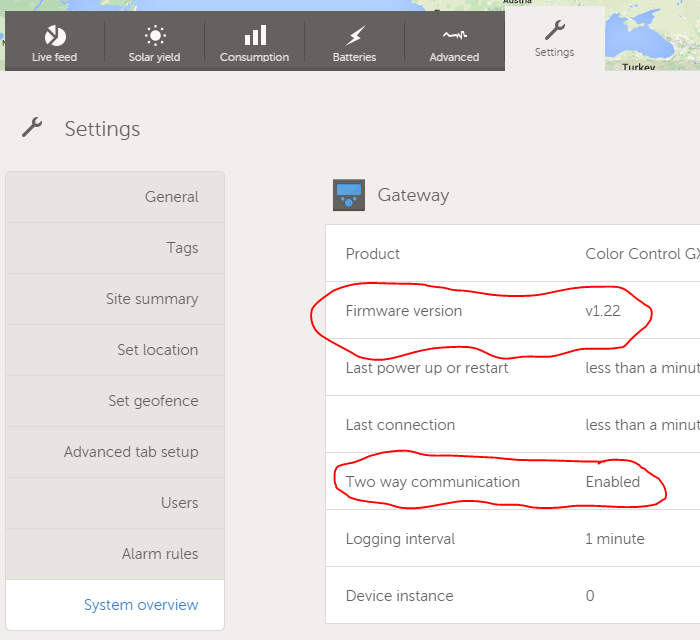
- Make sure to have Full Control access on the installation: On the VRM Portal, navigate to the site, then to the Settings tab, and click Users. Your login needs to highlight in green and show Full Control.
- CCGX must be connected to internet, and Two-way communication must show as up in the Device list on the VRM Portal.
This screenshot shows the Device list on the VRM Portal. See GX device firmware version, as well as Two-way communication status encircled in red:
5.2 Two way communication: Troubleshooting
As a first step, carefully go through above steps of configuring Two-way communication.
Error "VRM API not responding"
This error indicates a network or firewall issue between the computer running VE Power Setup and the backend.
VE Power Setup needs to communicate with the VRM database, which is done by connecting to https://juice.victronenergy.com/.
There might be a firewall blocking access to it. Your network might also require all traffic to go through a HTTP(s) proxy, which VE Power Setup does not support. Confer with your network administrator if this is the case.
Error "Problem communicating with two-way communication relay server"
This indicates a problem between your current location and the two-way communication relay server.
The relay server, https://pubsub.pubnub.com/, is used to connect to the Color Control, despite it being behind a firewall. Access to it from your current location might be blocked by a firewall, or your network requires communication to go through a HTTP(s) proxy, which VE Power Setup does not support. Confer with your network administrator if this is the case.
Windows XP
VE Power Setup runs on Windows XP, but you may have to perform a few manual steps.
- Because Windows XP is no longer maintained by Microsoft, some installations don't have the proper SSL CA certificates installed, so you may need to install them as outlined by the Global Sign website. Power Setup needs the following:
- If you get a crash right at start up, you need to install the Microsoft Visual C 2008 redistributable.