
In this blog Dirk-Jan Faber shows us some of the new tools which have been made available in the latest version changes to Node RED, and where to find the latest files.
Between releases 3.14 to 3.20 quite a lot has changed on the Node-RED nodes, but not all of the changes are immediately obvious when you check your Node-RED flows. In this blog post I’ll walk you through the changes that will help you to create more efficient and easy-to-use flows.
If you are not already familiar with Node-RED, you can read all about it here.
Nodes showing the last seen value
Previously, the input nodes reported “Ok” or “(Dis)Connected” as a status. With the update to 3.20 this behaviour has changed – it now reports the last value seen by the node. This is how the input node used to appear:
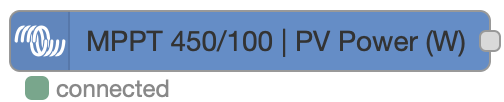
It now appears like this, for example:

Having your flow open and being able to view the PV power value change makes developing the rest of the flow a lot easier. If you expect to see values in kilowatts but you see the values in watts, you’ll need to divide by 1000 to obtain the expected values.
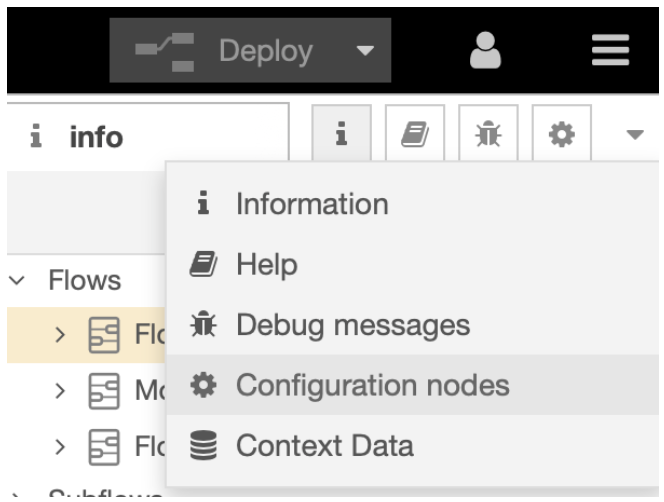
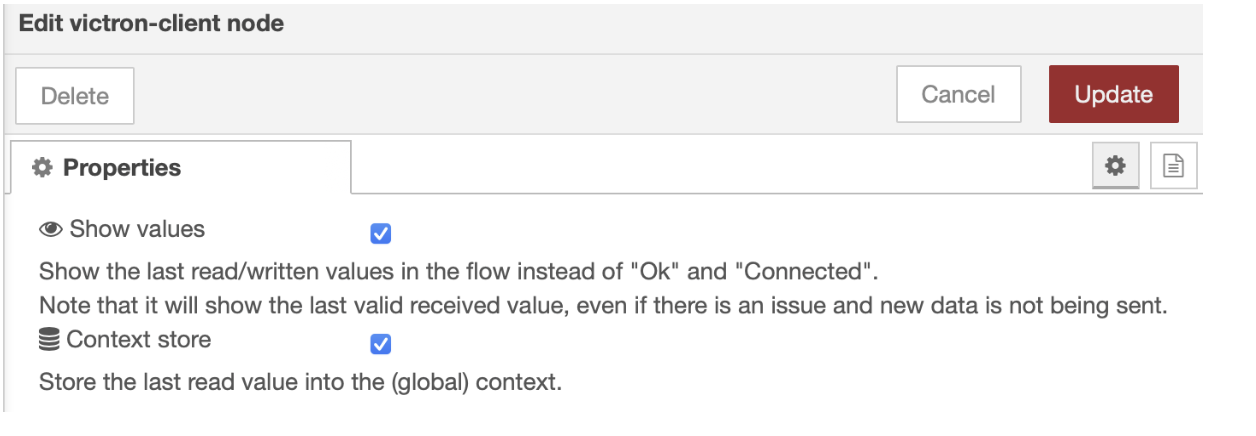
If you don’t like this new behavior, you can disable it via the Configuration nodes, and then select the Victron Energy Client. Previously this configuration node offered no ‘options’ – now there are two checkboxes. The first one allows you to disable the ‘value’ readings and revert simply to showing “connected”. You probably want to leave the option checked.
Storing the last value in the global context
Whilst in the Victron Client configuration, you may also notice the new “Context store” option. Enabling this will result in the node storing the last seen value into the global context. This is a way to store information that can be shared between different nodes without using the messages that pass through a flow.
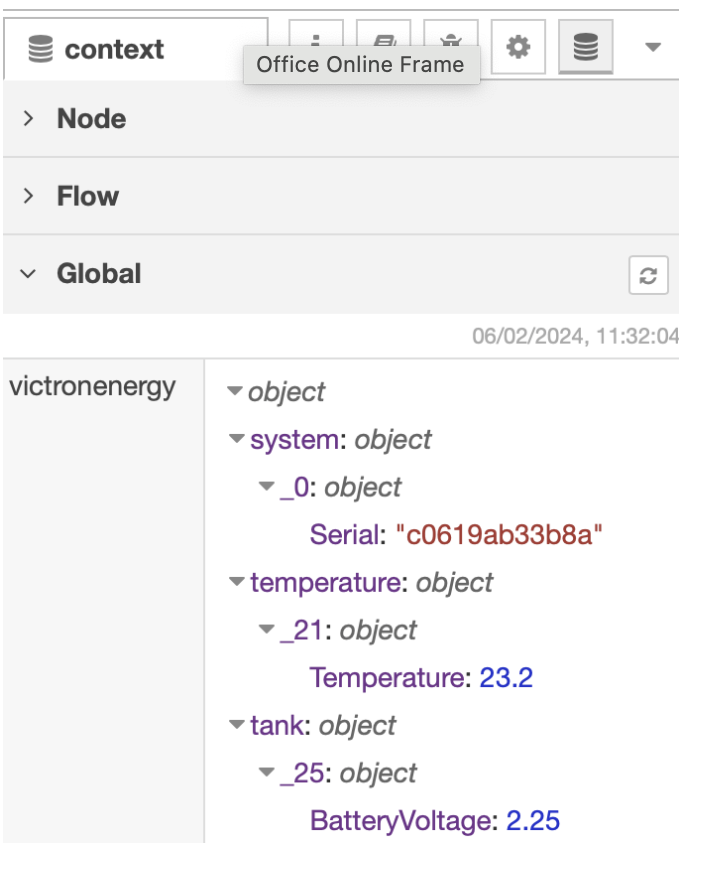
The values are stored under ‘victronenergy’ in an object containing all of the seen values. With this, you can fetch the latest value from the context by using a change node (or directly from a function node). Perhaps not everyone will want to use this, but it can simplify your flows.
The above picture shows that my current flows have 3 input nodes:
- A system node, showing the VRM portal ID of the GX device
- A temperature sensor, showing the current temperature. The temperature meter has device instance 21.
- And thirdly, a tank sensor with device instance 25, shows the battery voltage.
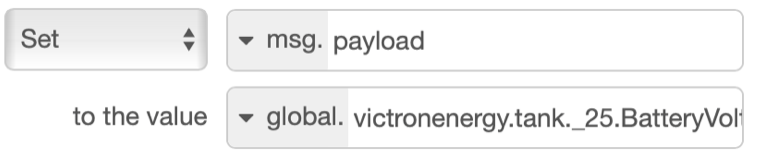
With this data, I can use a change node to set the msg.payload to the latest battery voltage of the tank. The change node needs to be configured to retrieve “victronenergy.tank._25.BatteryVoltage” from the global context in order to get that information. The device instance is used to differentiate between multiple devices. These id’s will vary depending on your installation. In the drop-down menu of the custom input and custom output nodes you may also notice these identification numbers.
The edit panel of the change node then looks simliar to this:
Using the custom input and output nodes

The two custom nodes have also been recently added and I would like to explain their use, as they are quite versatile. These two nodes use the complete underlying communication bus, where all of the other nodes also read from, and write to. The normal Victron nodes only show a filtered result.
This means that you might be able to find values in the custom nodes which haven’t been made available in the task-specific node. Usually some product-specific values can be retrieved from here; e.g. the Refresh time from a Victron grid meter. Also, things like a (numerical representation) of the firmware version.
One thing to be aware of is that you do need to be careful when writing values with the custom output node. There might be system processes also writing to the same entries, causing the system to get confused.
Node-RED Dashboard 2.0
Node RED is migrating from dashboard version 1.0 to version 2.0. Read the full statement on why they are pushing this successor here.
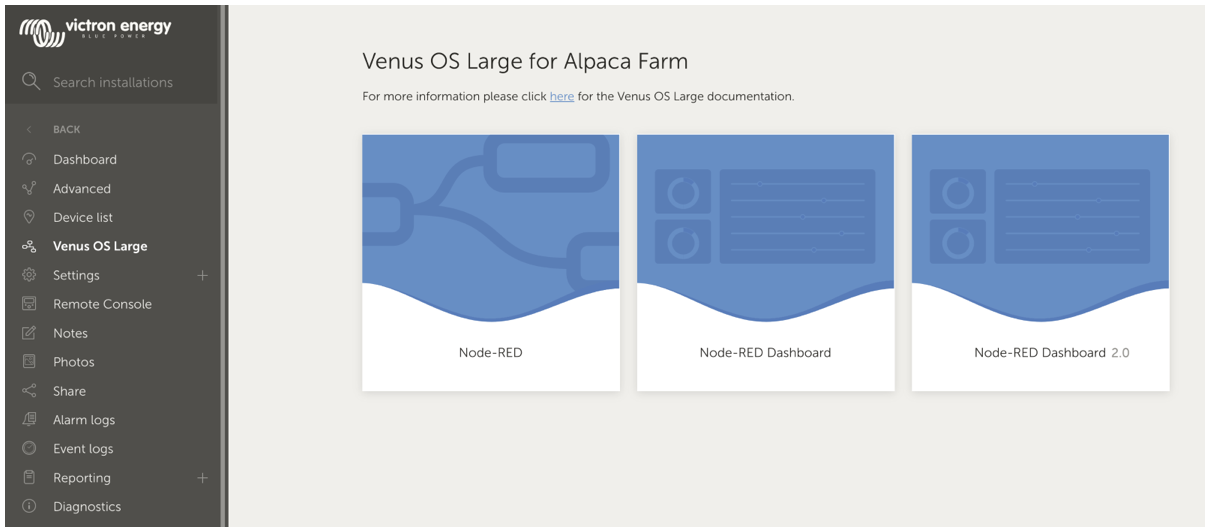
In order to get started with dashboard 2.0, you will need to add [@flowfuse/node-red-dashboard] to your palette. After you’ve installed the module, a new tile will appear on the Venus OS Large menu on VRM, thus allowing you to access the new dashboard easily via VRM.
More Victron nodes
Although not being shipped by default, there are some extra installable nodes, which can be helpful for Victron systems. These can be installed via the install tab on the Manage palette menu item. Everyone can create new nodes and publish them. Finding new nodes can be done by searching for “victron” in the search tab on https://flows.nodered.org/search?term=victron
I’ll cover two of them below, but there are several more to discover. Also, when you look for inspiration or more examples, check out the examples here.
Victron VRM API

This node allows you to directly query the VRM API for information on your site. You will need to create an access token first to get started, but once you’ve done that, you can perform several queries. E.g. get the solar forecast for your site.
More information on the VRM API can be found here.
Node to install: [victron-vrm-api]
Victron Modbus
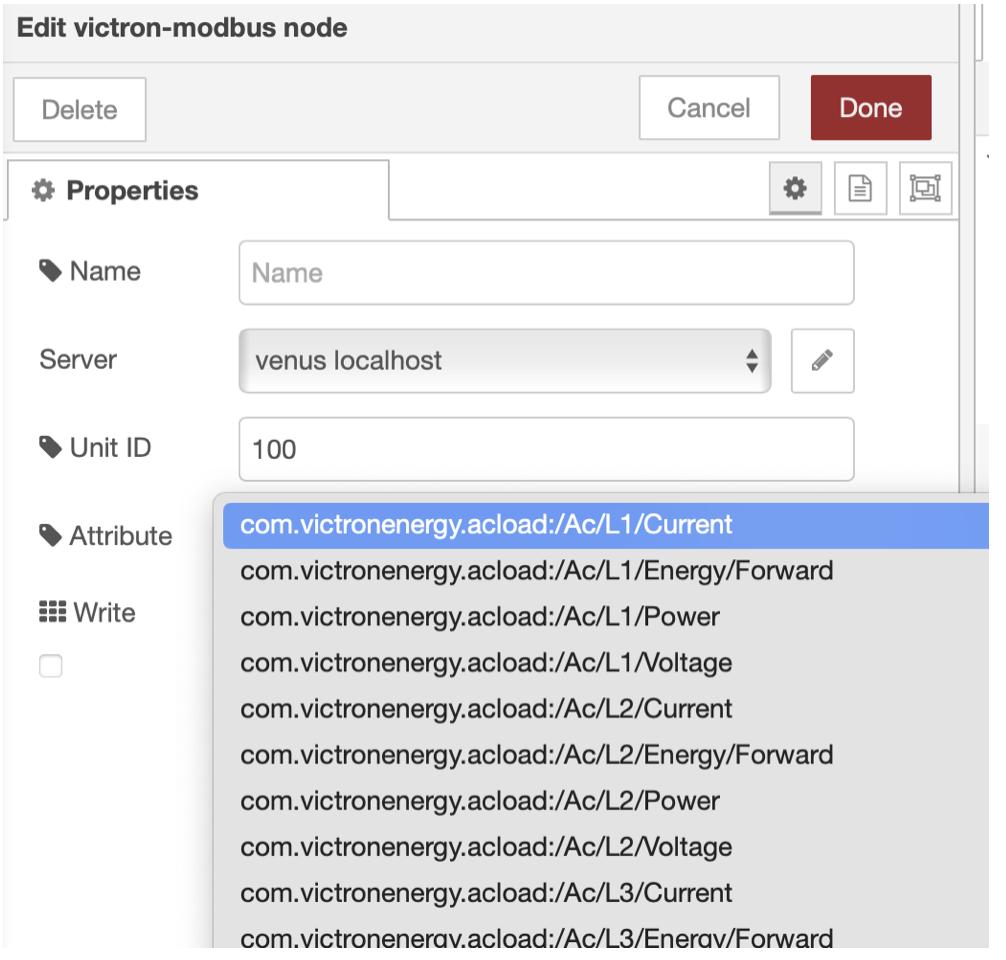
Instead of using the default Victron nodes, some people prefer to get values via the modbus instead. This node makes it easier to access the correct values. As this node uses the configuration of node-red-contrib-modbus to make the connection, you will need to install that node first, before getting this to work.
Once installed, you can just select the value you want to retrieve or write to from the dropdown. You will also need to input the Unit ID to make this work, but that can be easily found in the Remote Console under Settings -> Services -> Modbus TCP -> Available services.
Nodes to install:


