 Add this page to your book
  Remove this page from your book
  Manage book (
 Help
Help Table of Contents
Venus OS Large image: Signal K and Node-RED
1. Introduction
This manual documents Venus OS Large. Venus OS is the the software running on our Cerbo GX monitoring device as well as other GX devices. Venus OS Large is an extended version of the common software, adding Node-RED and Signal K server.
Node-RED offers PLC like programming for connecting hardware devices, APIs and online services. It provides a browser-based editor that makes it easy to wire together flows. With it, one can for example program a functionality such as activating a relay based on a temperature measurement combined with time. Or make far more complex algorithms, tying relays, measurements, or other data available from Venus OS or elsewhere together. All without having to write real source code. Node-RED is also called Low-code programming for event-driven applications.
Also Node-RED features a fully customisable dashboard, viewable in a web browser - both locally but also remotely, via the VRM Servers.
To get a good idea of its possibilities, see the example flows.
Signal K server Signal K Server is a server application that runs on a central hub in a boat; in this case a Victron GX device. A few of its most used features are:
- WiFi navigation and AIS data server to charting apps such as iSailor, Navionics, iNavX, Aqua Map.
- The perfect Anchor alarm, for features and details see Signal K docs -> Anchor alarm.
- Automatic log book
- Serve full featured marine instrumentation package such as the iOS WilhelmSK App or KIP.
The the official Signal K documentation provides more information about Signal K itself. Note that many of the information about how to install Signal K does not apply: it comes pre-installed on the Victron GX devices when installing Venus OS Large.
For more information on Signal K on Venus OS, see below chapter.
2. Where to find support
Node-RED and SignalK are a stable and reliable features in Venus OS Large for GX devices. There are tens of thousands of systems running Node-RED or SignalK in the field. However, Victron does not provide support for systems which make use of these extended features to implement advanced solutions.
Node-RED support The Victron Community is a good place to ask questions and get answers:
On Community, first search if someone else had a similar question already. And if you can’t find such, then create a new question. Make sure to tag it with Node-RED.
Signal K community For support on Signal K, the largest crowd of helpful people can be found in the Signal K Discord & Signal K GitHub discussions forum. Both are best found here: https://signalk.org/community/
3. Requirements
3.1 GX Device compatibility
The compatible GX devices are:
- Ekrano GX (fastest processor)
- Cerbo GX (second-fastest processor)
- Cerbo-S GX
- Venus GX (slowest processor)
- Octo GX
- MultiPlus-II GX (fastest processor)
- EasySolar-II GX (fastest processor)
The Color Control GX (CCGX) and the CanVU GX are not able to run Venus OS Large.
Venus OS large is also available for certain RaspberryPi models. Installation files below, and installation & other RaspberryPi specific instructions here.
3.2 CPU & memory resources
Both Signal K as well as Node-RED are resource intensive software applications relative to the CPU and memory of most GX devices.
The level of intensity largely depends on the system's specific configuration - whether it's the type of flows in Node-RED or the volume and processing requirements of messages in Signal K.
WARNING: Venus GX The Venus GX is the slowest GX-device still supported by Victron. Running both Signal K and Node-RED at the same time will very likely overload the device and may result it in becoming unstable.
If a GX-device runs out of memory or the load on the CPU becomes too high, the device will eventually reboot which may render a system unstable.
More details about CPU & RAM differences is available here.
3. How to install and update
Step 1. Preparations
- Cerbo GX - No preparations required.
- Venus GX - First install & boot v2.73,or a later version. And only thereafter install Venus OS Large. The reason for this is to make sure the partitioning of the flash is per requirements of Venus OS Large.
- MultiPlus-II GX - No preparations required.
- EasySolar-II GX - No preparations required.
- RaspberryPi 3 - No preparations required.
- RaspberryPi 4 - No preparations required.
Note, when installing on a RaspberryPi, do make sure to familiarise with the Venus OS for raspberrypi documentation as well.
Step 2. Update to the latest firmware version
See Settings → General → Firmware → Online updates (previously, Settings → Firmware → Online updates). For more information, refer to the user the manual of your GX device.
Step 3. Set the image type Venus OS Large
In the Online updates menu:

Set the Image type to 'Large', navigate one level back in the menu and check for a new version and install that.
The firmware will take some time to download depending on the speed of your Internet connection, after which the GX-device will reboot for the installation which typically takes about 2 minutes.
Step 4. Verify and enable
- Verify that the image was successfully installed: go to the Settings menu, and check that under the integrations for availability.
- Enable either Signal K or Node-RED. Installer access level is required to enable/disable these settings.
Visible once successfully installed, the integration settings:

How to update
Both online and offline update methods can be used. The Image type setting, see the How to install chapter, defines what image type is being updated. See the manual of your GX-device for more details.
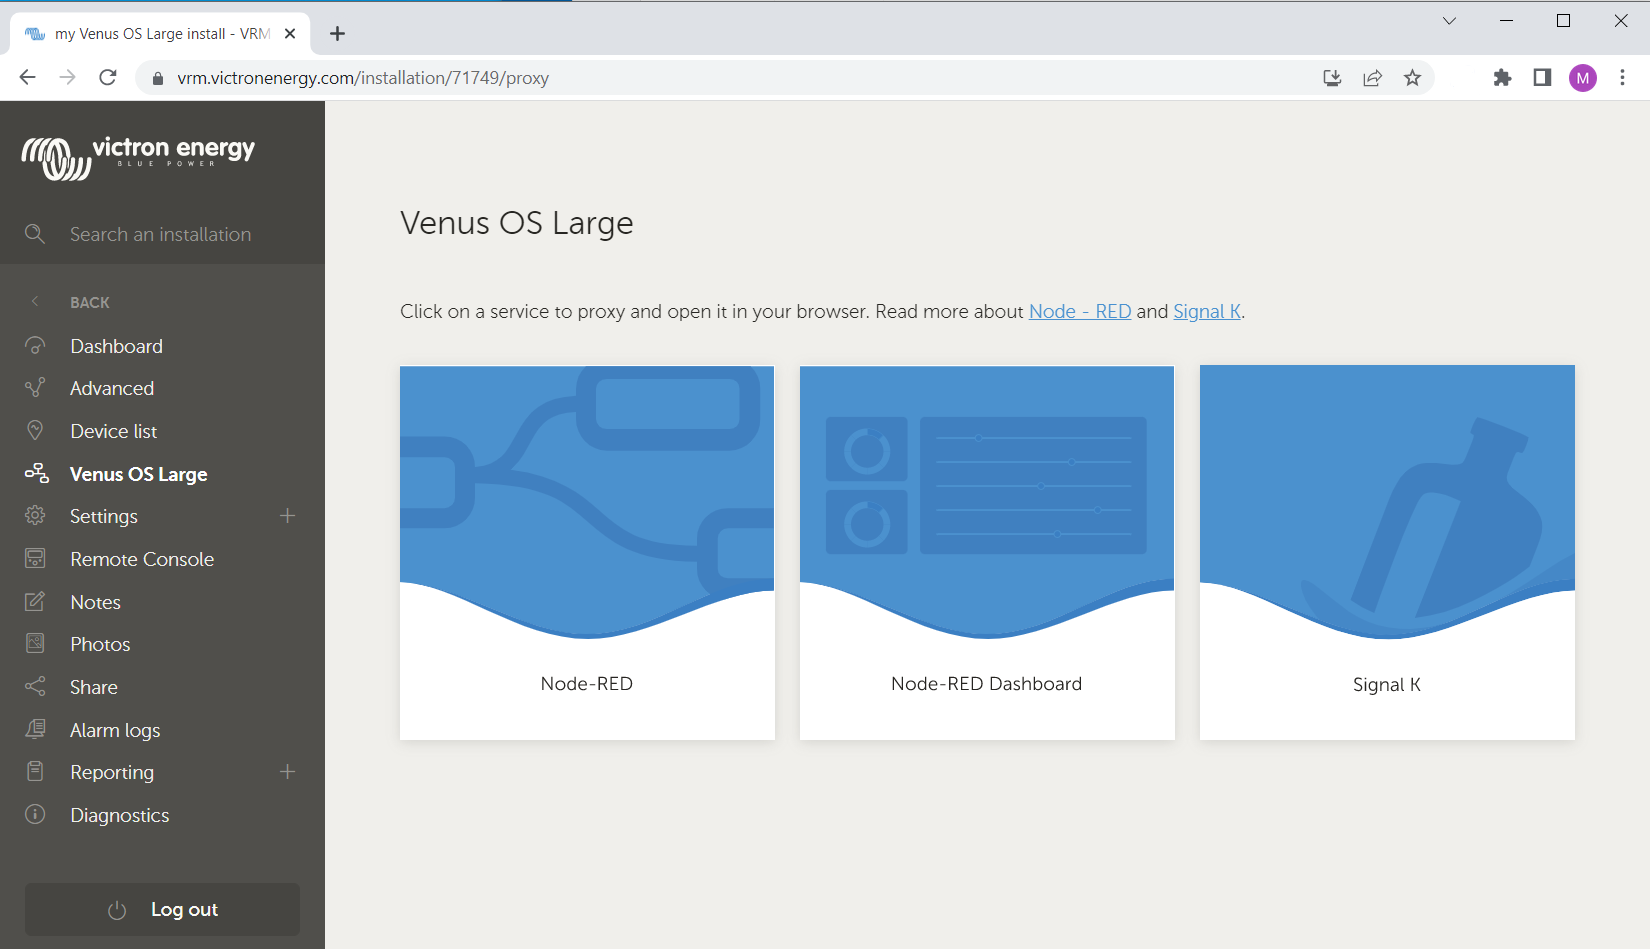
4. Accessing Node-RED and Signal K
After installing and enabling Node-RED or Signal K, they need to be configured through a website in your browser.
To access the Node-RED flow editor, type https://venus.local:1881. Note that it might be necessary to replace venus.local with an IP address on your LAN, for example: https://192.168.178.224:1881. The web browser will show a security warning (from using HTTPS on a local IP address), which must be accepted.
Node-RED flow editor

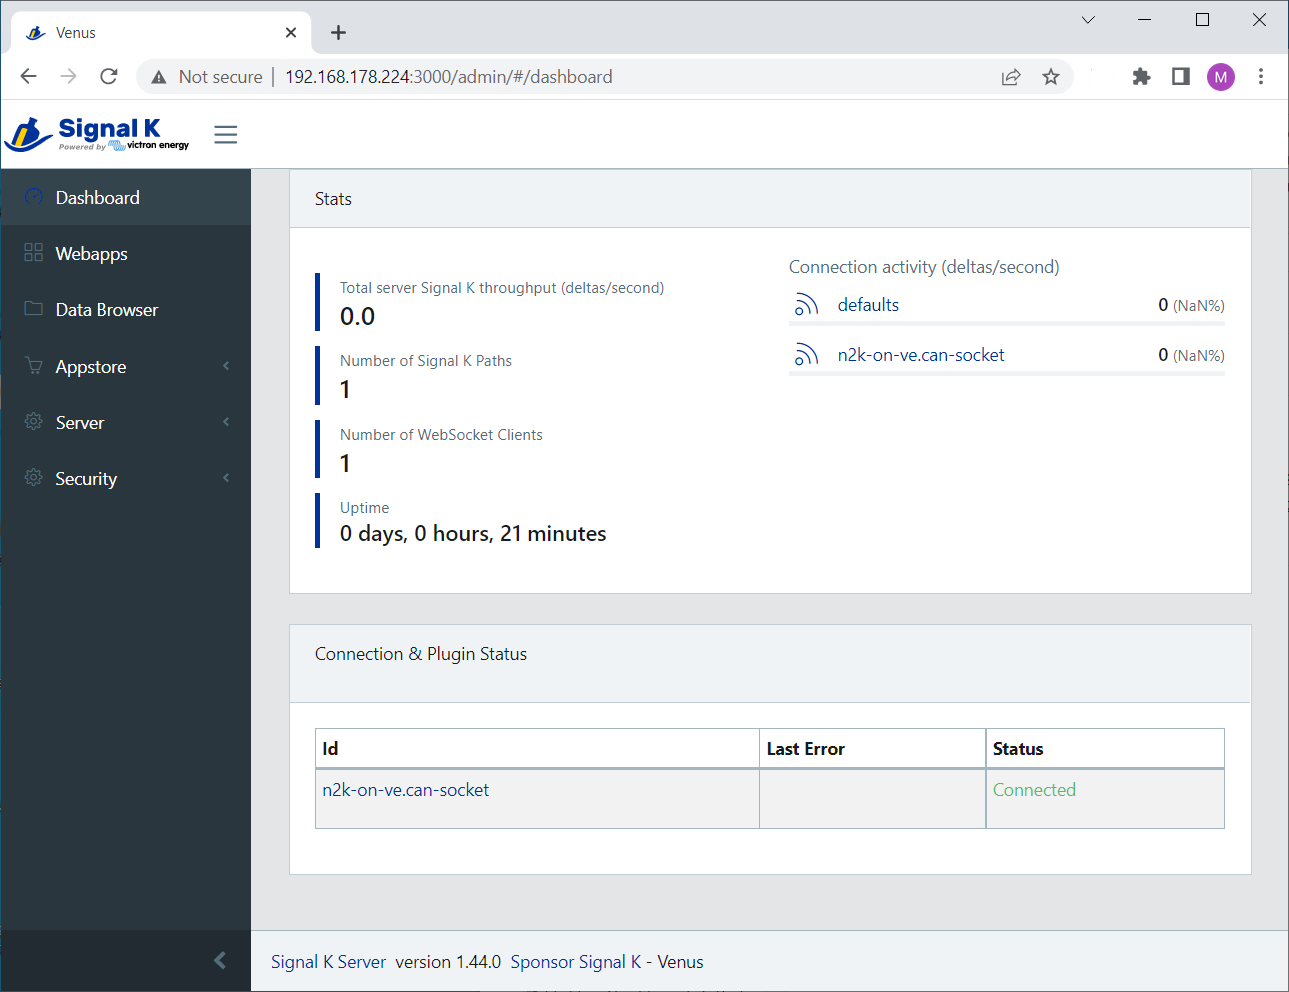
To access the Signal K admin panel, type http://venus.local:3000. Just like Node-RED above, note that it might be necessary to replace venus.local in that URL by an IP address. For example: http://192.168.178.224:3000/
Signal K admin panel
See the Remote Console on LAN chapter on our GX manual for how to find the IP address on the GX-device.
5. Node-RED

5.1 Introduction
Node-RED is a tool for connecting hardware devices, APIs and online services in new and interesting ways. It provides a browser-based editor that makes it easy to wire together flows. With it, one can for example program a functionality such as activating a relay based on a temperature measurement. Or make far more complex algorithms, tying relays, measurements, or other data available from Venus OS or elsewhere together. All without having to write real source code, as Node-RED calls Low-code programming for event-driven applications.
Also Node-RED features a fully customisable dashboard, viewable in a web browser - both locally but also remotely, via the VRM Servers.
A good tutorial on how to work with Node-RED is here: https://nodered.org/docs/tutorials/first-flow. On https://github.com/victronenergy/node-red-contrib-victron/wiki/Example-Flows you can find example flows that use the Victron Energy nodes. Searching for Victron on https://flows.nodered.org/ will give all community flows that have been tagged “victron”.
5.2 Three part introductory webinar
This is a 3 part introductory webinar on Node-RED and Venus available at the Victron Tech YouTube channel:
2. Basic building blocks and the dashboard
3. Complex flows and dashboard example
The Node-RED editor can be accessed from your LAN at https://venus.local:1881/. For some systems, you'll have to replace venus.local by the ip-address. You can also access the Node-RED editor from VRM, where it is available via the Venus OS Large menu.
5.3 Node specifications
Node-RED comes with a core set of useful nodes, and within the Venus OS large install there is a set of Victron nodes added to that: the Victron Pallet. All of the different nodes are described here.
For developers: source code for the node-red-contrib-victron modules is here, and note that updating is not possible from either the Node-RED editor as the commandline. The recommended way to get to the new node-red-contrib-victron version is to await a new Venus OS large build.
5.4 Examples
Our most up to date library of examples can be accessed from within Node-RED. See the main menu (accessible from the top right), and then click Import. Or ctrl-i.
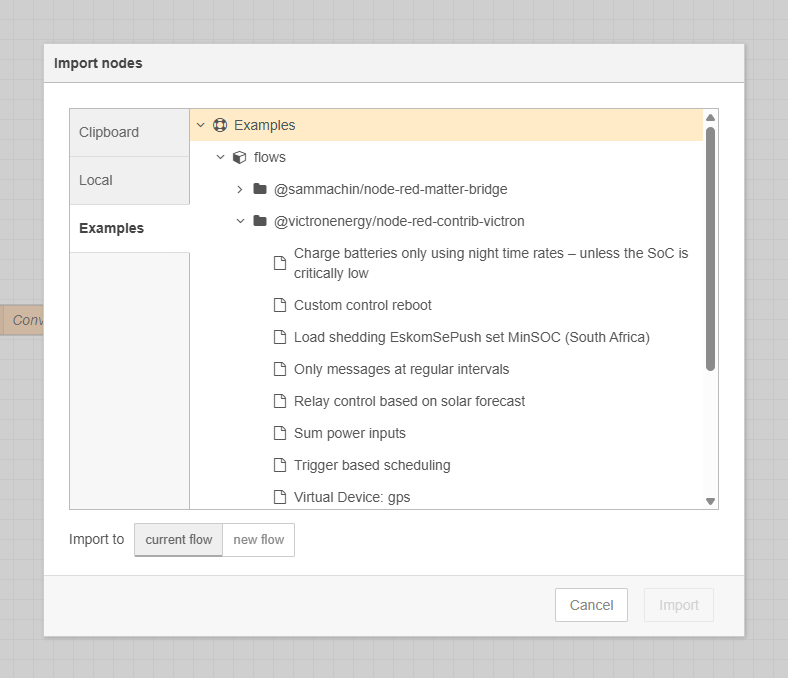
To see the examples when you don't have access to a Node-RED installation and flow-editor, see their copy here: https://github.com/victronenergy/node-red-contrib-victron/wiki/Example-Flows.
5.5 Back-up and restore
Just as with other software it is important to keep your Node-RED flows save and secure. We advise you to periodically backup your flows using the palette manager “Export → all flows” option to download the flows.json file to your PC.
On a fresh installation you can then use the “Import” option to import this file. Note that importing flows that rely on unavailable nodes will complain about that. See below in how to install extra nodes.
It is always wise to create an extra backup before performing an update of the firmware.
Do note that the above instruction only makes a backup of your flows, not of the Node-RED configuration. The configuration is stored in .config.*.json files under /data/home/nodered/.node-red/.
5.6 Installing extra nodes
Node-RED comes with a core set of useful nodes, but there are many more available from both the Node-RED project as well as the wider community.
For example nodes that give access to weather data, or with timer functionality, and so forth. You can find several example flows on https://github.com/victronenergy/node-red-contrib-victron/wiki/Example-Flows
You can search for available nodes in the Node-RED library.
The Victron Palette comes pre-installed.
Read the Adding nodes to the Palette - guide by Node-RED to learn how to install and manage node palettes.
To install new nodes/palettes requires a working internet access.
Palettes will be installed on the data partition on the GX Device. Which means that they will remain installed when updating Venus OS to a new version.
Refer to the remove button in the palette manager to remove self-installed palettes.
When installing a newer version of a palette than what is pre-installed in Venus OS, Node-RED will use that newer version.
Make sure that there is always 30MB of free space remaining on the data partition. One of the example flows shows how to check the free space using a Node-RED dashboard .
5.7 Controlling relays
For a relay to be controllable via Node-RED, it needs to be switched to manual control first. In most cases this needs to be done by using VictronConnect.

GX Device relays
To be able to control the relay(s) on the GX Device, configure them to be Manually controlled:

Battery Monitor Relay
The relay in a BMV can be controlled. Make sure to set, using VictronConnect, its option in the BMV configuration to REM, which is short for Remote Controlled.
The relay in a Lynx Shunt VE.Can can be controlled. Make sure to set the relay function to “Manual control” in the user interface of the GX.
The Relay in the Lynx Smart BMS is not available for control via Node-RED.
SolarCharger MPPT Relay
In order to switch the relay via Node-RED, first use VictronConnect to switch the operation mode to manual control.
Note that only the larger model solar chargers feature a relay.
(VE.Bus connected-) Multi, Quattro and similar product relays
Its not possible to control the alarm relay nor the AC-out 2 contactor of our inverter/chargers. Also, there are no plans to make them controllable remotely, which includes no plans to make them controllable from within Node-RED either.
RS series (inverter, multi) relays
First set the relay to manual control using VictronConnect. Once that has been done, the relay can be controlled using Node-RED.
Charger relays
The only charger which has a relay that is controllable is the Smart IP43 Charger. To use that for remote control, set its mode, using the VictronConnect app, to be remote controllable. Note that its use is limited: the relay is only powered (and thus only controllable) when the charger is switched on. It doesn't work when it's turned off with AC connected. This limitation applies to the 230V models as well as the later 120V/240V models.
5.8 Virtual devices
Virtual devices make it possible to connect equipment and data sources that are not natively supported by Victron to a GX device. Once created in Node-RED, these devices appear on the GX-device and behave like real Victron-supported hardware, becoming part of the larger Victron-based solution.
Purpose and Examples
Virtual devices are ideal for integrating third-party or DIY equipment:
- Virtual switch – an IoT switch running Tasmota can be exposed in the GX New UI switch pane, and controlled in automation flows based on conditions such as battery state of charge.
- Virtual meteo – weather data from an unsupported or custom weather system with an API can be injected into a virtual meteo device. The data (e.g. wind speed, temperature, humidity) then becomes visible to the GX and in VRM.
- Virtual grid meter – calculated grid import/export values can be published to the GX device, allowing systems without a supported grid meter to present grid data.
- Virtual GPS – GPSd or another data sources can be used to provide live positional data.
- Virtual tank/temperature sensor – integrate LoRa, MQTT, or custom sensors.
Supported Virtual Devices
Currently supported device types include:
- Battery
- Generator
- GPS
- Grid meter
- Meteo (eg. weather station data)
- Motor drive (eg. electric boats)
- PV inverter
- Tank sensor
- Temperature sensor
As separate Virtual Switch node is provided for the virtual switch feature.
Virtual Switches
Virtual Switches are a special class of virtual devices:
- They appear in the Switch pane of the New UI in Venus OS.
- They can be controlled like a real digital switch — toggled on/off, queried from the GX, and automated via Node-RED flows.
- Their state is stored on the GX device and can survive reboots.
- They are useful for integrating third-party automation logic, external hardware, or remote control scenarios without requiring a physical relay.
Setup
- Update to the latest version of Venus OS.
- Add the relevant Virtual Device node in the Node-RED flow.
- Configure the device type.
- Connect it to a data source or control logic.
5.9 Node-RED Dashboard
Besides the flow and automation functionality, Node-RED also supports fully customisable dashboards, including graphs, gauges, indicators and controls such as switches and sliders.
The dashboard is viewable in a web browser - both locally and remotely via VRM. See chapter 7 for remote access.
Recommended: FlowFuse Dashboard 2.0
Install @flowfuse/node-red-dashboard via the Manage Palette menu (right side of the editor). This is the current, actively maintained dashboard package. The older node-red-dashboard package is deprecated and should no longer be used.
Once installed, the dashboard nodes appear in the palette on the left. After configuring and deploying a dashboard, an extra tile appears in the Venus OS Large menu on VRM to access it remotely.
Example dashboard:

Alternative: uibuilder
For users comfortable with HTML, CSS and JavaScript, node-red-contrib-uibuilder is a powerful alternative that gives full control over the frontend. It does not provide ready-made widgets - you build the UI yourself using any web framework you prefer. This makes it more flexible but significantly more complex than Dashboard 2.0.
5.10 Configuration files
WARNING: the vast majority of systems using Node-RED will not, and should not (!), have to modify any of the files here described. Venus OS itself, including Venus OS large and Node-RED, is made such that its not necessary to dive into the command line.
The information here provided is for the benefit of the (few) users that do need or want to change them.
On startup of Node-RED on Venus reads three settings files.
/usr/lib/node_modules/node-red/venus-settings.jsis read first. Never change this file as it will be overwritten by a Venus OS update./data/home/nodered/.node-red/settings-venus.jsis used to override and/or extend the first file and will survive Venus OS updates. Do not edit this file as this is for Victron to use./data/home/nodered/.node-red/settings-user.jsis used to override and/or extend the second file and will survive Venus OS updates. You are allowed to edit this file if you please, but don't be too surprised if that causes Node-RED to break after an upgrade.
When using these files, make sure that the configuration is enclosed within a module.exports = {} block.
There are more configuration files in /data/home/nodered/.node-red/. You might not have all of them on your system or even some more if you installed one or more of our candidate releases.
flows.json- This is the flowFile, which is used to store your flows. You can also export this file from the Node-RED menu.flows_cred.json- If your flows contain credentials/login information, these get stored in this file..config.*- These files are for Node-RED to store its settings.
For more information on such Node-RED configuration customisations, see https://nodered.org/docs/user-guide/runtime/configuration.
5.11 Ready-to-use solutions
Node-RED can also be used for doing more advanced tasks. Some examples of ready-to-use solutions are:
- Dynamic ESS - fetch the ideal ESS setpoint from VRM based on dynamic energy prices and predicted solar forecast
- EskomSePush - use Node-RED for charging the batteries before the next load shedding happens (for South African users)
5.12 Using data from VRM
For some flows it can be useful to retrieve data from the VRM Portal Database. For example to retrieve de Solar irradiation or yield forecasts.
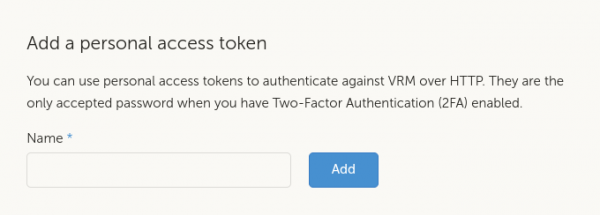
To access data from the VRM API, a VRM access token is needed. This is done by going to the access token part of VRM and add a new token. Once generated, store the access token in your password vault as you won't be able to retrieve it again.
Thereafter, that token can be used to retrieve data from the VRM Portal API.
Full portal API documentation is here: https://vrm-api-docs.victronenergy.com/#/.
To, for example, retrieve Solar Irradiation forecasts, see the stats call, and then one of these attributes:
  1221	vrm_pv_inverter_yield_fc	7	PV Inverter - Yield Forecast
  1220	vrm_pv_charger_yield_fc	4	Solar Charger - Yield Forecast
  1173	vrm_solar_irradiance_fc	0	Solar Irradiance Forecast
  1172	vrm_solar_irradiance	0	Solar Irradiance
Note that there could be more relevant attributes, see VRM documentation for that.

The Victron VRM API node makes it easy to use the VRM API from a Node-RED flow. Alternatively take a look at above mentioned Dynamic-ESS flow.
5.13 Node-RED files, folders & settings
On GX devices, the nodered system user has its home in /data/home/nodered/. The actual Node-RED runtime (flows, nodes, configuration, and settings-user.js) lives in /data/home/nodered/.node-red/.
All files or folders below are in /data/home/nodered/.node-red/:
| File / Folder | Purpose | Notes / Caution |
settings-user.js | Main Node-RED config. See here. | Controls ports, security, editor options, and contextStorage. Syntax errors here will break startup. |
flows.json | Flow definitions | Do not hand-edit unless necessary. Corruption risk. |
flows_cred.json | Encrypted flow credentials | Same as above. Hand-editing may break decryption. |
context | Stores persistent variables | Only used if explicitly enabled in settings.js. Don't store large or binary data. |
lib | Optional library for subflows/functions | Safe for advanced users. Persistent and editable. |
Note: If created, /data/home/nodered/settings.js will be ignored by Node-RED on GX devices. Only /data/home/nodered/.node-red/settings-user.js will be processed.
To serve media files (like images) from Node-RED on a GX device, create and edit the file /data/home/nodered/.node-red/settings-user.js and add:
module.exports = {
  httpStatic: "/data/home/nodered/www"
}
Then create a subfolder such as /data/home/nodered/www, make sure it is owned by the nodered user (chown -R nodered:nodered), and place your media files there, for example image.png. The image can be referenced in dashboards using relative URLs like:
background-image: url(/image.png);
Restart Node-RED to apply the changes:
Stop
svc -d /service/node-red-venus
Start
svc -u /service/node-red-venus
Restart
svc -t /service/node-red-venus
NOTE: All files are stored on /data, which has limited space. Do not store large media files, logs, or large images in /data. Consider hosting such data externally and reference via URL or another Node-RED supported external storage mechanism (database, cloud storage, MQTT, FTP, etc).
5.14 Node-RED FAQ
Q1: Write/read file gives "Error: EACCESS: permission denied'
Since Venus OS 2.90 and on wards, Node-RED no longer runs as user root, but as user nodered. This means that the Node-RED flows are only allowed to access files and directories that are owned by the nodered user. These files typically start below /data/home/nodered/. So modifying the storage location to something like /data/home/nodered/storage.txt ought to work.
Q2: How can I update the Victron node pallette
As that pallette is part of the total Venus OS large package, it can only be updated by installing a newer Venus OS large version.
In case you see that there is a newer version Victron pallette available online, and thats not yet shipping in a Venus OS Large version, then the only option is to wait: a new Venus OS Large version is usually made available shortly after updating that pallette.
Q3: How can I password protect Node-RED / My Node-RED is password protected
Venus OS v3.50 and later
For systems that have a security profile set (under Settings → General → Security Profile), the password protection is linked to the chosen security profile. The password that has been set for either security profile “weak” or “secured” is also used to access Node-RED, in combination with username admin.
Venus OS versions prior to v3.50
The Node-RED's password protection is tied to the remote console. If a password is set for the remote console, this password is also used for securing Node-Red. The username is admin, the password is the remote console password.
Q4: How do I restart Node-RED from the Venus GUI?
In order to restart Node-RED you need to disable and enable it from the menu. You can find this under Venus OS Large Features → Node-RED.
Q5: How does safe mode work and what is it?
From the Venus GUI you can select Node-RED to be enabled in “safe mode”. This means that Node-RED will start without starting the flows. This allows you to open the flows in the editor and make changes without the flows running. When you deploy your changes, the flows are then started. The safe mode can be handy if one of the flows has an error that causes high CPU loads on the Venus device or other issues.
Q6: Can I install the @signalk/node-red-embedded?
No, at least not into the node-red instance which comes as part of Venus OS Large. To @signalk/node-red-embedded, we recommend to use the node-red plugin/instance that can optionally be installed into signalk:
- enable Node-RED in the SignalK server, using its dashboard.
- disable the Venus OS Node-RED, in GX Device → Settings → Venus OS Large → Node-RED
- install the Victron pallette into the Node-RED thats part of SignalK server
Q7: I get the error: Failed to remove, unrecognised module
This is seen when trying to remove a module that has been previously uninstalled, but left some files behind. After which Node-RED is incapable of completely removing the module. This is probably a remnant of upgrading an old version of Node-RED to a newer. What we've seen is that the module is still on the disk, but Node-RED no longer is aware of it in its configuration. The way to recover from this is to add the module to the Node-RED configuration again. This can be done by performing the following steps:
- Determine the name and version of the complaining package. This information can be found in the pallete manager.
- Stop Node-RED (can be done via the remote console)
- Create a backup of your
package.jsonfile in/data/home/nodered/.nodered/. - Edit the
/data/home/nodered/.node-red/package.jsonfile - Add the complaining module and version to the
dependenciespart of thepackage.jsonfile. Make sure that the file remains valid JSON. Comma's and quotes are easily overlooked. - Start Node-RED
After following these steps Node-RED should know about the module again and you should be able to remove or upgrade it.
Q8: The browser complains about non private connection
Node-RED on Venus now uses SSL for its connection. As the certificate is signed by a “self signed certificate”, your browser is unable to trust the connection and throw a warning (“Your connection is not private” or something similar). In order to proceed, you need to press the “Advanced” or “Show Details” button and then click to visit the website. Some browsers will still display 'Not secure' and claim that the Certificate is invalid, but that is inherent to self-signed certificates. The benefit is that usernames and passwords no longer travel in clear text over the network.
Another implication might be that you need to prepend the connection with https instead of http and change the port from 1880 to 1881. So you should connect to https://venus.local:1881/ for Node-RED. If your browser still wants to connect to the old http way, you may get an ERR_EMPTY_RESPONSE. Adjust the url in your browser to connect to the https site instead.
Finally, if you want to use the Node-RED command line interface for administration, you will run into the Error: self signed certificate error. This can be solved by setting the NODE_EXTRA_CA_CERTS environment variable to /data/etc/ssl/venus.local.crt like so:
export NODE_EXTRA_CA_CERTS=/data/etc/ssl/venus.local.crt
Q9: How often do the Victron input nodes send a msg?
The input nodes send out a message on each value change. If the ‘only changes’ checkbox is set, this will be the only output of the node. If the 'only changes' checkbox is not set, the node also sends out the current value each 5 seconds. If you want more fine grained control, consider storing the desired values in a context in combination with triggered intervals. See here for an example on how to do that.
Q10: How can I get Node-RED to also listen to http port 1880
There are some nodes that are only able to connect to a http site. In that case you probably also want to enable http on port 1880. This can be achieved by creating (or adding to) a user configuration file /data/home/nodered/.node-red/settings-user.js, containing:
module.exports = {
   /* Make sure that we also listen on port 1880 on all interfaces */
   uiHost: "::"
}
And restart Node-RED.
Q11: Is there a way to have the context survive reboots?
By default the context is stored in RAM memory of the GX device only. When the GX device reboots or loses lower, the context information is lost.
In order to keep the context data, it is needed to store the context to disk. This can be achieved by creating (or adding to) a user configuration file /data/home/nodered/.node-red/settings-user.js, containing:
module.exports = {
  contextStorage: {
    default: {
      module: "localfilesystem",
      config: {
        flushInterval: 300 // Save context data every 5 minutes
      }
    }
  }
}
With the above settings, context files will get created periodically in /data/home/nodered/.nodered/context/. In order not to wear out the flash memory too much, don't write too often.
6. Signal K
6.1 Introduction
6.1.1 Why have Signal K on your GX Device?
By adding Signal K, the GX device becomes a data hub for all marine electronics on your yacht. For example AIS, boat speed and wind data, and more. The Signal K is the interface between all those devices and protocols on one side, and mobile Apps on phones, tablets and the alikes on the other. Note that SignalK itself is not a visualisation tool, its purpose is purely to gather all the data and make it available for web- phone-, and tablet-apps for the visualisation.
Also, there are SignalK plugins to forward the data to influxdb & Grafana.
Popular Apps compatible with Signal K:
- Auqua Map
- iNavX
- iSailor
- Navionics
- Wilhelm SK - WilhelmSK is a highly customizable boat instrument display available for iPhone, iPad, Apple Watch and AppleTV.
- … (welcome to add more here)
6.1.2 Instruments compatible with Signal K
- All Victron products that can be connected to a GX device
- NMEA0183 and NMEA2000 GPS data, AIS data, Wind Temperature and other environmental data, tbd
- Engine data available on NMEA2000 and SAE 1939
- Fusion Stereo
And many more.
6.1.3 What is Signal K ?
Signalk-server is a software application that, in the context of this manual, runs on your GX Device and interface to all Victron protocols and more. It uses plugins, and there is a large community of enthusiasts around it, making it one of the most flexible and complete pieces of software that understands the plethora of protocols of all different manufacturers that make marine electronics.
For more information on Signal K, read the the Signal K Server readme.
Note that Signal K is not a Victron project. At Victron, we are great fans of sailing, open source as well as community driven projects. And Signal K is a perfect example of such project. And when running on a GX Device its a perfect marriage.
6.1.3 Considerations on how to install Signal K
The type of install described in this document, running Venus OS including SignalK, has these advantages: no need to use a rapsberrypi, all ready in one box; no special firmware updates or commandline knowledge needed to maintain or update it. Doing this was born out of a wish to make Signal K Server (also) available to the more mainstream users.
The other common type of Signal K Server install, installed on a RaspberryPi running Raspbian, has the advantages of more flexibility, and ease of installing extra components such as Grafana or Influx. The disadvantage is that you are basically setting up a Linux computer yourself, which you’ll also have to maintain yourself. Whereas the Venus OS type is more of a complete product; no need to bother about keeping individual components up to date and worrying about their compatibility.
There is no one right way for everyone to do this; the best solution will depend on the requirement.
For raspberrypi owners, note that its very easy to try both methods and switch between them: simply have two sdcards.
6.2 Documentation and support for Signal K
- Signal K Discord - a real time chat group including a special Victron channel.
Do not contact normal Victron support for any help on SignalK. Its based on community support, not official support.
6.3 First use & configuring
Follow these steps to turn your GX into a NMEA to WiFi gateway within 5 minutes.
These instructions assume that your GX device has already been set-up with Venus OS Large, and Signal K is enabled.
Step 1. Signal K Admin page
Open a web browser, and go to the Signal K admin page by navigating to http://venus.local:3000.

Step 2. Set the admin password
Go to Security → Users and create an admin user for Signal K and protect it with a secure password.

Step 3. Vessel information
Go to Settings and enter some basic information about your boat.

Step 4. NMEA2000 Can-bus connection
For NMEA2000 networks, its recommended to have all connected devices use isolated connections. Therefore, when connecting the an NMEA2000 network, we recommend using the Ekrano GX and the Cerbo MK2 GX. Connect to the port physically labelled “VE.Can 1”.
Signal K is preconfigured to have its port operational for this.
Here is how you can see the preconfigured connection in the Signal K Dashboard:

Note that, to keep that operational, that port must remain configured as a 250kbit VE.Can & NMEA2000 port in the Remote Console:

For more information on CAN-busses, see chapter 6.4.
Step 5. Optional: Configure NMEA0183 serial connections
Use this to, for example, configure a USB-connected NMEA0183 connection in SignalK. Go to Server → Connections.
Make sure to not add a connection using any of the built-in serial ports (/dev/ttyO0, /dev/ttyO2, /dev/ttyO4, /dev/ttyO5). These are the VE.Bus- and VE.Direct ports on the Venus GX, and it is not necessary to configure them in SignalK. Data from any devices there connected is already available in SignalK, via the “Victron Venus Plugin”; see Dashboard → Server → Plugin Config.
Note that once configured in SignalK, for example a USB-serial port, that port is no longer normally available in Venus OS. For example, when plugging in a USB-GPS; and then adding a connection for its corresponding tty in the SignalK, makes for that GPS to be no longer be recognised and available in Venus OS.
Step 6. Verify received data
Go to the Databrowser to see the data now available to Signal K, and to tablets and nav. apps on WiFi:

Step 7. Configure your nav app
Steps needed here will differ per app. The key required data is:
- Host/IP address: venus.local
- Protocol: TCP
- Port: 10110
Done!
Now you should have all your data such as position from the boat’s GPS, speed, wind data, as well as AIS targets in your favourite nav app. Like here in Navionics:
Where to go from here? Anchor alarms, trip recording, automatic log books and more
- Automatic log book & trip recording: https://svrenaissance.com/starlink-and-victron-a-match-made-in-heaven-for-boaters/
6.4 CAN-bus ports
Below lists documents the mapping from physical ports on the device to the interface within Venus OS. This information is needed when you want to deviate from the standard configuration.
Cerbo GX
| Enclosure label | Interface | Notes |
|---|---|---|
| VE.Can 1 | can0 | Non-isolated and default enabled in SignalK |
| BMS-Can | can1 | Non-isolated, not usable within SignalK for NMEA2000 |
Within the Victron product range, CAN-bus ports that are labelled BMS-Can are limited in their functionality due to hardware constraints. Their only use is to connect to a managed battery such as BYD and Pylontech, used in landbased ESS & Off-grid systems - not in the marine market.
Cerbo GX MK2
| Enclosure label | Interface | Notes |
|---|---|---|
| VE.Can 1 | vecan0 | Isolated and default enabled in SignalK |
| VE.Can 2 | vecan1 | Non-isolated |
Ekrano GX
| Enclosure label | Interface | Notes |
|---|---|---|
| VE.Can 1 | vecan0 | Isolated and default enabled in SignalK |
| VE.Can 2 | vecan1 | Non-isolated |
6.5 Signal K FAQ
Q1 - How to best handle & install a GPS
You want the data available in SignalK and in Venus OS, so that it gets to VRM. And preferably a quality GPS.
USB GPS Dongle
Plugging it into the GX Device will make it be recognised automatically; within Venus OS itself as well as in SignalK, using the victron venus plugin. No need to configure anything.
NMEA2000 GPS
Connect it to the GX Device on the canbus port. Consider using our VE.Can to NMEA2000 cable to go from the NMEA2000 Micro-C cables to the RJ-45 on the GX Device.
In Venus OS v2.60, support for NMEA2000 GPS-es was added.
Signal K can then get it in two ways: directly from the NMEA2000 canbus in case thats configured as a data provider in Signal K. And via the native Venus OS functionality through the Victron-signalk-plugin.
Conclusion (untested), when using a NMEA2000 GPS, it will be available to both Venus OS and Signal K.
Part of a NMEA0183 network
Tbd. Actually a NMEA0183-network is probably something that doesnt exist: you can't have NMEA0183 in a network, its point to point.
Q2 - What happens when I updated a pre-installed Plugin?
A few plugins are installed by default on Venus OS Large. These include FreeboardSK, signalk-venus-plugin and more. They are part of the (read-only) image of Venus OS.
When a newer version of such plugin is available, it is still possible to install the update - by pressing the Update button in the Signal K Admin UI → Appstore → Installed page.
The newer version of the plugin gets installed onto the data partition. And Signal K server will use that, as it prioritises the version of the plugins installed there over the one included in the image.
WARNING: above also means that once Venus OS ships with a newer version of the plugin than the version installed manually, Signal K Server will keep using that older one. To get out of such situation, remove the plugin by using the Appstore → Installed page, and then the trash icon.
Note that the same icon is also available for the pre-installed plugins. Pressing it does nothing - since they can't be removed.
Q3 - Can I update signalk-server?
Signal K Server comes preinstalled with Venus OS. And except by “hacking into it”, it cannot be partially updated:
The normal -and recommended- method to get a newer version of Signal K Server is to wait for Victron to release a newer version of Venus OS.
In case you can’t wait, and don’t mind the extra work as well as risks, here is how to update it yourself.
Be warned, this method might or might not remain working - its documented only for convenience.
Note that all changes made to the rootfs will be overwritten the next time you do a Venus OS update.
Step 1: Get yourself root access into your GX Device.
Step 2: Follow this procedure:
## Change the rootfs from read-only to read/write, as well as increase file system size
## to use the complete partition.
/opt/victronenergy/swupdate-scripts/resize2fs.sh

## Backup a file you'll need to restore later
# dev-tip: a list of especially installed files on a Victron install is here:
# https://github.com/victronenergy/meta-victronenergy/tree/master/meta-third-party/recipes-extended/signalk-server
# in that folder, open the .bb file and read the do_install function
cp /usr/lib/node_modules/signalk-server/get-mfd-announce-address.sh /data/home

## See version as well as install location for signalk-server
npm list -g

# output will be something like this:
# /usr/lib
# ├── @victronenergy/node-red-contrib-victron@1.5.2
# ├── corepack@0.17.0
# ├── node-red@3.1.0
# ├── npm@9.5.1
# └── signalk-server@1.46.3

## Stop signalk-server
svc -d /service/signalk-server

## Update to a newer version, here is how to update to last released version:
npm install -g signalk-server

# And to update to a more specific version, do something similar to this:
# npm install -g signalk-server@2.3.0-beta.2

# Output will be something like this:
# added 120 packages, removed 179 packages, and changed 586 packages in 6m
#
# 57 packages are looking for funding
#  run `npm fund` for details

## Restore that file
mv /data/home/get-mfd-announce-address.sh /usr/lib/node_modules/signalk-server

## Install the signalk-venus-plugin in same place where it normally is on Venus OS
cd /usr/lib/node_modules/signalk-server
npm install signalk-venus-plugin

## If you want, see updated version:
npm list -g

# output will be similar as above, but then with newer version

## start signalk-server again, and see log output:
svc -u /service/signalk-server && tail -F /data/log/signalk-server/current | tai64nlocal

## press CTRL-C to stop seeing the log. signalk-server will keep running in the background.
7. Remote access via VRM
The three available web interfaces, the Node-RED flow editor, Node-RED dashboard and the Signal K admin panel can also be accessed remotely, via VRM.
After enabling them, to the VRM, and there click the Venus OS Large menu. Note that this might be slow, depending on the quality of the connection.
8. Troubleshooting
8.1 Disk space issues / data partition full
Using both Signal K Server, as well as Node-RED, it is possible to completely fill up the data partition.
The GX device will issue a warning, #46 Data partition full, as soon as the free space of the data partition is below 5%.
To see the exact free space, go to Settings → General → Modifications.
Having the data partition full will lead to unexpected results. The system is not built to be resilient for that. Some examples:
- Venus OS itself no longer working correctly,
- Signal K Server refuses to start / no longer works,
- Node-RED refuses to start,
- and similar.
Depending on what the issue is, there are a few things you can do:
- Remove all Node-RED flows and installed node palettes. See next chapter on how to do that.
- Remove all Signal K Server log files. In case you're using SignalK, then we recommend to try that option first. See next chapter on how to do that (requires a USB stick or SD Card), and once done make sure to double check you're Signal K log setup; Most importantly, make sure that the
Keep only most recent data log filesoption is enabled. That feature is enabled by default, and can be found in the Signal K → Server → Settings section. - Do full GX factory reset, as per the instructions in the GX user manuals. This includes downloading a file called venus-data.tgz; see GX manual for details. Disadvantage is that you'll need to reconfigure the GX.
- A more detailed approach is logging into the SSH console, and checking for disk space:
Tips and tricks to login a diagnose disk space
Require root access: https://www.victronenergy.com/live/ccgx:root_access.
The df command shows disk space including percentage in user for all mounted storages. Note the 100% full of below data partition. That is a problem. It should show maybe 10, 20 or 30%, but never 100% in use.
root@einstein:/data/conf/signalk# df
Filesystem           1K-blocks      Used Available Use% Mounted on
/dev/root               988960    869484     48596  95% /
devtmpfs                465376         4    465372   0% /dev
tmpfs                   515040       952    514088   0% /run
tmpfs                   515040       276    514764   0% /var/volatile
/dev/mmcblk1p5         1182728   1182728         0 100% /data
tmpfs                   515040       952    514088   0% /service
overlay                 515040       276    514764   0% /var/lib
The du command, used as per below, shows space per folder in the directory tree. In this case up to 3 levels deep. And what you can see here is that almost all space is used by the files are in the /data/conf/signalk/ directory. Which for this example turned out to be log files, disabled by default.
root@Cerbo:/data/conf/signalk#  du -d 3 /data | sort -nr
1103640	/data
1099352	/data/conf
1099276	/data/conf/signalk
87048	/data/conf/signalk/node_modules
65732	/data/conf/signalk/.npm
7188	/data/conf/signalk/.cache
3920	/data/log
744	/data/log/swupdate
164	/data/var
160	/data/var/lib
116	/data/log/signalk-server
116	/data/conf/signalk/plugin-config-data
This is a view of a more healthy tree:
root@Cerbo:/data/conf/signalk#  du -d 3 /data | sort -nr
164608	/data
160312	/data/conf
160240	/data/conf/signalk
87048	/data/conf/signalk/node_modules
65732	/data/conf/signalk/.npm
7188	/data/conf/signalk/.cache
3924	/data/log
744	/data/log/swupdate
8.2 Backup / Reset to factory defaults
There are scenarios where you want to make a backup of your data or when you want to clear logging or even start all over and go back to factory defaults. In order to make this process easy, you can put one (or more) of the following files on an USB stick and reboot your device. The files will be unpacked and the scripts within will execute. Once the script is ready with its tasks, a notification of 3 beeps can be heard (on a Multiplus-II GX the notification will be shown in the display). After which the USB stick can be removed.
- venus-data-00-backup-data-partition.tgz - copies all that is on the
/datapartition onto the usb stick - venus-data-20-signalk-reset.tgz - removes all files and directories from
/data/conf/signalk/, which lets you start over again with SignalK. - venus-data-30-signalk-delete-data-logs.tgz - removes only the SignalK log files
- venus-data-20-node-red-reset.tgz - removes the files from
/data/home/nodered/, which lets you start with Node-RED from scratch.
See here for more information on how this process works.