Introduction
This guest blog is by Gordon Buchanan, yachting journalist, writer and photographer. Gordon has been working as a yachting writer for over 20 years, with countless magazine articles and two books to date.
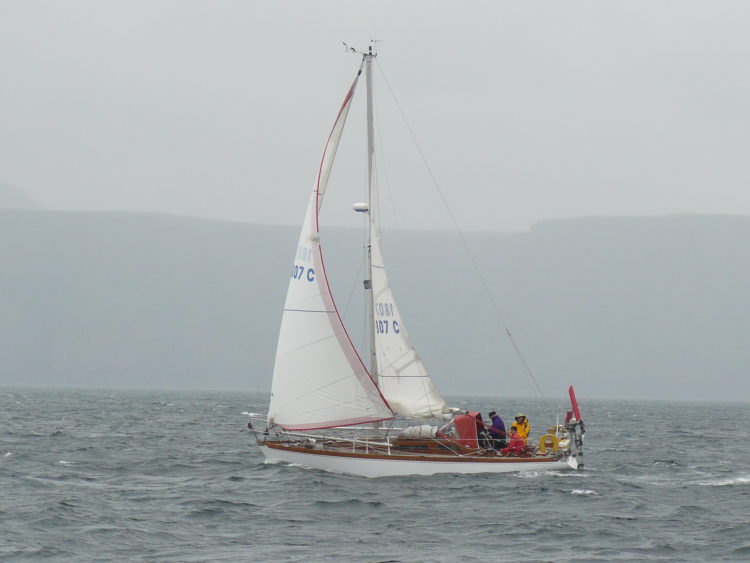
Gordon’s yacht Tantina II is pictured above rounding Cape Wrath. She was designed by J. Francis Jones as a cruiser racer under the old RORC 7TM rule and won Yachting World’s design competition in the year she was built in 1961. All wood, but substantially upgraded from her early days, she is 31 ft overall, sloop rigged and fast for her size. Gordon has sailed her from the Shetland Isles to Europe and even one trip to the Azores.
We hope Gordon’s end user article below helps and encourages others to fit a simple solar, quiet energy solution to their own vessels.
John Rushworth
Fitting solar to Tantina II
It was during a rare quiet moment during a race to the Azores that my thoughts turned to the overly regular routine aboard that meant starting the engine every few hours just to keep the batteries charged. Surely there must be a better way.
On a thirty-foot boat, there is only so much room for additional equipment so although charging depended solely on the engine alternator and its vulnerable drive belt; I chew these up with monotonous regularity, a better way had to be found. My search led me to wind chargers and solar panels. As I use a wind vane self-steering gear the stern of the boat does not lend itself to mounting a wind charger without causing major complications, and although wind chargers do potentially have a greater output than solar panels they can be noisy. Solar panels seemed a better alternative, albeit overcoming the problem of the space required took considerable thought. In any event, at that time the available solar panels did not seem to offer much in the way of charging current for any given size, so the project was postponed; for postponed, read laziness on my part.
It was only after looking at a couple of Victron Energy panels on another yacht that I realised that solar panels have improved dramatically.
Click image to view additional information about yacht Elektra
If I could fit a couple of the small ones I would have an additional method of battery charging, a great feature for peace of mind when well offshore, and there would be less wear on the engine as well as my ears. Due to the limited space available the maximum area that could be allocated restricted me to two of the smallest panels to be mounted on top of the pushpit rails. The panels chosen are the slightly more efficient monocrystalline ones, thus making best use of space.
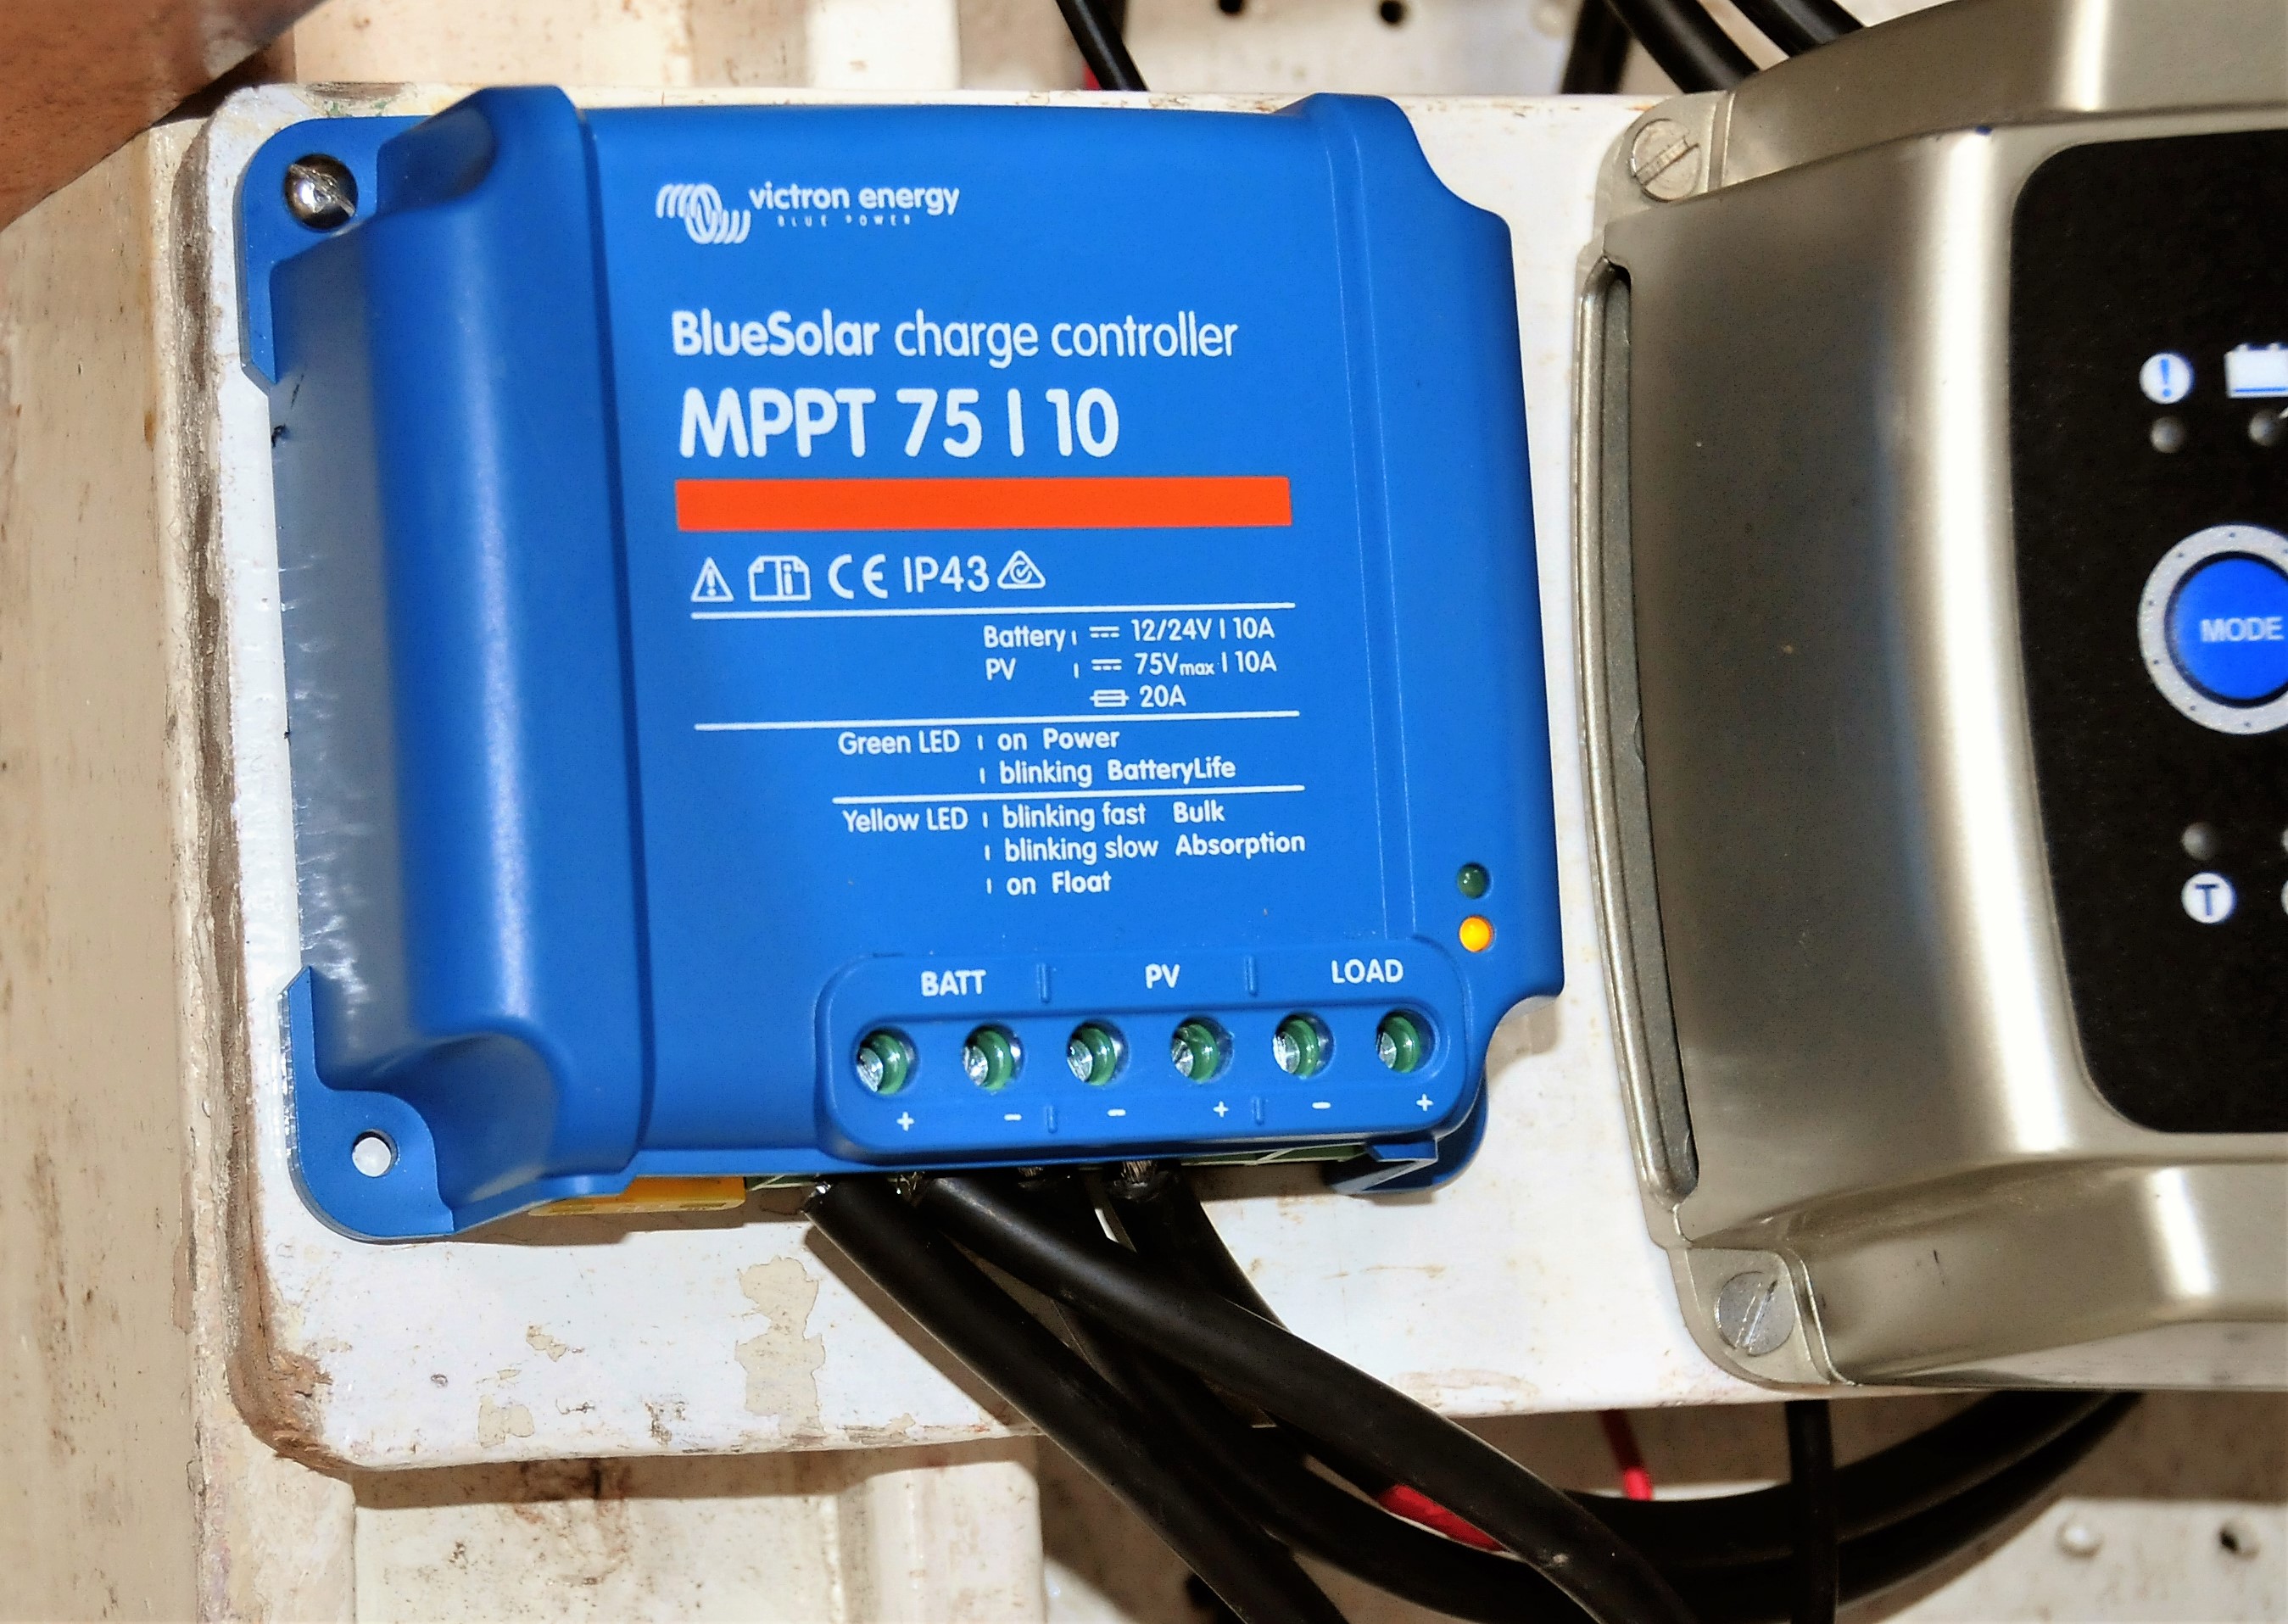
In the early days of solar energy capture I am sure that some solar panels were merely connected direct to battery terminals, a practice that is both inefficient and dangerous. Nowadays technology has improved and the installation of a charge controller is deemed essential. In Victron’s case their smallest unit is more than capable of handling my two panels. Furthermore, it encompasses MPPT technology that makes absolutely maximum use of available energy. Small and compact the charge controller fitted easily below decks with wiring connections obvious even without referring to the vast information backup available in the included documentation and online.
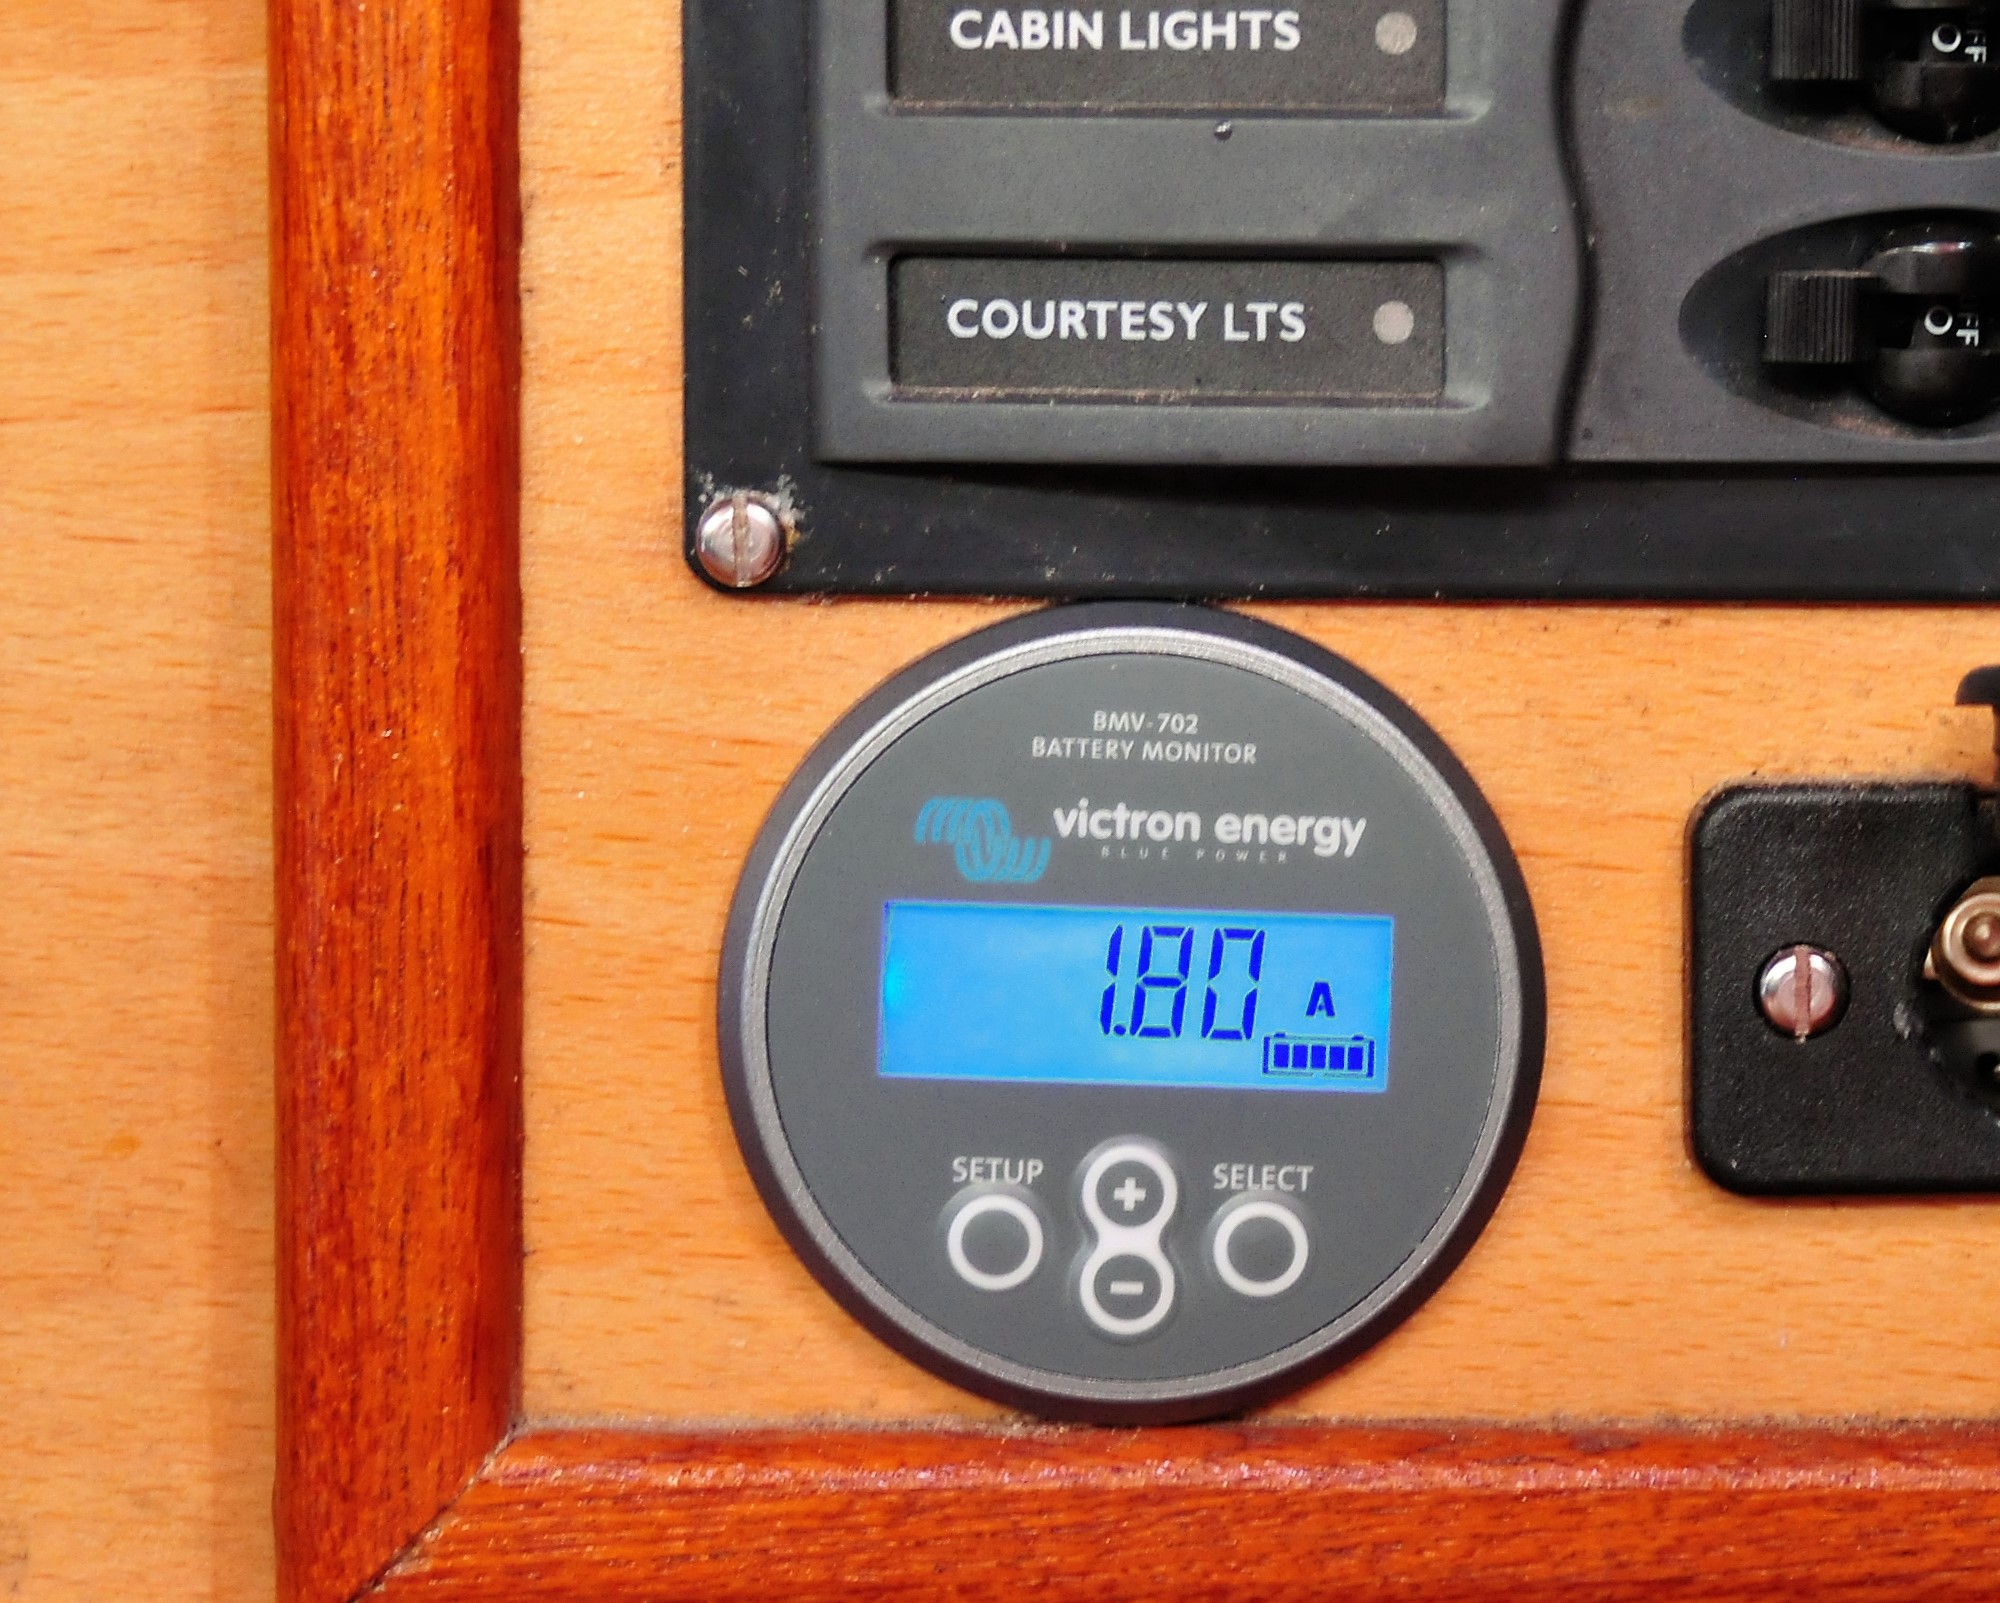
In order to identify the benefits of the new solar panels and as an upgrade to the existing battery charging arrangements on board I decided to fit a battery monitor. This provides a constant display of battery usage, and at the push of a button, information on the state of charge, amps used, and output from the solar panels. There are numerous additional parameters that can also be monitored, and as if that is not enough, by adding a simple dongle, all these readings are available on my mobile phone.
Installation
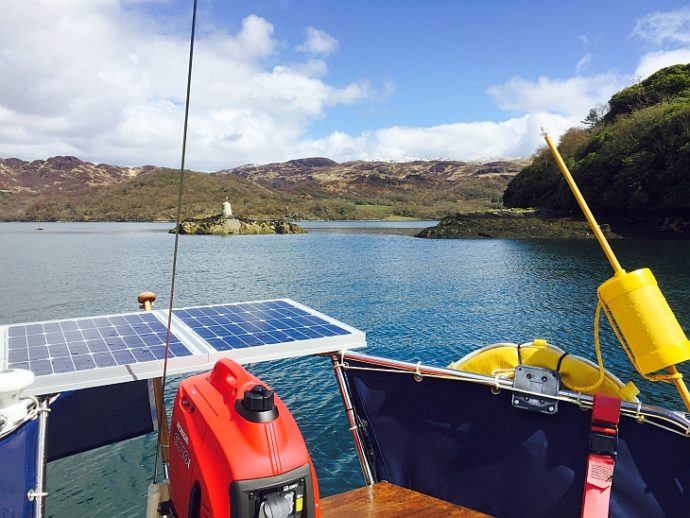
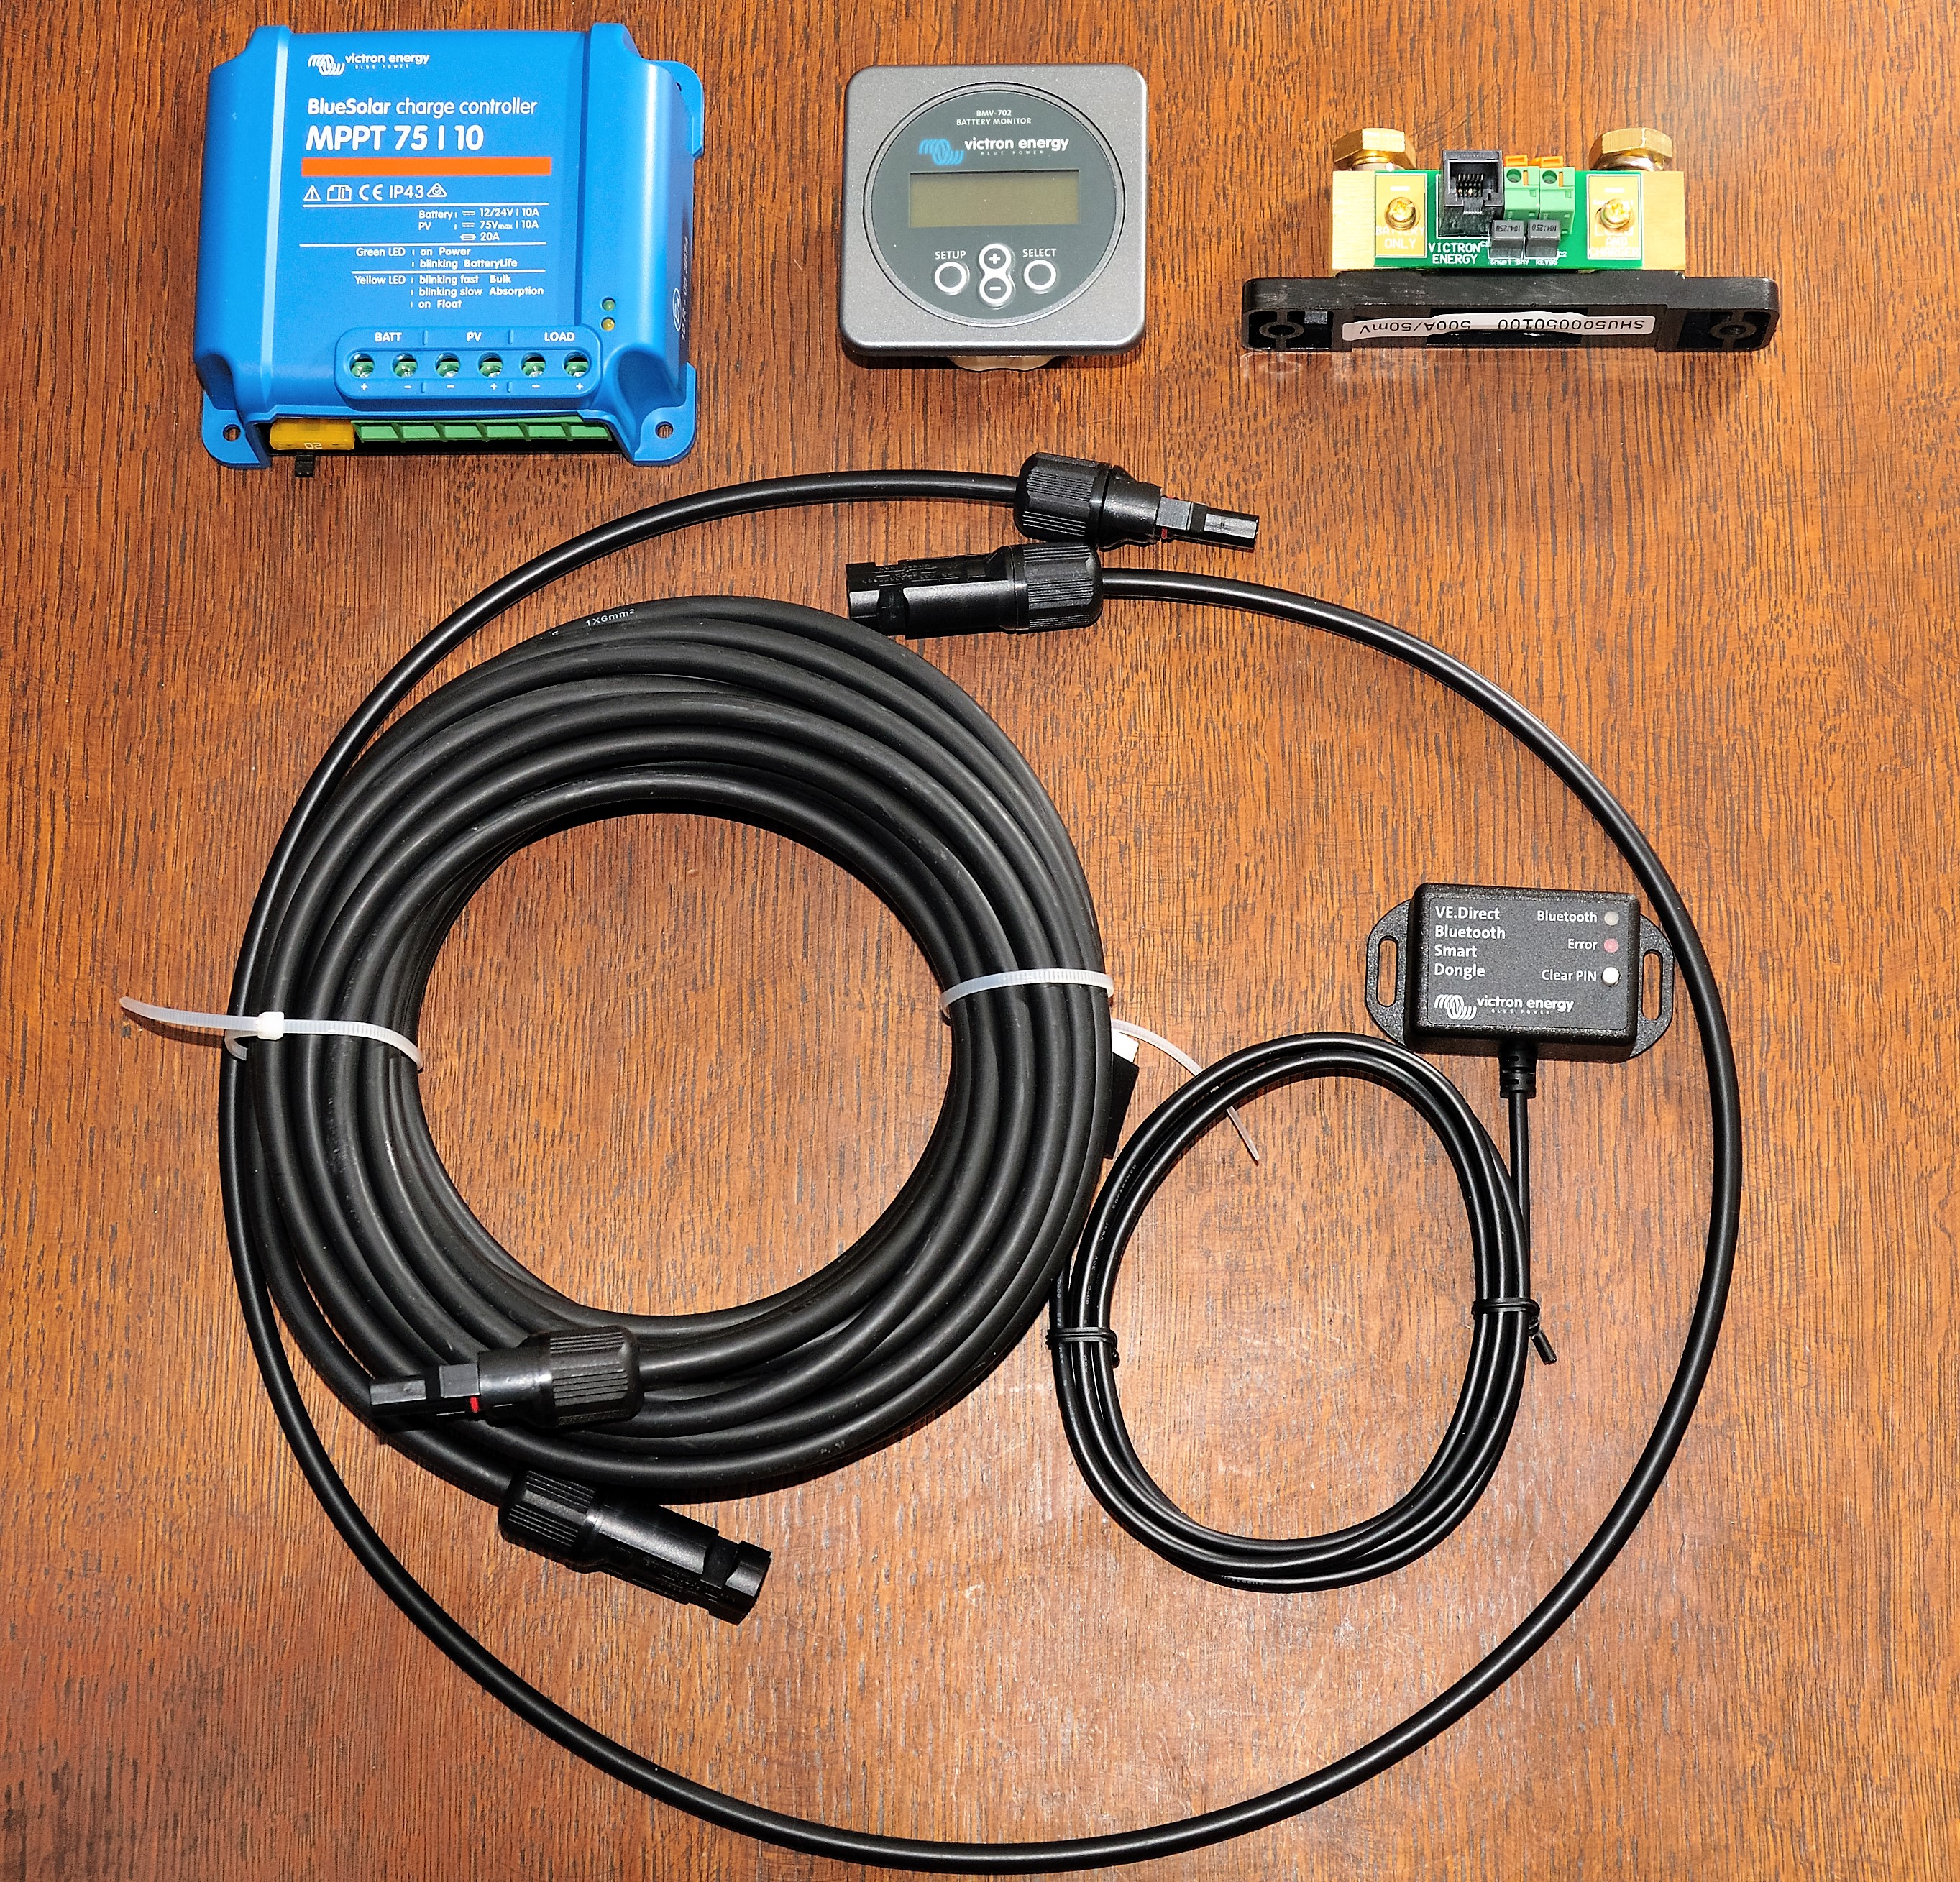
The components that form the system include a charge controller, in my case the smallest one is quite adequate, a battery monitor that also included a shunt (top right in the picture below) and a Bluetooth dongle. The solar panels comprised two of the 30 Watt monocrystalline versions. These I wired in series, as the charge controller then converts the panels’ available voltage to that of the battery system. The cables supplied by Victron Energy are at first sight quite substantial but have been sized to ensure that there is a minimum of voltage drop between the panels and the batteries. During the installation, I was delighted to find that these cables were of the highest quality fully tinned marine grade.
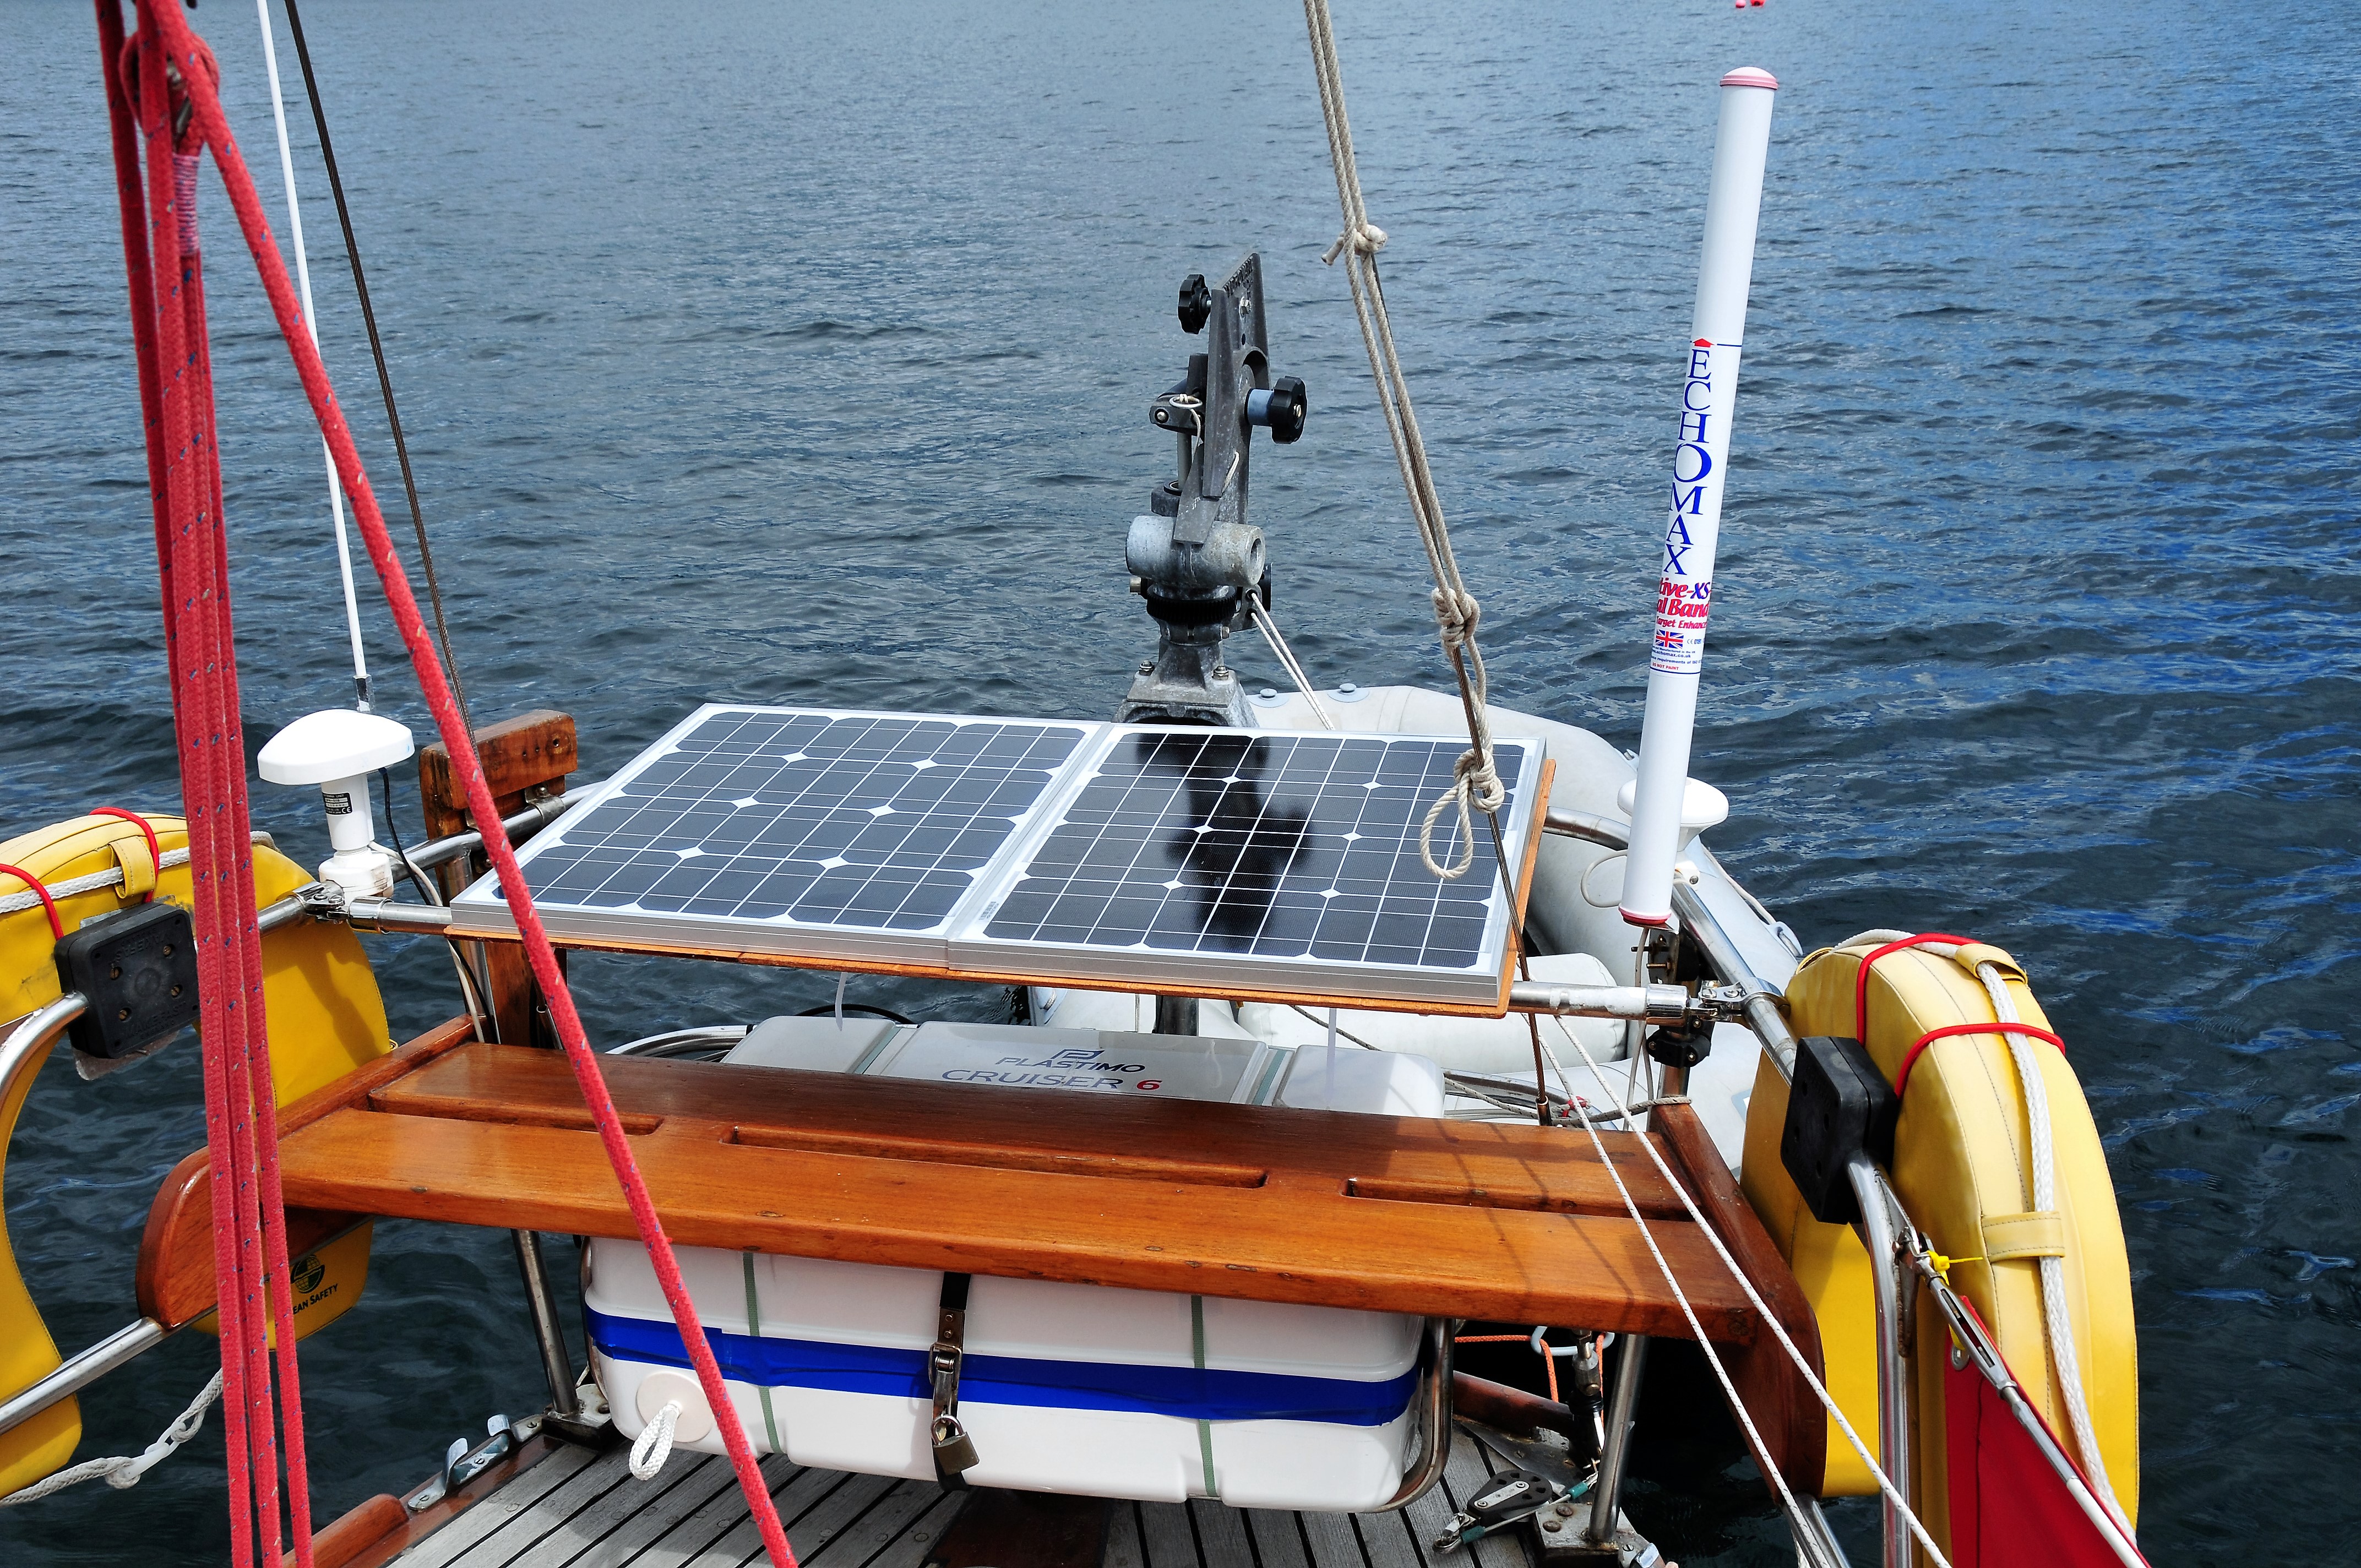
 The one problem that solar panels pose on small boats is one of space. Not only does space for mounting them need be found but that space needs to be as free of shadows as possible. At first glance, the cabin top was an obvious choice but in my case I regularly stand there when deploying the mainsail, and the boom and folded sail would create a rather large shadow thus affecting the efficiency of the panels. The area furthest from overhead items on my boat was at the stern, already in use for numerous items, but after some considerable thought a solution was found. An extra rail across the pushpit rails was installed using hinged clamps and bar connectors along with a length of stainless steel tube that matched the existing rails. Then it was a simple matter of making a platform onto which the solar panels could be bolted. The backstay on my boat is split and fortunately the panels just fitted between the stays. Each boat is different but there is often some space that is not heavily used which can be put to good use as in this case.
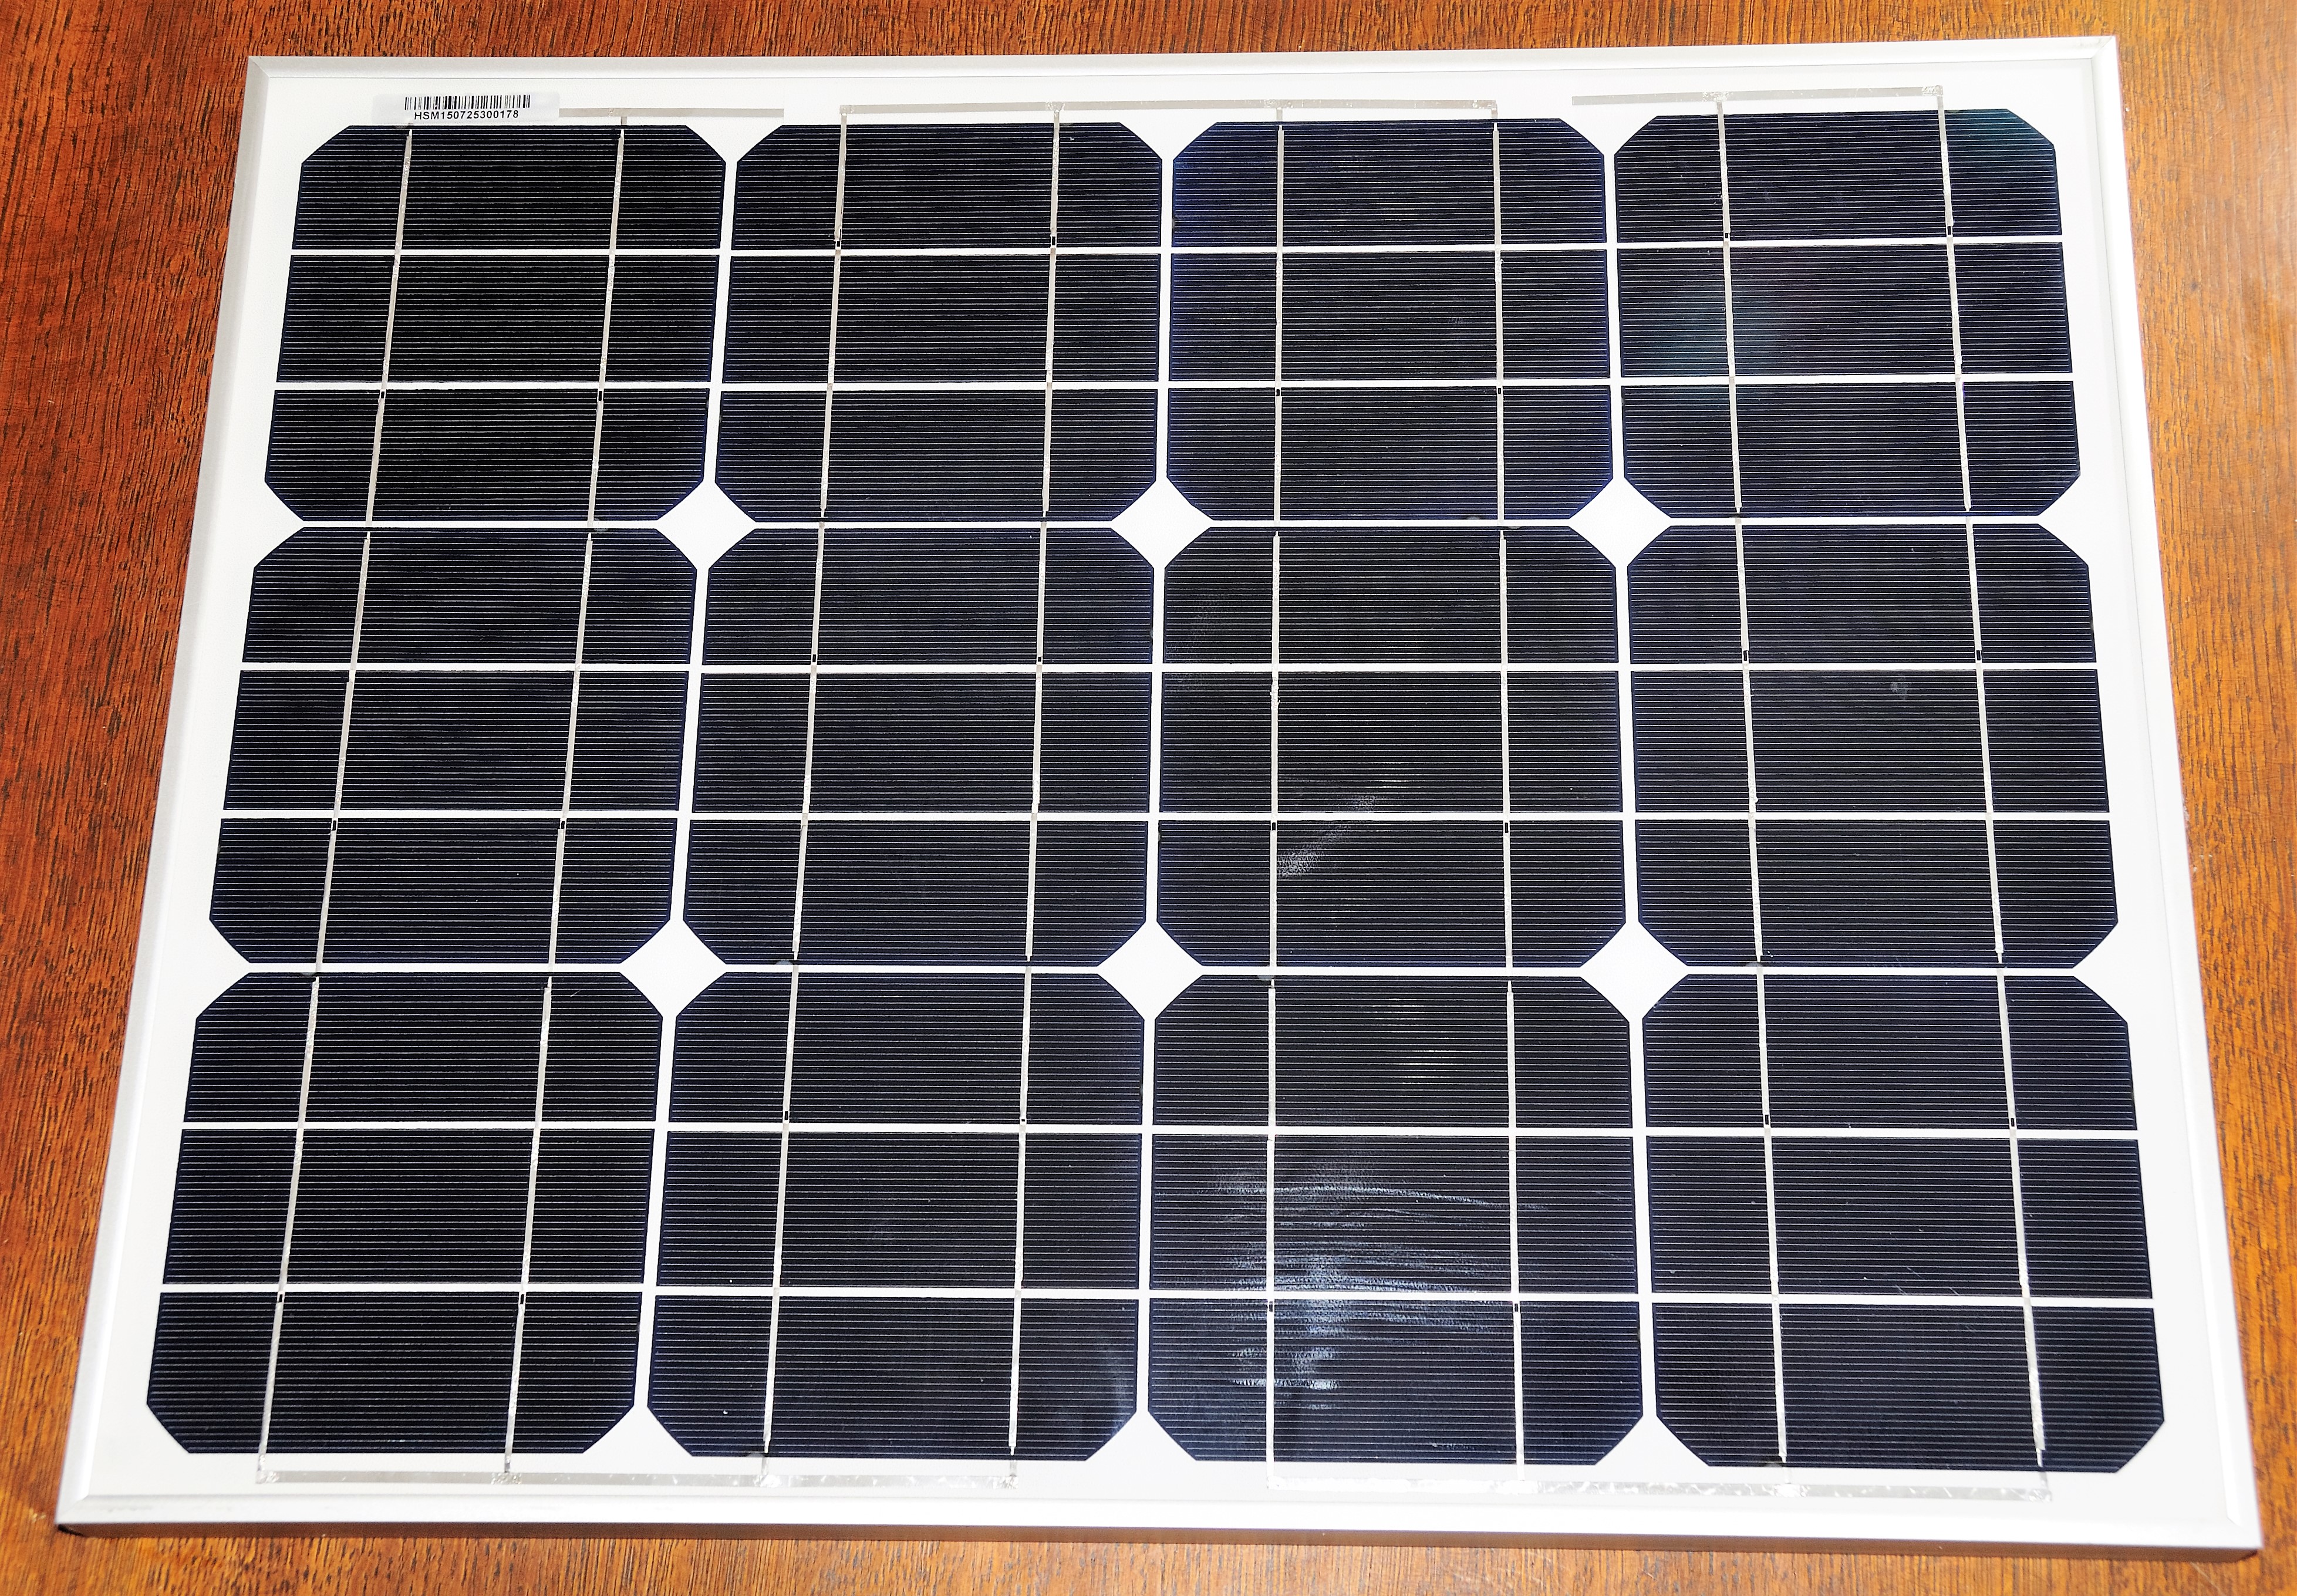 The panels themselves come prewired with a waterproof junction box glued to the underside, and onto which the cable connections fit. Fortunately the box is clearly marked with both positive and negative terminals so wiring is quite logical.
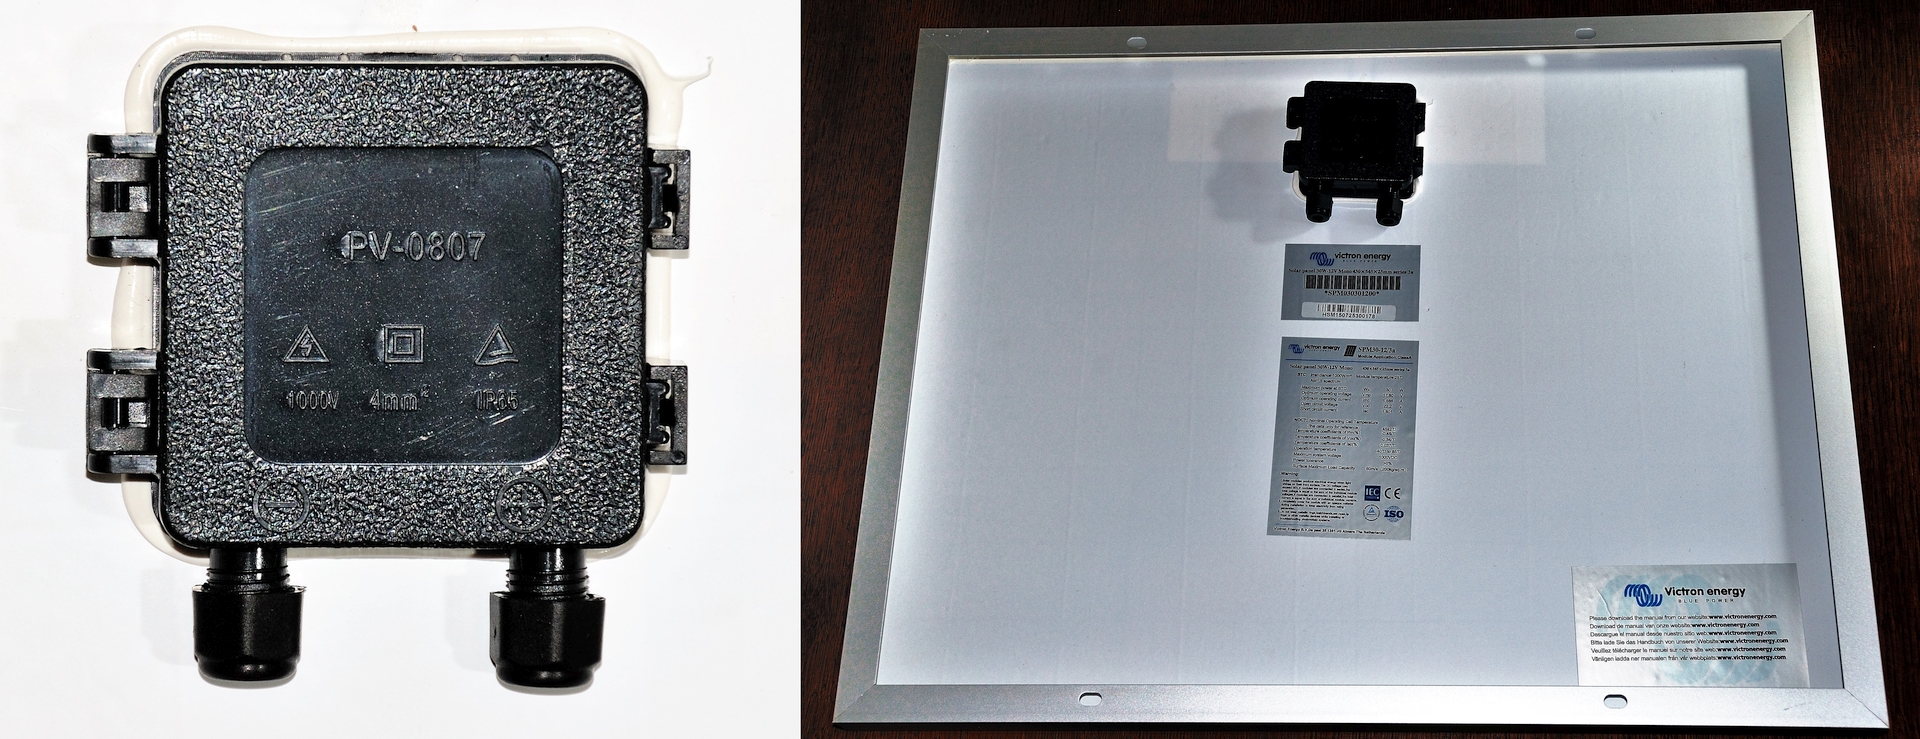 Connecting the cable ends to the junction box proved quite straight forward although tightening the seals at the cable entry glands required strong fingers. My two panels are interconnected via a 1 metre cable that came with pre assembled plug and socket. I cut the cable in the middle which allowed the bare ends to be inserted into the terminals in the junction box. This meant that the plug and socket then fitted together to connect the two panels, whilst being removable for maintenance. The aluminium frame is predrilled with holes for fastening it. I used 6mm machine screws to attach them to the plywood base that I made.
 The cables from the solar panels were led through a deck gland to a position close to my electronics panel. After mounting the MPPT 75/10 charge controller the cables were duly connected, but before I made the connection to the solar panels themselves. There is the potential for substantial currents to flow from the panels, especially when connected in series. I kept the panels covered to stop any generation of electricity during the installation as a precaution.
 Fortunately there was enough spare cable to lead the charger output to the batteries. The positive cable leads to the domestic battery bank, while the negative leads to the output side of the shunt that is part of the BMV-702. The BMV-702 is a battery monitor but is considerably more sophisticated than some, being able to monitor two battery banks as well as providing output of data via Bluetooth to a mobile phone or similar device. Comprising the readout dial and a 500amp shunt, it is simple to fit although I did have to scratch my head a bit about the best location for the two components. The readout I installed on the boat’s instrument panel at the chart table, and although it is installed as a round dial, a square bezel is also supplied as part of the kit.
The shunt itself is quite neat but it is necessary to connect battery cables to it so it does require a bit of space. I overcame the problem of where to put it by buying a project box from a well known electronics shop. This allowed me to fit the shunt in a relatively accessible place close to the batteries. As my batteries are mounted under the main cabin floor, positioning the box on the floor under the settee edge, kept the cables and wires clear of errant feet.
 The thin red wires are the sensor connections from the positive terminals on the battery banks and are simply plugged into the spring loaded terminals on the shunt. The grey cable is the data feed. If only one battery bank is installed the BMV-702 has the ability to measure battery temperature using the second small input terminal.
The last part of my installation is the VE.Direct Bluetooth Smart dongle. Mounted close to the BMV-702 it is simply plugged in using the attached cable, and powered via that lead. The App for mobile phones is readily downloaded from Victron’s comprehensive website.
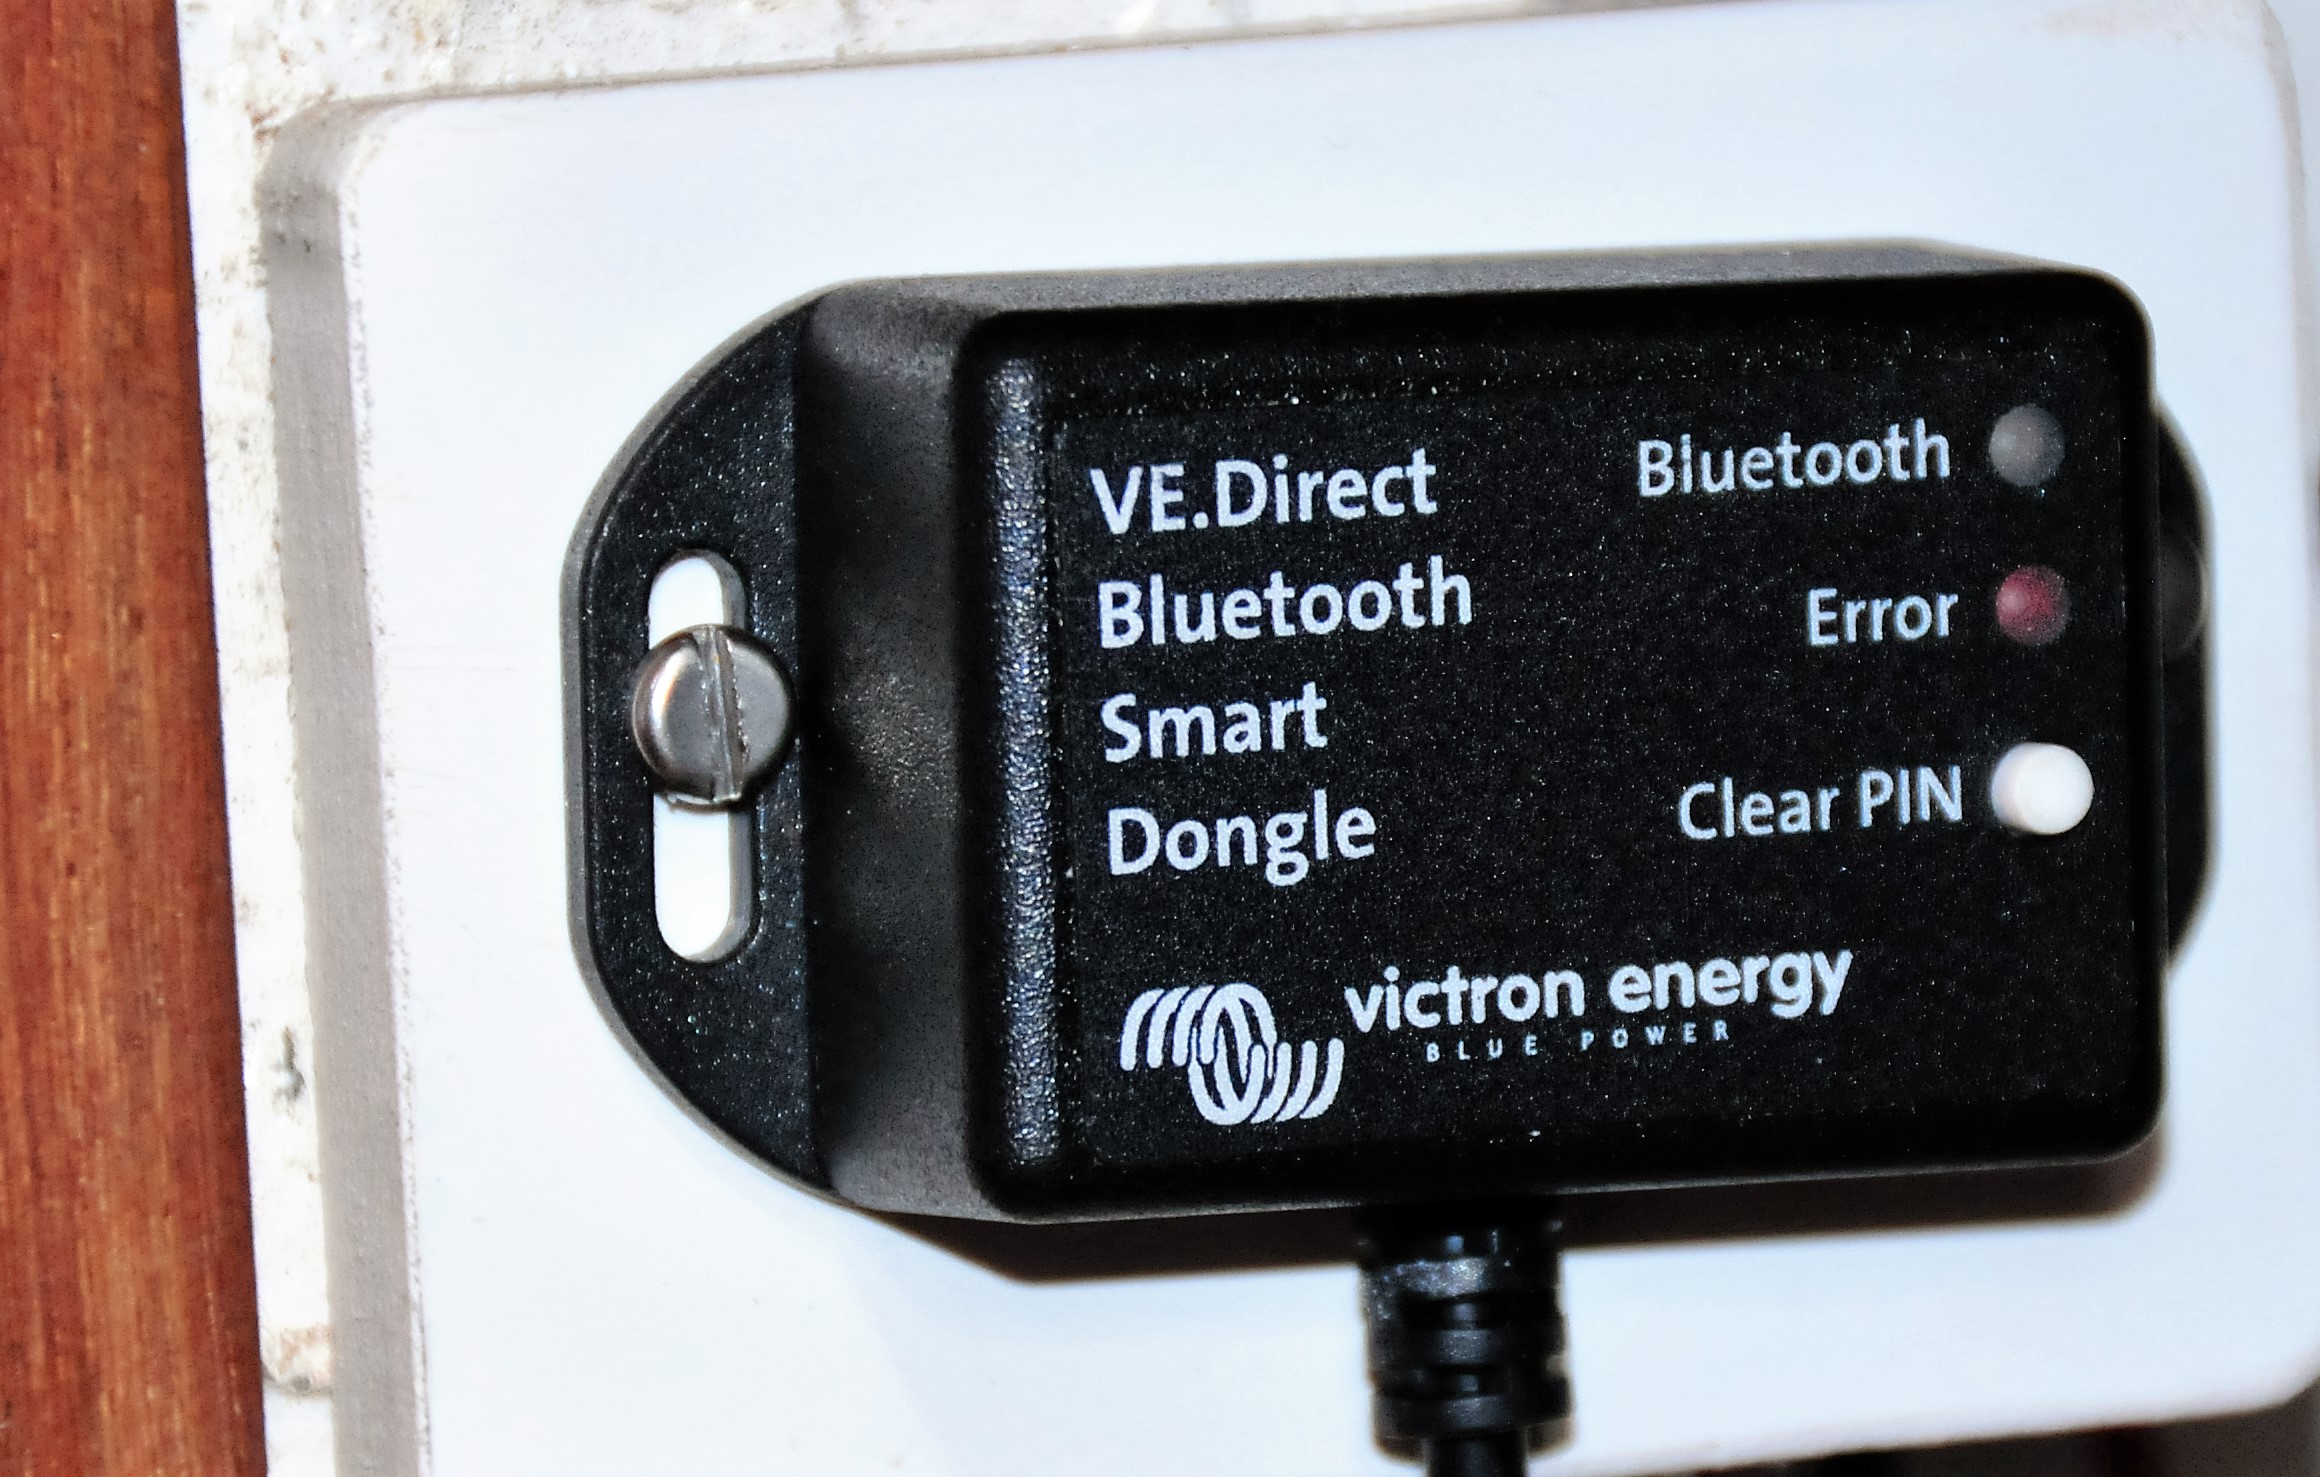
Note: the dongle can be connected to the BMV or the MPPT, as one desires, and can provide automatic firmware updates besides monitoring multiple parameters.
The system in use
Having overcome the complications that installing almost anything on a small boat entails, I am delighted to say that the system works very well. Even on a dull day there is a constant charge going to the batteries, and when the sun does shine, albeit that is occasionally in Scotland, the charge level increases dramatically. The benefit of the MPPT technology in the charge controller is that it does make best use of whatever available current is coming from the solar panels. Being a multi stage charger, in my case it only took about 24 hours for the batteries to reach a full charge, thereafter the charger went into its float charge mode. The yellow light on the picture of the charge controller indicates the float charge is in operation.
Many of the electrical systems on board are quite power hungry, such as the refrigerator and various pumps as well as instruments. I also like to listen to music when aboard myself; the stereo system draws almost a full amp on its own and with all these electrical demands it is wonderful to be freed from the ever constant need to run the engine. So far the engine charging has been limited to those times when it is needed for propulsion, a very welcome change.
 This smallest of the Victron Energy systems has proved to be both highly effective, and extremely well made. If I was to criticise anything it might be the print size of the instruction booklet for the MPPT 75/10, or perhaps that is a criticism of my aged eyes, but otherwise all the components appear to be of the highest quality.
Thoughts after my annual cruise
After fitting two of the 30 watt monocrystalline panels at the beginning of the season I was looking forward to a summer of long sunny days and constant electrical input. My annual cruise this year lasted some six weeks and although one expects some variations in the weather, a series of gales and almost constantly rain filled skies were not on the desired list. To say that conditions were not likely to show solar panels at their best would be an understatement.
Sheltering below decks for lengthy periods gave me plenty of opportunity to monitor the output from the solar panels and the charge state of my batteries. I was amazed at the results. Even on the dullest of days, and there were many to choose from, my batteries were receiving a healthy charge, and with the now much more occasional use of the engine – never during the whole six weeks did they fall below a 95% state of charge. It was fascinating to watch the battery monitor as the batteries went from their partially discharged state in early morning, my fridge and domestic equipment is on 24hours a day, to a full charge later on. I am sure the MPPT controller is at least partially responsible for the overall success of the installation, it allowed the solar panels to charge quite hard when the batteries were at their lowest, the rate of charge gradually reducing over the course of each day as the batteries neared capacity.
Before installing the Victron Energy solar panels I was a little doubtful if such small units would make much difference, but having used them for half a season I am completely converted to the joy of silent energy. One of those joys is being able to return to the boat after a break knowing that the batteries will be fully charged.
Solar power means not having to disturb this peace and quiet!
Gordon Buchanan
Helpful videos
Instructional video: How to connect the BMV-700 battery monitor
Instructional video: How to optimise the BMV-700 series sync parameters
BlueSolar MPPTs: VictronConnect instructional videos
Useful blog/manual
Matching solar modules to MPPT charge controllers
System components
2 x SPM030301200 (30W Mono) – BlueSolar Panels
1 x SCC010010050R (75/10 MPPT) – BlueSolar MPPTs 75/10, 75/15 & 100/15
1 x BAM010702000R (BMV-702) – BMV-700 series
1 x ASS000100000 (BMV Temp sensor) – Temperature sensor for BMV-702 (Note not used for this installation as starter battery wired instead).
1 x ASS030536010 (Bluetooth smart dongle) – VE.Direct Bluetooth Smart dongle
1 x SCA000100000 (Solar cable 1m/4mm²) – See Pricelist
2 x SCA001000100 (Solar cable 10m/6mm²) – See Pricelist
All components supplied by Victron Energy distributor Barden UK Ltd. For further information contact:

Philip Smith
Technical Sales Manager
T: +44 (0)1489 570770
www.barden-uk.com


