6. Funzionamento
6.1. Display del dispositivo
L’inverter possiede uno schermo LCD, che mostra le informazioni di funzionamento.
Le pagine cambieranno una dopo l'altra, con una pausa di circa sei secondi tra ognuna di esse.
Stato dell'inverter: Indica quando il Multi RS Solar sta invertendo. Potenza in uscita, Frequenza e tensione CA. | 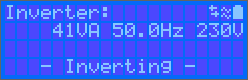 |
Stato ingresso CA: Indica lo stato dell'ingresso CA. Appaiono la potenza in uscita, la Frequenza e la tensione CA. La riga inferiore mostra lo stato del relè di ingresso CA. | 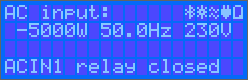 |
Batteria:
Energia batteria (per la carica appaiono numeri positivi, per la scarica appaiono numeri negativi), Corrente, Tensione CC, Temperatura (*), Stato della carica (*) e Tempo restante (*). Stato della batteria (ad es., scarica, prima fase di carica, assorbimento, mantenimento, ecc.).
Stato della batteria: La seconda riga del display mostra lo stato della batteria, misurato ai morsetti batteria del Multi RS Solar. Questi valori non tengono conto di altre sorgenti di carica o carichi presenti nel sistema complessivo. Potenza batteria, tensione batteria e corrente batteria. La terza riga del display indica la temperatura e lo stato di carica della batteria. Questi valori possono provenire dal monitor della batteria del sistema, se disponibile. | 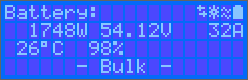 |
I valori negativi indicano la scarica della batteria. La riga inferiore mostra lo stato della batteria "In scarica". | 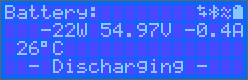 |
Fotovoltaico:
Nella seconda riga sono indicate l'energia solare, la tensione e la corrente. Ogni tracciatore MPPT appare in una pagina separata. Vengono visualizzati anche il rendimento giornaliero e il rendimento totale. | 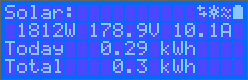 |
Se è stato collegato un inverter FV CA, verranno visualizzati la sua potenza e il suo rendimento. | 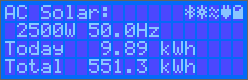 |
Nell’angolo in alto a destra del display si trovano le icone delle informazioni del sistema.
 | Comunicazione su qualsiasi interfaccia (ad es., Bluetooth, VE.Can, ecc.) |
 | Bluetooth attivo: il colore dell’icona cambia quando è collegato |
 | MPPT attivo |
 | (Lampeggiante) Errore o Avviso |
 | Inverter Attivo |
 | Batteria, pieno corrisponde alla tensione, lampeggia quando vuota |
6.2. Protezioni e riavvii automatici
6.2.1. Sovraccarico
Alcuni carichi, quali motori o pompe, assorbono forti correnti di punta durante l'avviamento. In tali circostanze, può accadere che la corrente di avviamento superi il limite di sovracorrente dell’inverter. In questo caso, la tensione di uscita diminuirà rapidamente per limitare la corrente di uscita dell'inverter. Se il limite di sovracorrente viene superato continuamente, l'inverter si arresta per 30 secondi e si poi si riavvia automaticamente. Dopo tre riavvii seguiti da un sovraccarico entro 30 secondi dal riavvio, l’inverter si arresta e rimane spento. Per riavviare il normale funzionamento, scollegare il carico, spegnere l’inverter e poi accenderlo.
6.2.2. Soglia di bassa tensione batteria (regolabile in VictronConnect)
L’inverter si spegnerà quando la tensione di ingresso in CC cade al di sotto del livello di arresto per batteria bassa. Dopo un arresto minimo di 30 secondi, l’inverter si riavvierà se la tensione torna al di sopra del livello di riavvio per batteria bassa.
Dopo tre arresti e riavvii, seguiti da un arresto per batteria bassa entro 30 secondi dal riavvio, l’inverter si arresta e smette di riprovare in base al livello di riavvio per batteria bassa. Per annullare tale azione e riavviare l’inverter, spegnerlo, riaccenderlo e limitare i carichi per attivare la ricarica della batteria mediante energia solare.
Vedere la tabella dei Dati Tecnici per sapere i livelli di arresto, riavvio e rilevamento per difetto in seguito a batteria bassa. Questi possono essere regolati tramite VictronConnect (computer o app).
Inoltre, si può anche utilizzare un altro MPPT o caricabatterie esterno per ricaricare la batteria e raggiungere il livello di Tensione di riavvio o di Rilevamento carica. !!! Se si utilizza la funzione del segnale di “consenti carica”, questa deve rimanere al di sopra della tensione minima, in modo che, se la batteria è completamente scarica, non consentirà alla carica di avviarsi. In questo caso, si può disattivare temporaneamente tale funzione in VictronConnect, affinché la carica si riavvii e poi attivarla nuovamente.
Vedere la tabella dei Dati Tecnici per sapere i livelli di arresto e riavvio per difetto in seguito a batteria bassa. Questi si possono modificare tramite VictronConnect (computer o app). In alternativa, si può implementare il Taglio dinamico, vedere https://www.victronenergy.com/live/ve.direct:phoenix-inverters-dynamic-cutoff
6.2.3. Alta tensione batteria
Ridurre la tensione di ingresso in CC e/o verificare se nel sistema sia presente una batteria difettosa o un caricabatterie solare difettoso. Dopo un arresto dovuto ad alta tensione della batteria, l’ unità attenderà 30 secondi e poi riproverà l’avvio appena la tensione della batteria sia scesa a un livello accettabile.
6.2.4. Temperatura alta
Un’alta temperatura ambiente o un carico alto persistente potrebbero provocare un arresto per surriscaldamento. L’inverter si riavvierà trascorsi 30 secondi. L’inverter continuerà a riprovare e riprendere il funzionamento e non rimarrà spento dopo vari tentativi. Ridurre il carico e/o spostare l’inverter a una zona più ventilata.