
Recently we heard how Stefanie fitted Lithium batteries and renewed the electrical system on board her yacht Taku Moe.
She soon found that her old alternator wasn’t packing a big enough punch for her new batteries – and wasn’t surprised.
Here she tells us her experience of installing a high-power alternator.
Stefanie Loges takes up the story:
Our new lithium installation has already proven itself on a 10-day round trip through the Danish South Seas, although the solar modules are not yet installed and we were dependent on shore power or a generator to charge the lithium bank. An advantage of Lithium storage is clearly the ability to discharge the batteries far below the usual level of 50% State of Charge (in the case of lead batteries) without fear of shortening battery life.
However, a clear weak point emerged during the trip that I had actually foreseen. The old 14V / 50A alternator of our Volvo Penta 2003t was noticeably and measurably overwhelmed to supply the Orion-Tr Smart 12 / 12-30 DC-DC Charger (B2B) with sufficient power. The Orion should run the lithium bank via the starter battery with a constant current of min. 35A load. The current is not adjustable, so always full power until the batteries are full.
The whole thing works quite well for almost an hour, but the alternator heats up minute by minute. At well over 100°C, measured with an infrared thermometer at the hottest point of the alternator, I decided to switch off the Orion, using the Bluetooth function, in order to protect the alternator.
I read somewhere that conventional generators have an average (from cold through warm to hot) efficiency of perhaps 50%. That seems to be true with our alternator.
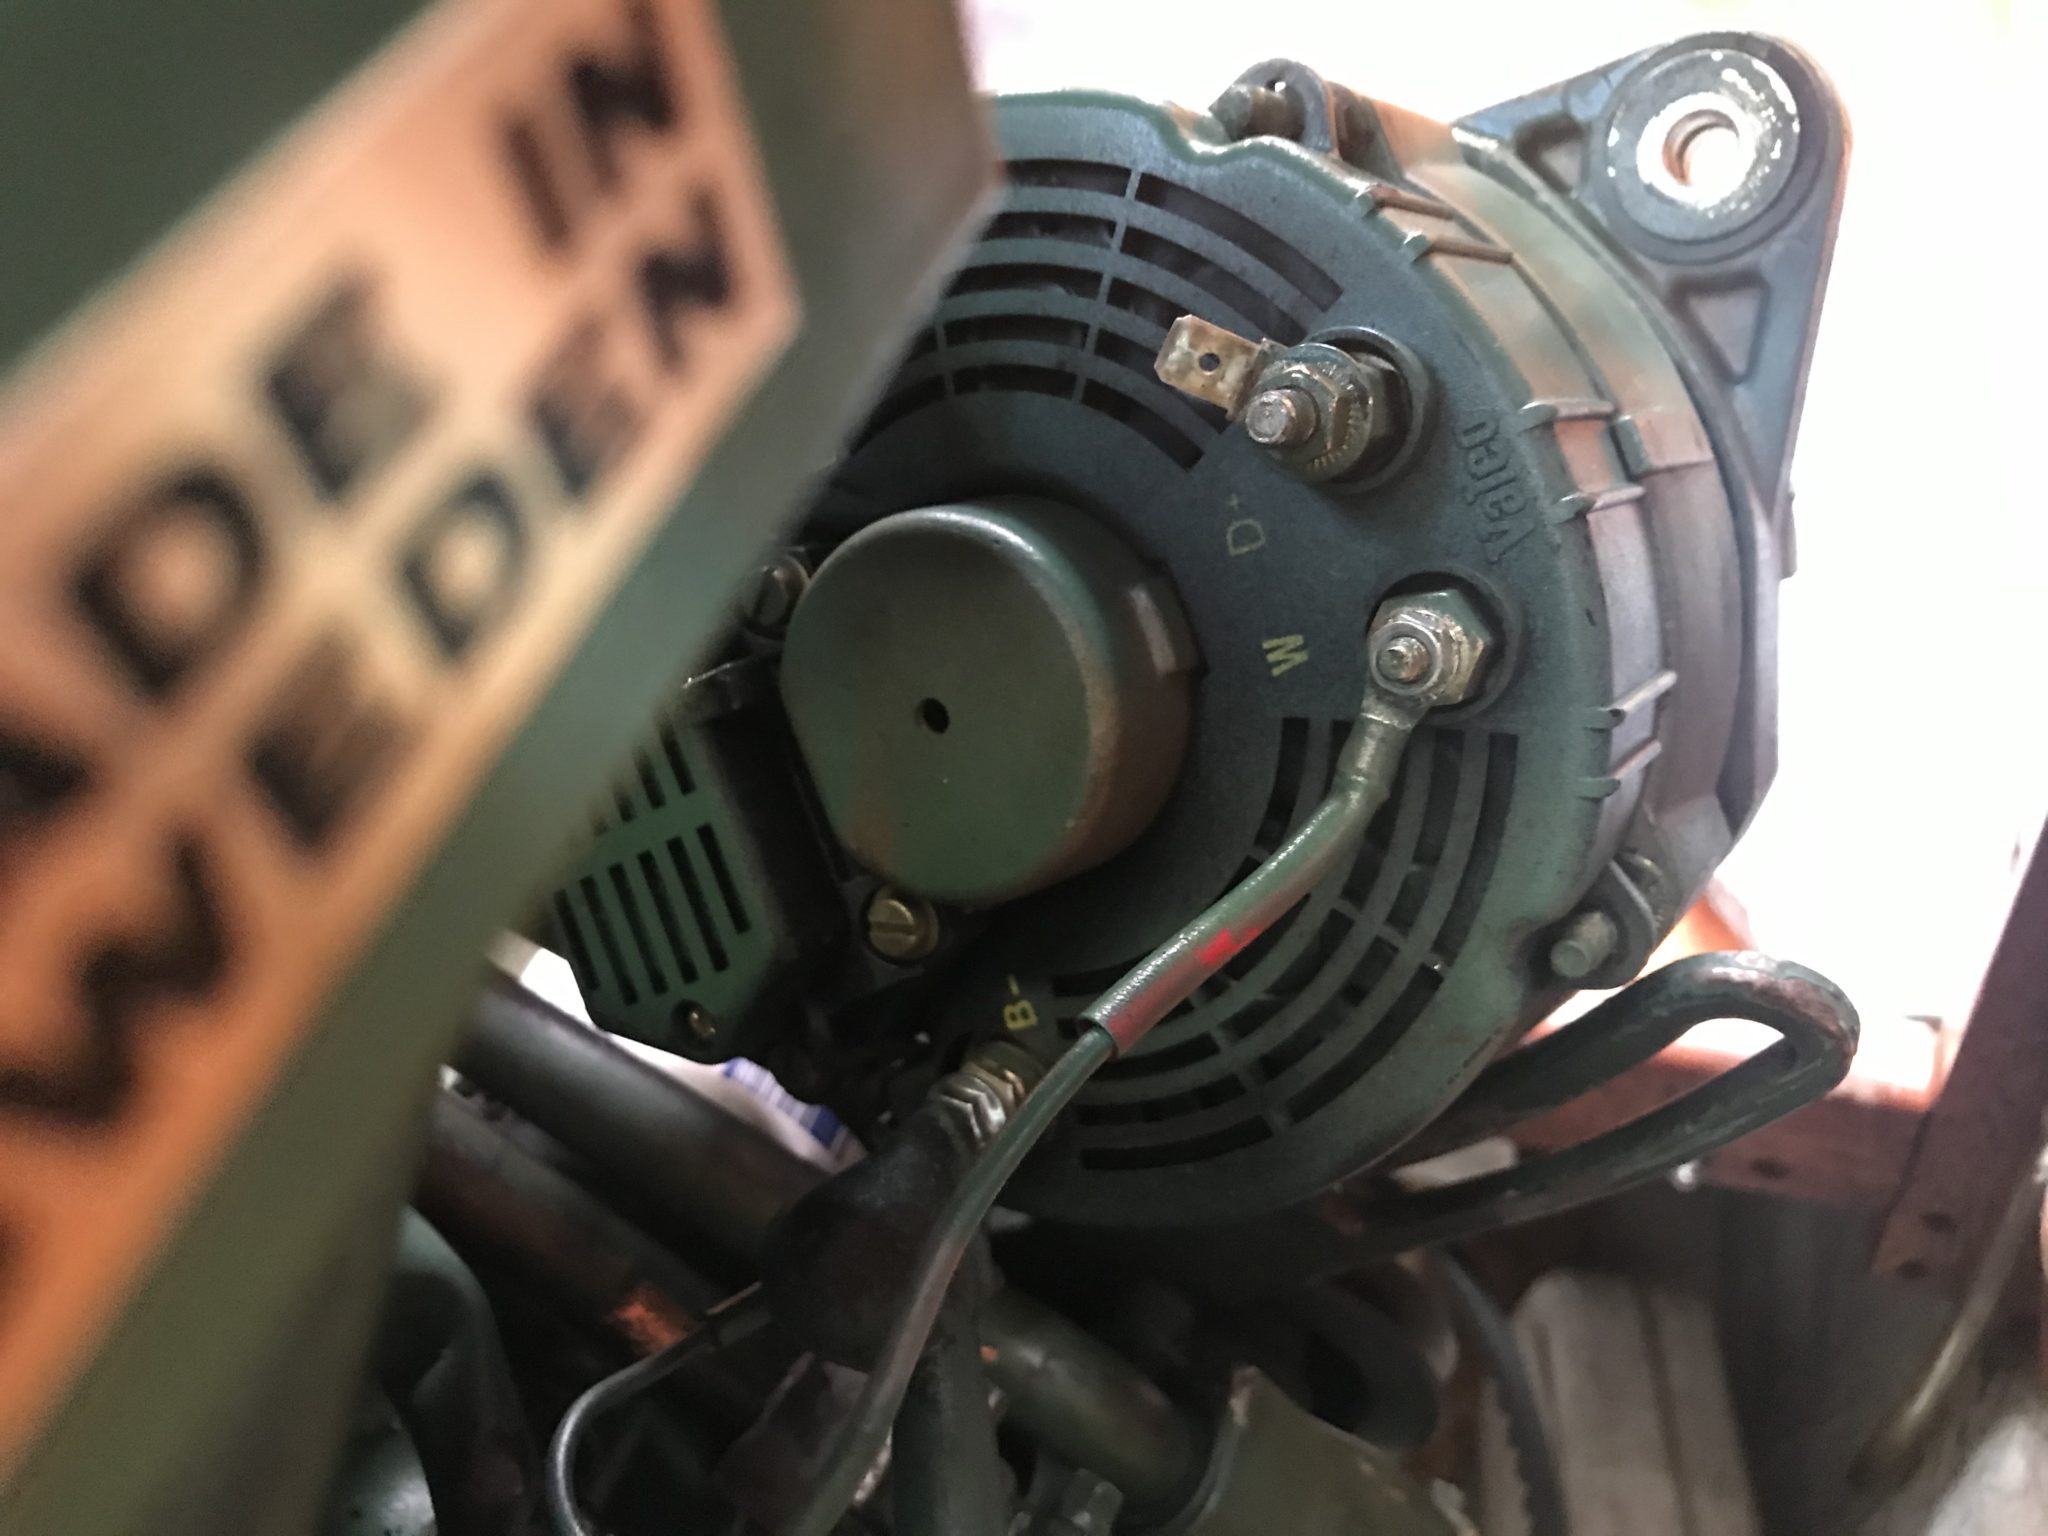
Good old Valeo alternator from Volvo Penta
My first thought was to install a smaller Orion with max. 25A Output. But I dismissed that idea immediately because we definitely don’t want to forego fast charging of the batteries. If only 250Ah have to be recharged, we would, in theory, have to let the machine run for 10 hours (excluding any solar power input). So a different concept has to be found in order that we don’t miss out on power generated by the engine when we’re forced to motor because there’s no wind.
Amongst English-speaking Blue-Water sailors there is a lot of talk about Balmar high-performance alternators which use an external regulator to control the field voltage, and include different charging programs for different battery types. Including one that you can completely adjust to your own requirements. Balmar alternators are temperature-controlled, meaning if it gets too warm for them, the output is reduced by reducing the field voltage. The controller also has other features such as a ‘Belt Load Manager’ to keep the slip and abrasion of the V-belt under control and reduce output power. More on that later.
However, a Balmar alternator is not exactly the cheapest on the market and, at around 850 euros, makes a deep hole in the treasure chest. But you do get an external controller, cables, and a 1/2 inch V-belt pulley.
Alternatively, an original Volvo Penta 70A alternator could be used. That should cost about 600 euros. Too much – in my opinion – for old technology, because the intelligent controller and other features are missing.
After a short consultation with Balmar, we negotiated a reasonable price with Energy Solutions UK for a price for the Balmar KIT, 621 Series 100a SingleFT Alternator, MC-614 regulator and temperature sensors, and the new alternator was delivered just a week later.
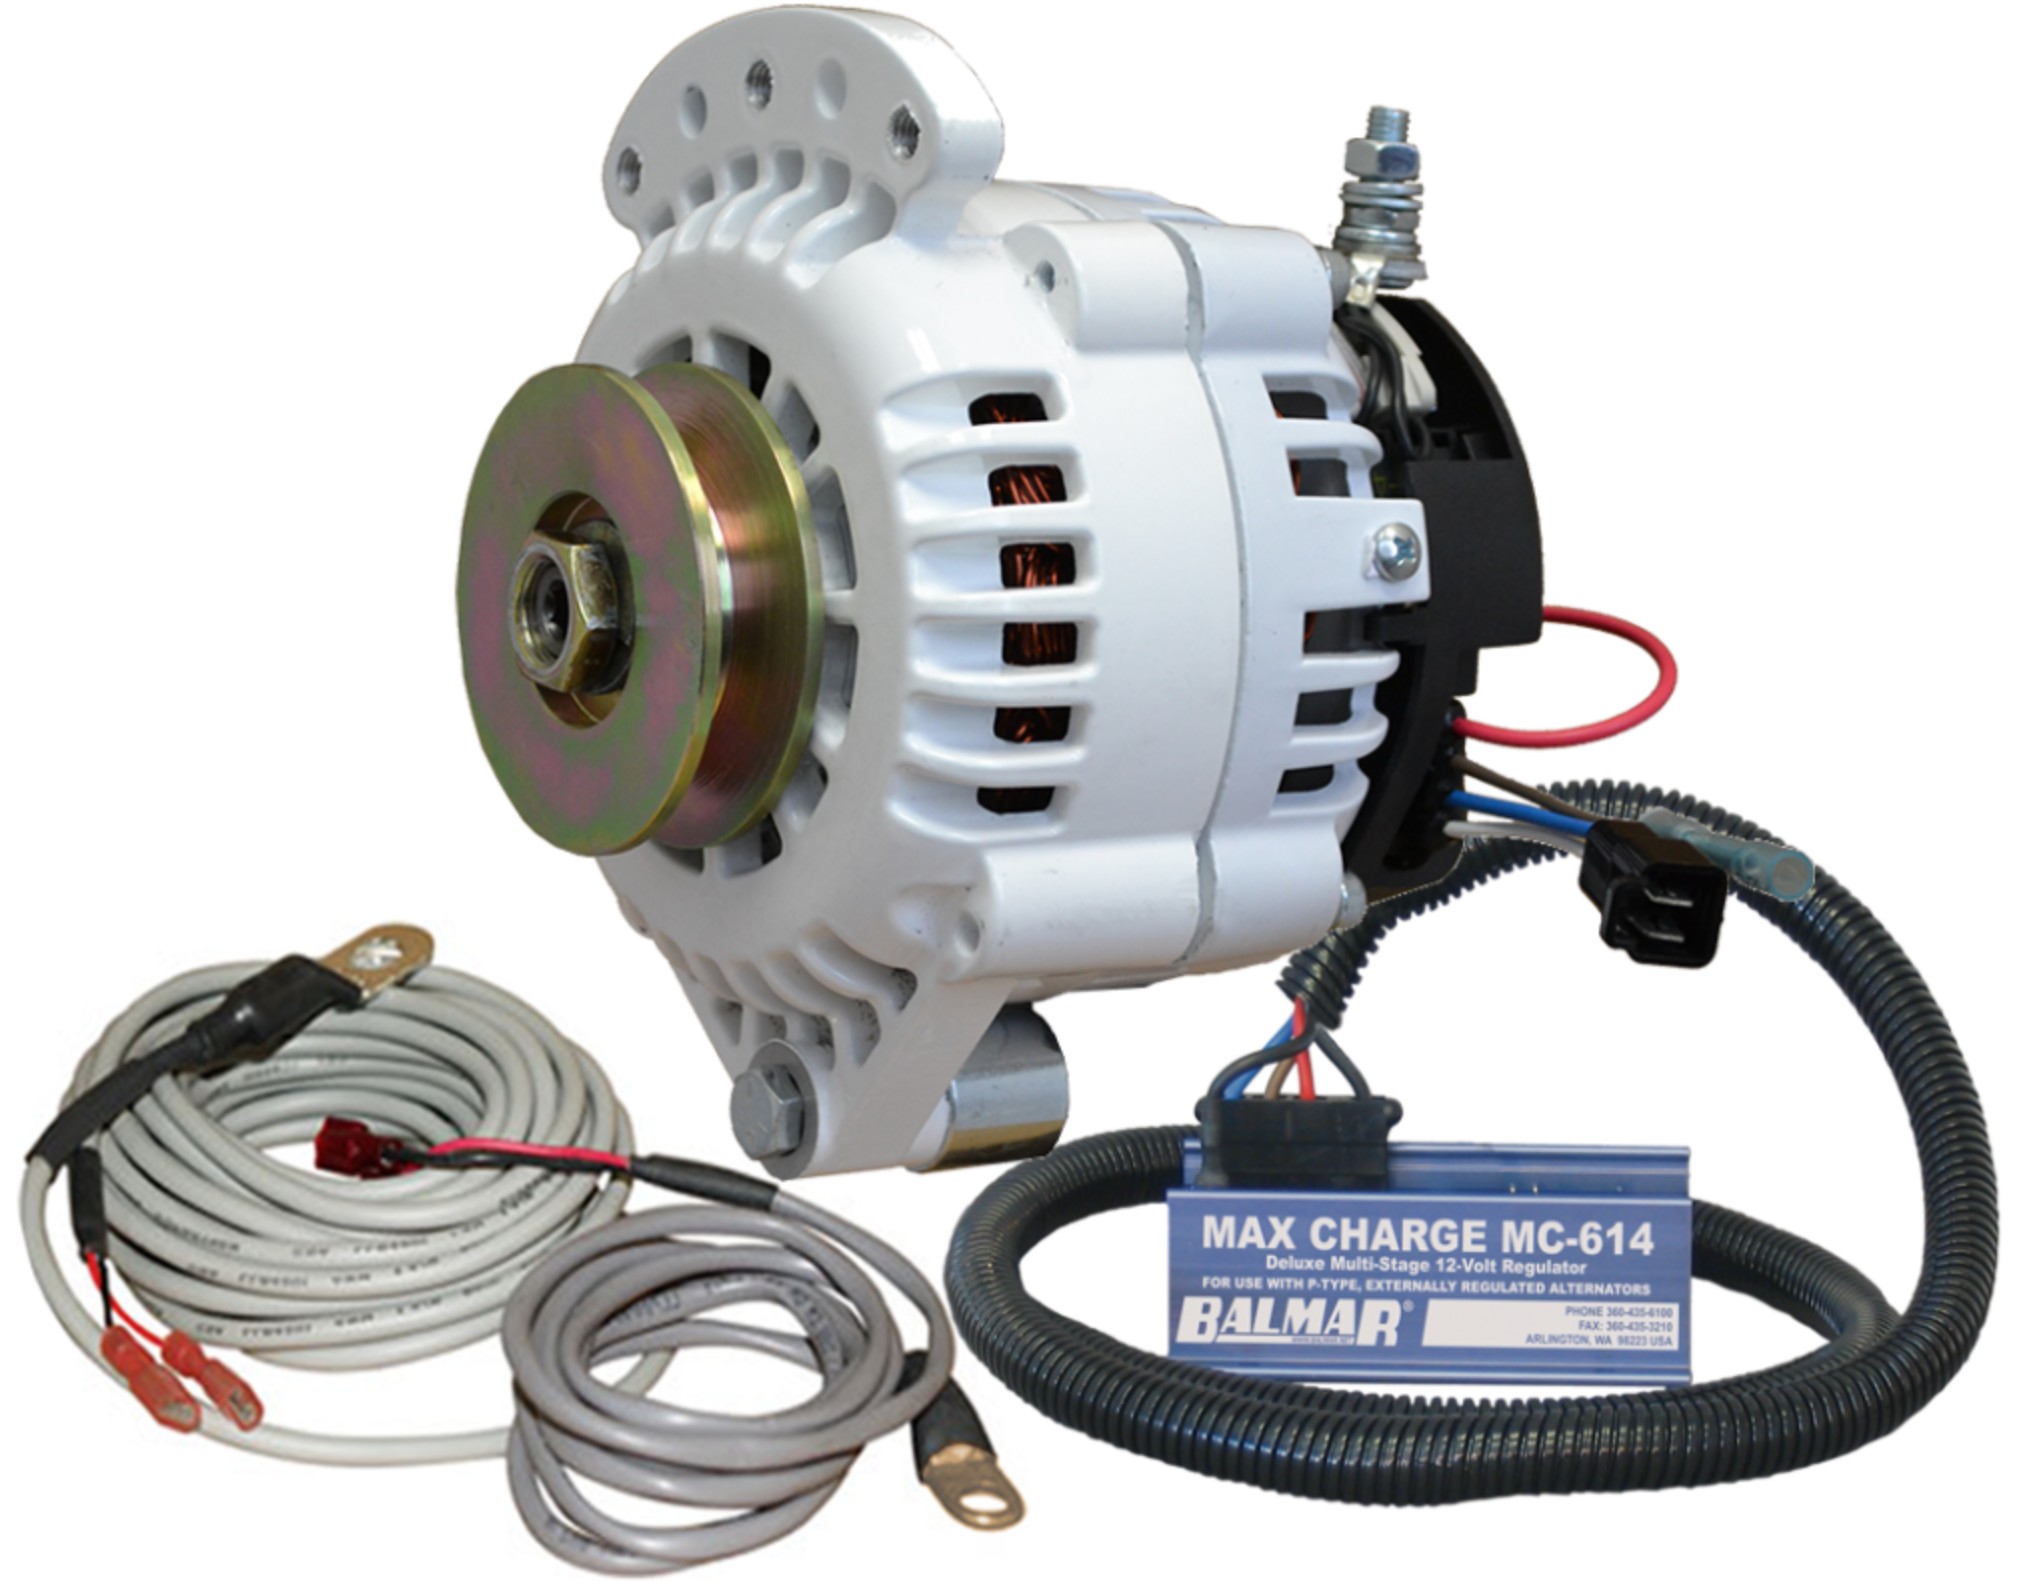
Balmar 621 alternator with MC-614 and accessories
Usually the starter battery is attached to the alternator. The consumer bank is then charged either via an isolating diode, an A2B (Alternator to Battery) or a B2B (Battery to Battery – DC-DC Charger). As I explained above, this works in principle, but not particularly efficiently – unless you already have a powerful alternator. In order to be able to draw full power, the alternator should charge the consumer bank directly via the controller – our starter battery has a 110Ah capacity (remember that batteries should only be recharged at a rate no greater than 20% of their capacity – in this case max 22A charging current). For that, the Balmar would be completely oversized.
So the wiring has to be changed completely. A new 50mm2 cable is required from the alternator to the lithium bank, an a battery switch should be installed as a service disconnect for working on the alternator – and also a corresponding fuse for the cable. Laying the starter cable from the engine ignition switch on the control column to the engine compartment to the MC-614 was a bit more complex. With the starter cable, the charging of the lithium bank by the VE.Bus BMS or a manual switch can be interrupted at any time during operation without damaging the alternator. Then the Victron Orion-Tr Smart 12 / 12-30 DC-DC Charger had to be exchanged for a 12 / 12-18 and reconnected so that the starter battery can be charged further as required. The rest of the installation was absolutely uncomplicated, even for a layman like me with two left hands when it comes to manual skills ?
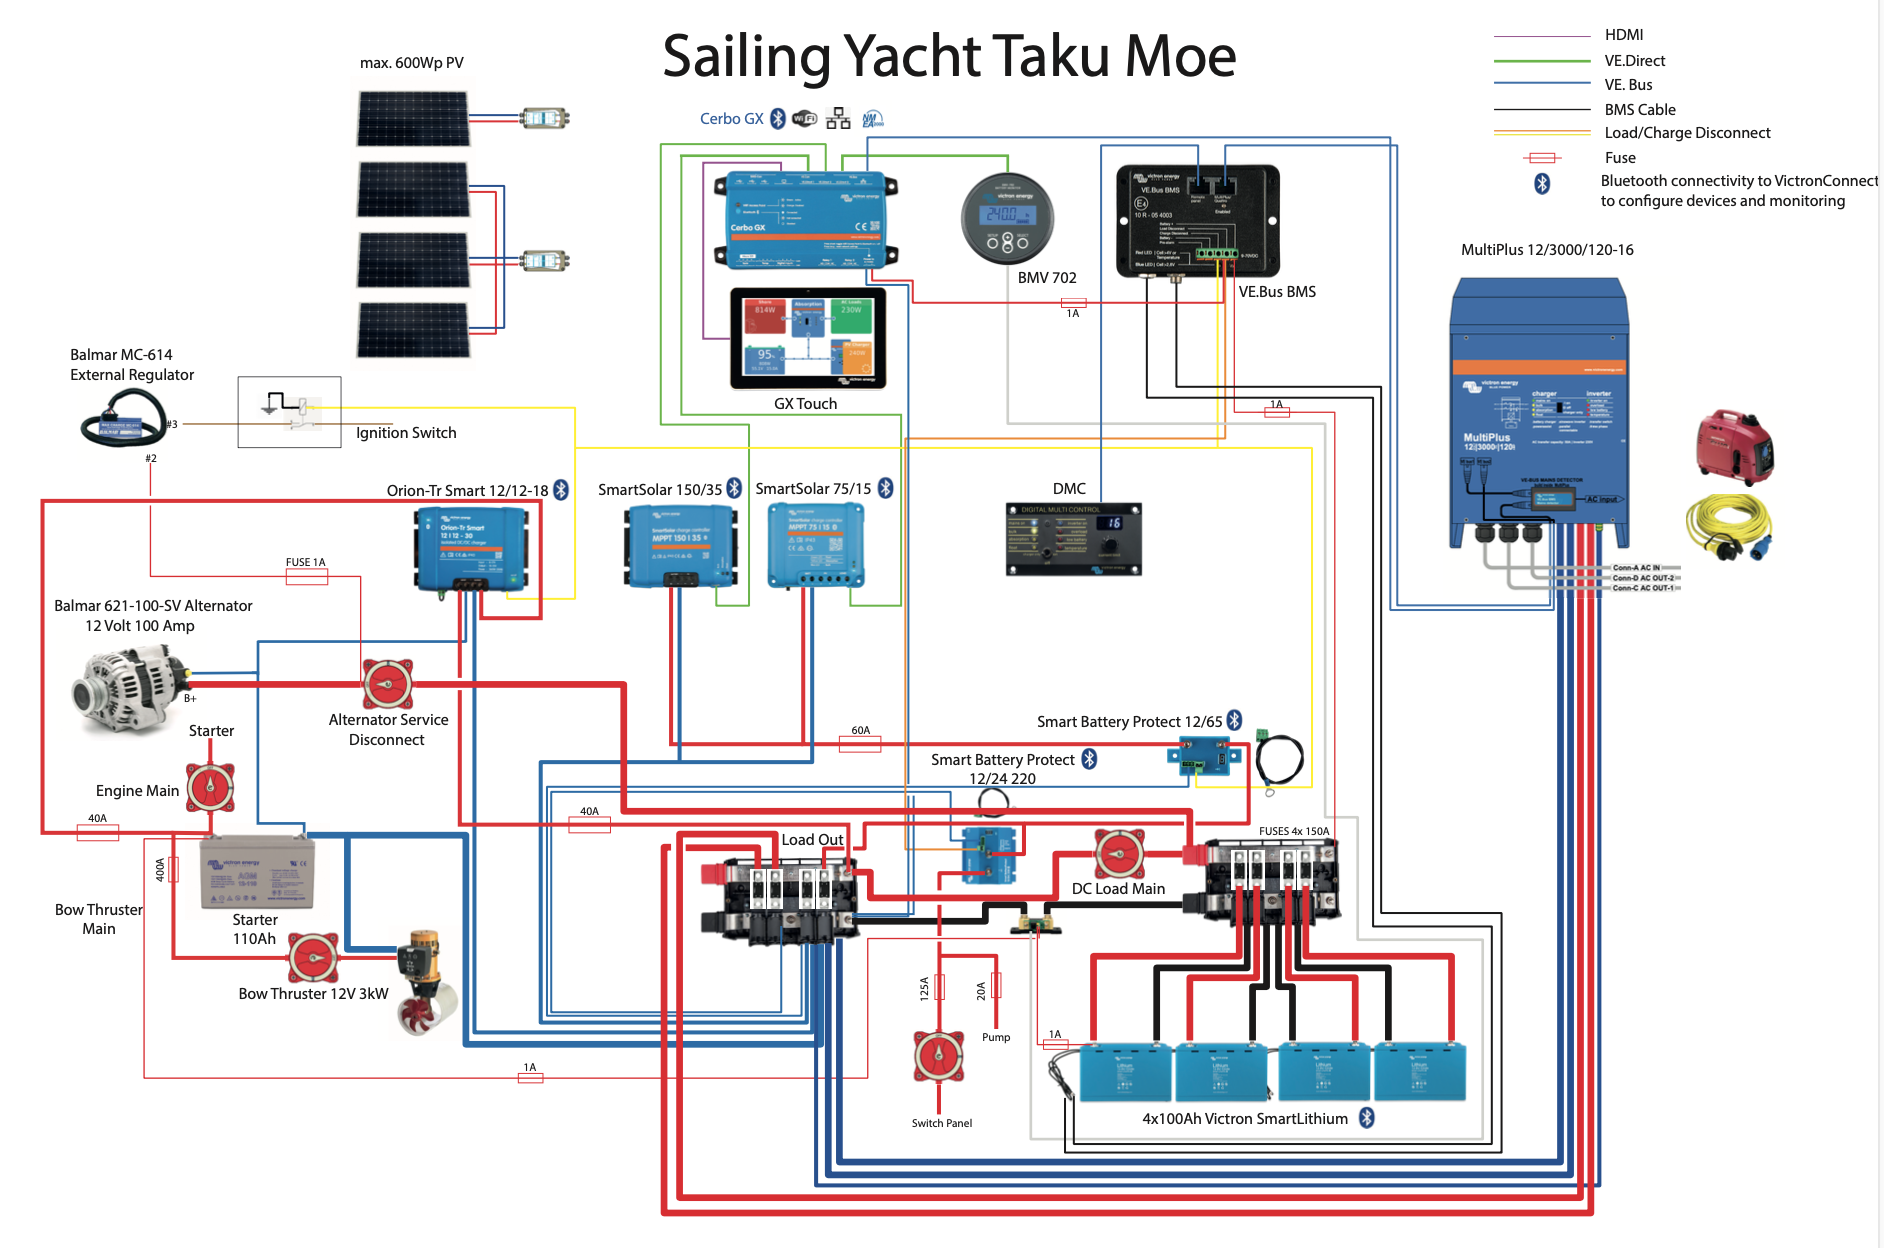
The new circuit diagram
Too bad that when we tensioned the V-belt we placed the tensioning lever exactly where a fresh water cooling water pipe runs from its pump. The pressure bent the line and loosened its seat in the pump – resulting in 5 litres of glycol-fresh water mixture in the engine bilge. A fitter then had to fix that ?
We carried out a first test without programming the MC-614 controller. Even when the engine was idling at 850 rpm, the clock showed more than 50A and at 2000 rpm it reached 80A. That was a good start.
However, the V-belt worries me a bit. With a width of 10mm, it is only suitable for 50A provision. Anything beyond that significantly reduces the service life of the belt. A wider V-belt won’t fit onto the V-belt pulley of the fresh water pump and flywheel. To solve the problem, new V-belt pulleys are required – ordered specifically for our engine: Balmar 48-VSP-2001 Pulley Kit for Volvo Penta 2001, 2002, 2003, 2003t with K6 V-belt pulleys for a V-ribbed belt.

The so-called Belt Manager of the MC-614 is now used to (at least temporarily) avoid the problem. The Belt Manager reduces the field voltage by approx. 5% per setting – with 9 settings available. At position 9 the field voltage is reduced by approx. 45%. Reduced field voltage means reduced output – by how much cannot really be predicted because other parameters such as temperature, V-belt tension etc. also play a role here. You just have to try it out. I chose the highest setting -9 when idling at 850 revs and got around 20A; at 2000 revolutions I got around 45A with a cold alternator. The small V-belt should not have any problems with amount of work and should last until the new V-belt pulleys are installed.
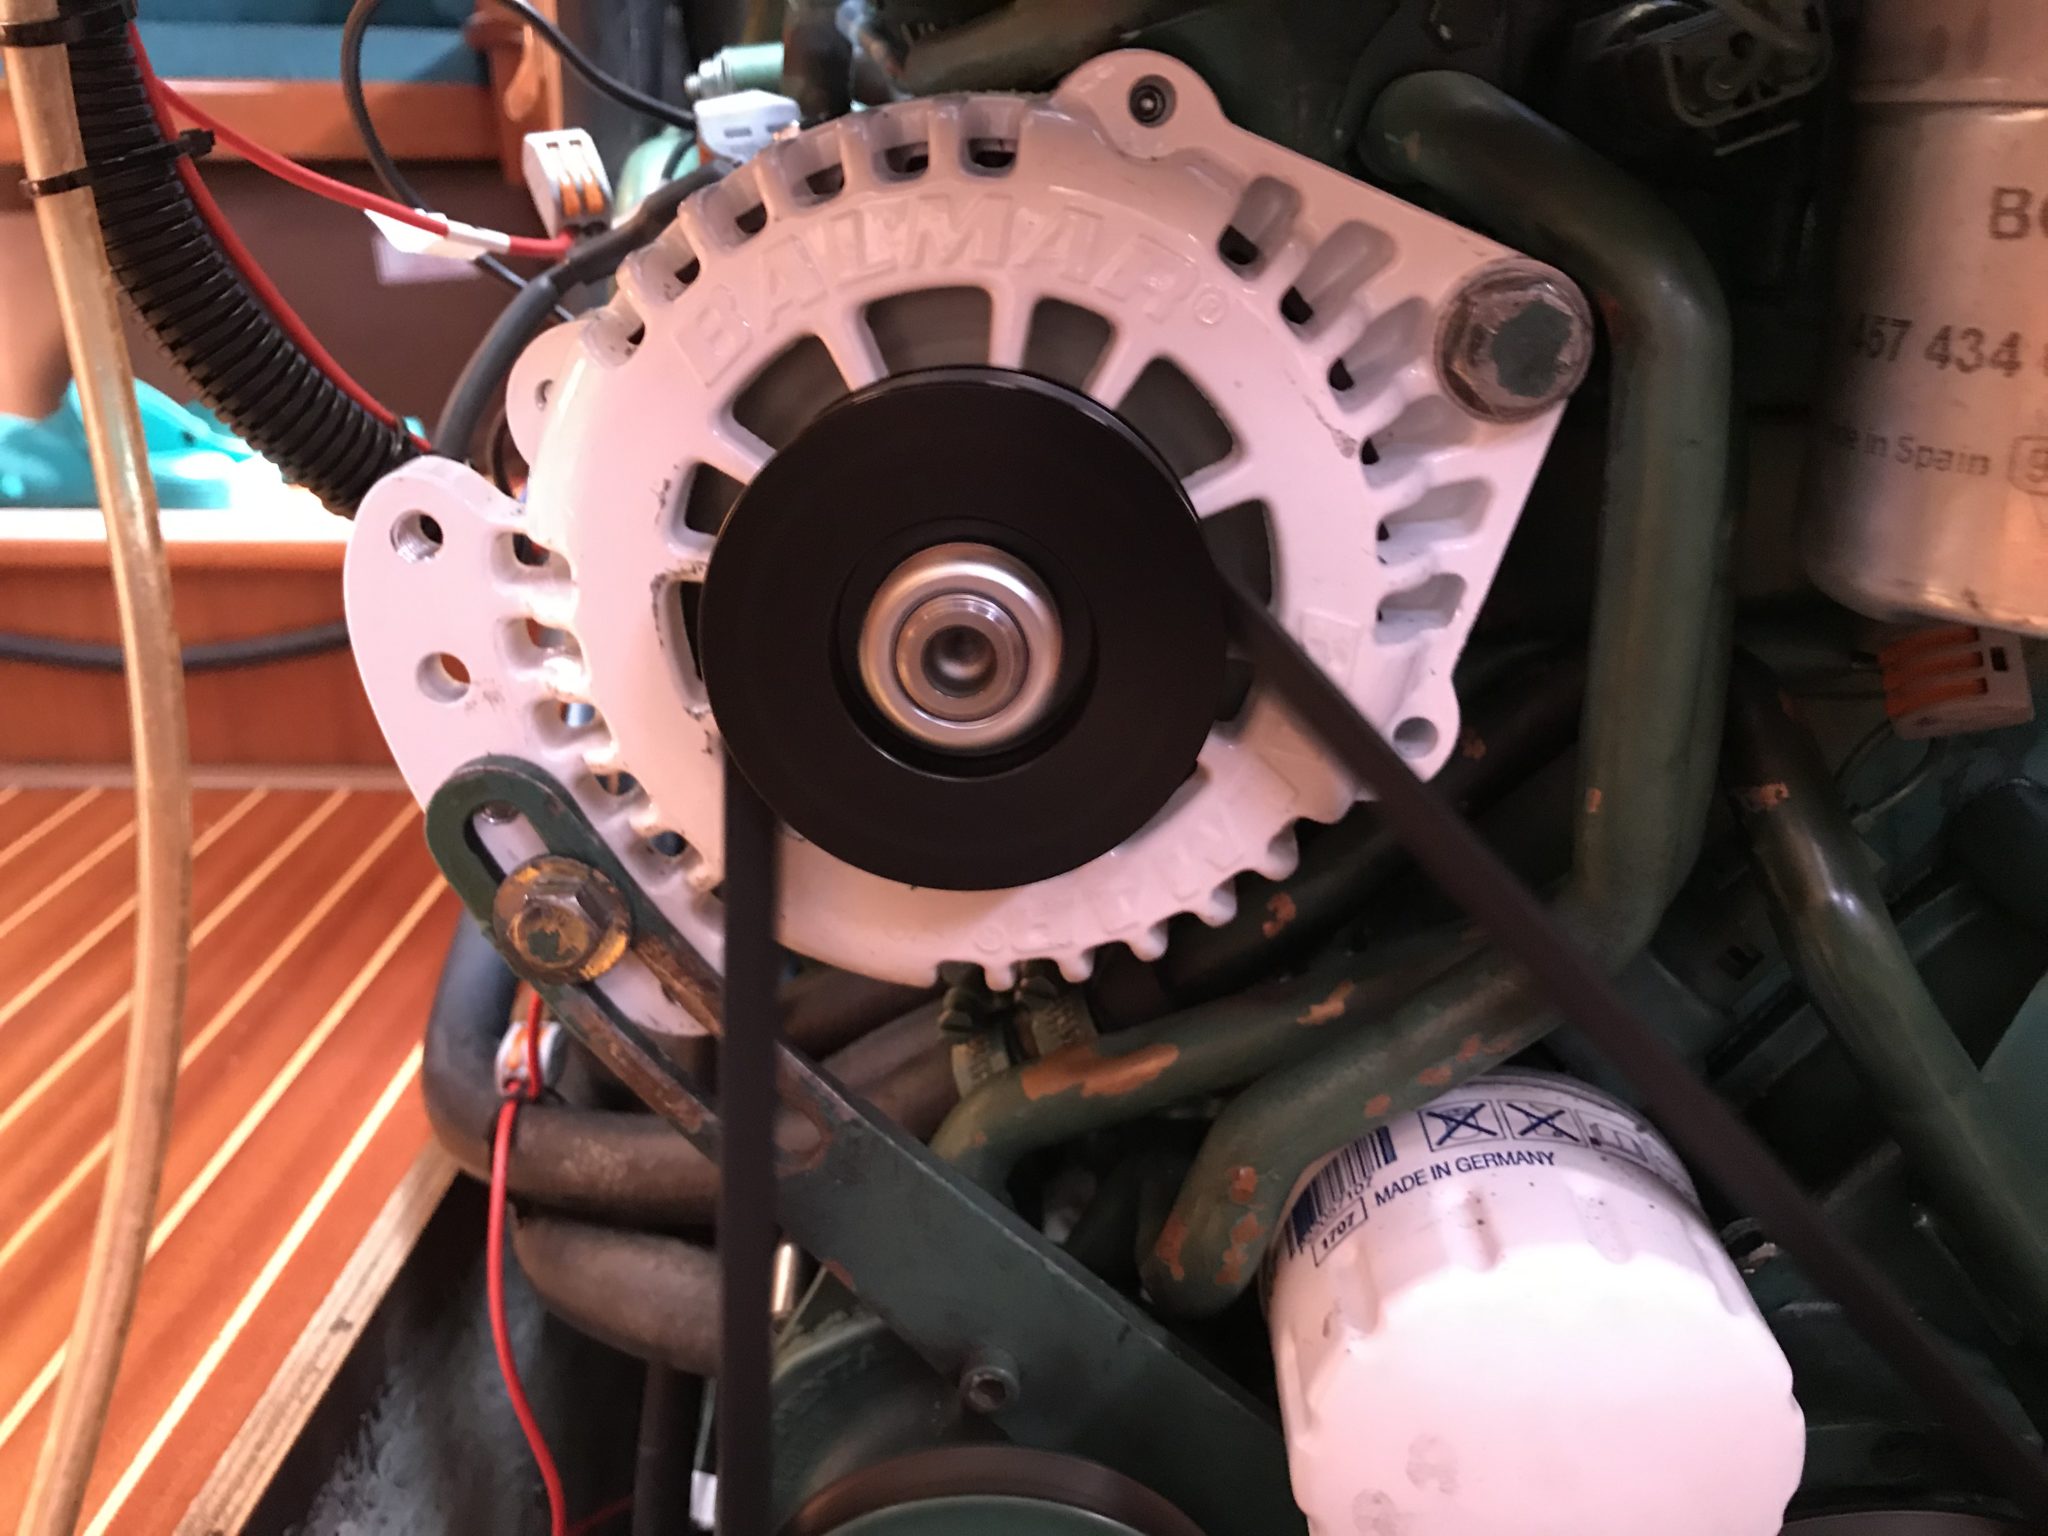
Balmar 621 100A alternator with 10mm (3/8 ″) V-belt installed
Programming the MC-614 takes some getting used to. The delivery package includes a magnetic pen with which a magnetic reed switch in the MC-614 can be switched. The controller can then be programmed using the reed switch. A little awkward, but do-able. You have to click through the menus serially until all settings are made. There are some great programming instructions on Marine How To – one of the best sources on the Internet when it comes to Balmar and the basics of electrical installation in the yacht sector.
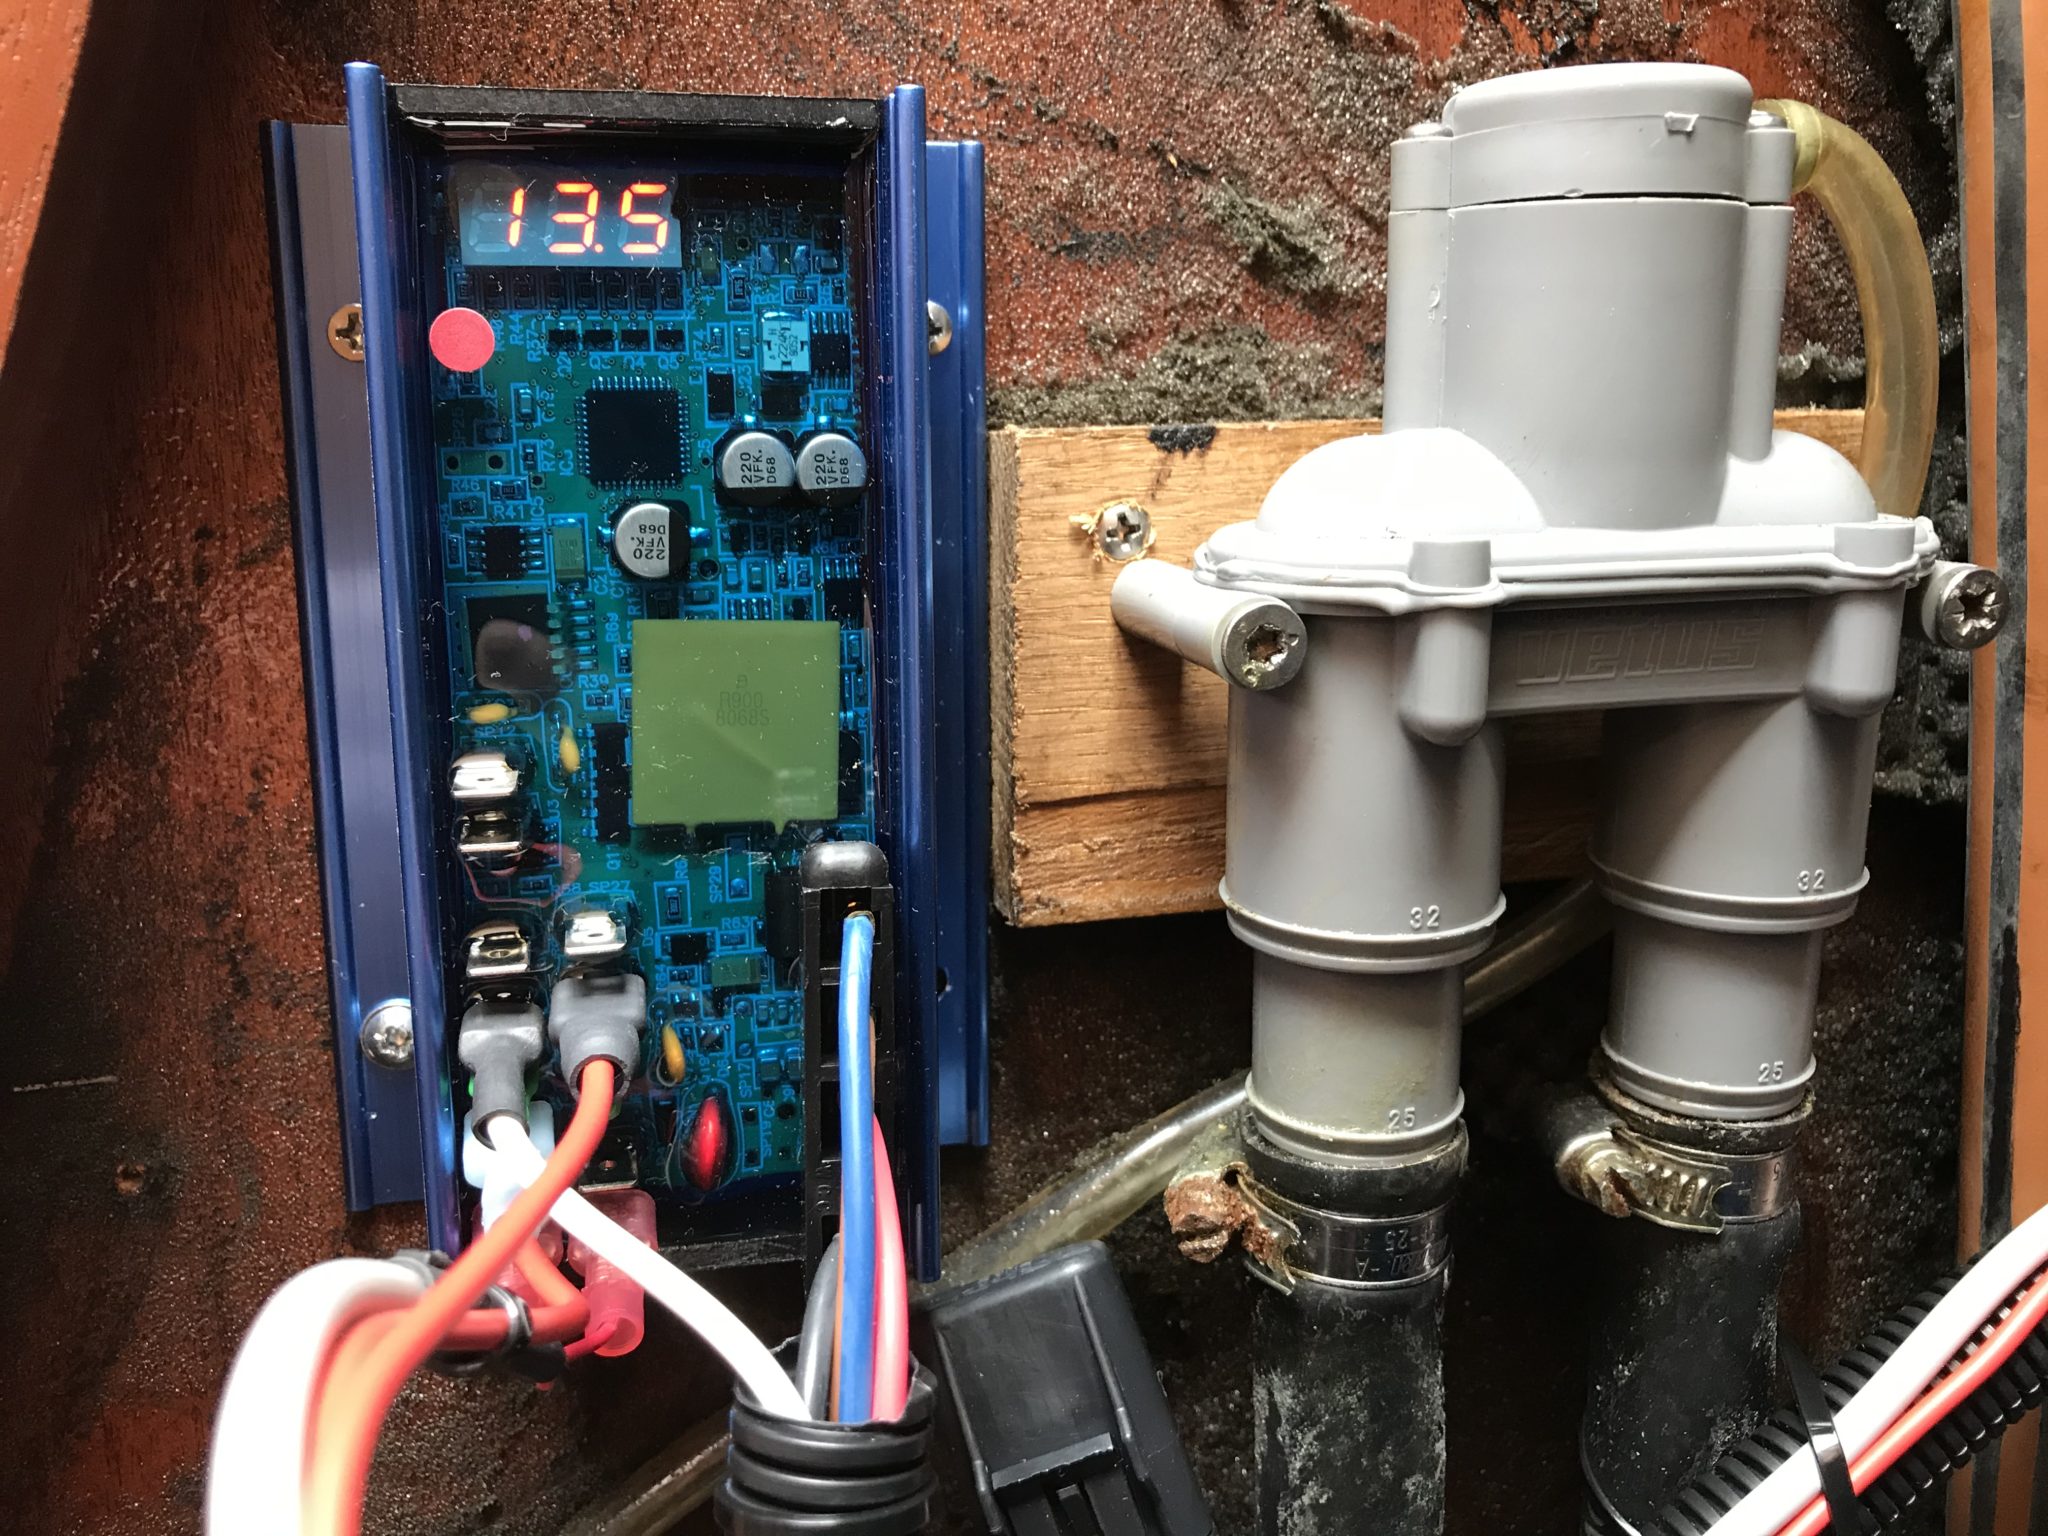
Balmar Max Charge 614 External Regulator – the red dot represents the reed switch
I have chosen the following settings for our Victron SmartLithium 12.8:
- bA Battery Type: LFP
- bEL Belt Load Manager: -9
- dLc Start Delay Programming: 1
- AHL High Voltage Limit: 14.2
- CL Battery Temp Voltage Compensation Limit: 14.2 (this means that no temperature compensation takes place)
- bu Bulk Voltage Limit: 14.2
- Au Absorption Voltage Limit: 14.2
- A1c Minimum Absorption Voltage Duration: 0.3 (corresponds to 18 minutes)
- Fu Float Voltage Limit: 13.4
- AL1 Max Alternator Temperature: 100 (° C)
- b1L Battery Over Temp Limit: 44 (° C – however no temperature sensor connected because the VE.Bus BMS is in control)
- SLP Battery Temp Compensation Slope: 0.0 (see also CL)

Regulator Programming Cheat Sheet can be downloaded from marinehowto.com
We’ll see how the Balmar alternator does with new V-belt pulleys.
Stop Press: The installation of the pulley kit seems to be a bit more difficult than I thought. Reason is the water pump pulley, which originally is not screwed to the pump and instead was cold-weld. Now I’m seeking for a solution to easily get the old pulley off and install the new one without destroying the pump. A fitter hopefully will get it done in the next few weeks.
German speakers will certainly wish to follow Stefanie’s blog.