13. VRM Portal
13.1. VRM Portal introduction
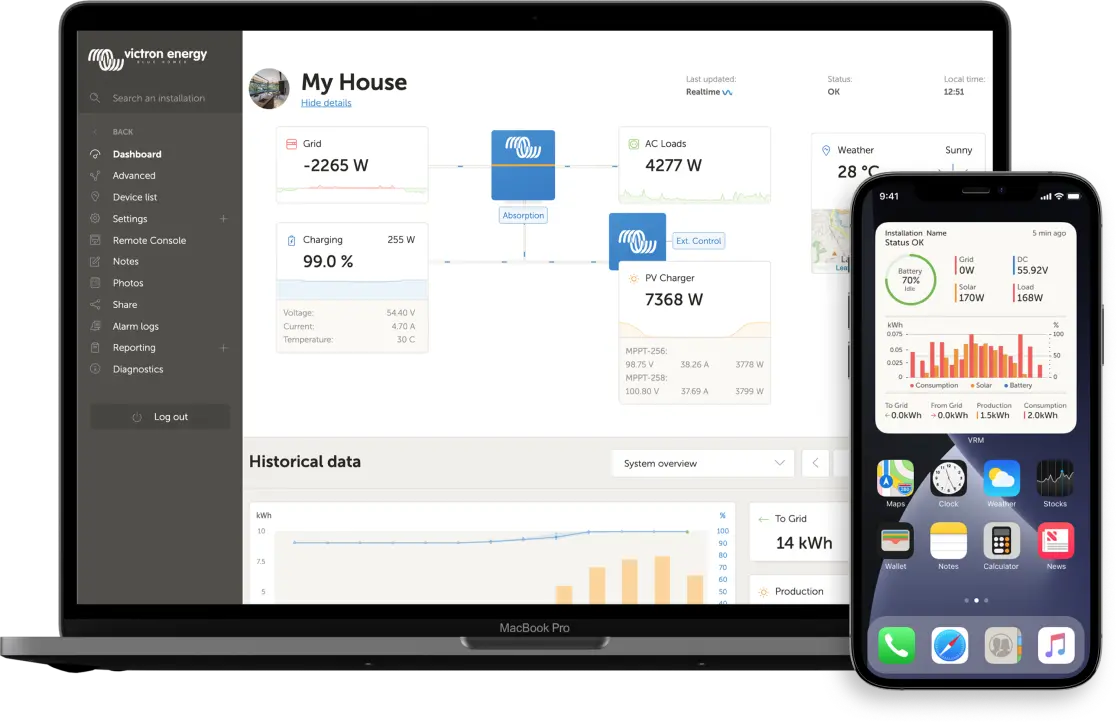 |
With VRM (Victron Remote Monitoring) you can remotely monitor, control, manage and optimise your Victron Energy systems and identify potential problems early by setting alerts and alarms.
When connected to the internet, a GX device unlocks a wide range of VRM Portal and VRM App features for monitoring, alerts, diagnostics, control, and management. Key features are summarised below.
Remote access: Easy access to all statistics and systems status online
Remote Console on VRM: Access and configure your system as if you were standing beside it
Remote firmware update: Update the firmware of connected solar chargers and other Victron products
Remote VEConfigure: Download and upload Remote VEConfigure files from and to the Multi/Quattro connected to your GX device
Remote Controls: Control devices such as the EV Charging Station, Inverter/charger, GX relay, Genset and ESS system remotely via VRM
Use of the VRM App for iOS and Android including VRM APP Widgets on your mobile device's homescreen
See the Internet Connectivity chapter for how to connect the device to the internet.
For a complete overview of all features and functions of the VRM Portal, see the VRM Portal documentation.
13.2. Registering on VRM
Detailed instructions are in the VRM Portal Getting Started document.
Note that the system must first successfully transmit data to the VRM Portal. If no successful connection has been established, the system cannot be registered to your VRM user account. In such cases, please refer to the sections Troubleshooting data logging and Remote Console on VRM - Troubleshooting below.
VRM device registration from touch screen
A GX device can be added to the VRM portal directly from a physical touch screen. The UI provides a QR code in Settings → VRM, removing the need to read the portal ID from the device sticker. This option is only available on physical touch screens such as the GX Touch 50, GX Touch 70, or Ekrano GX.
VRM device registration from Remote Console
A GX device can also be added to the VRM portal via Remote Console. The Settings → VRM menu includes a link button, removing the need to read the portal ID from the device sticker.
13.3. Datalogging to VRM
Datalogs are transmitted to the VRM Portal via the internet, whenever available. All relevant settings are accessible via Device List → Settings → VRM online portal in the VRM Portal menu. The datalog transmission is designed to function reliably, even over poor internet connections. Connections experiencing up to 70% sustained packet loss are still adequate for data transmission, although some delay may occur. Note that data log transmission to VRM depends on the Access settings for Remote Console & Controls pane in VRM, which must be set to either Full (default) or Read-only. |  |
Adding External Storage
If the GX device cannot transmit logs to the VRM Portal, it stores them internally in non-volatile memory, retaining data even during power loss or reboot.
The internal buffer can hold logs for several days. To extend this period, insert a microSD card or USB stick. Check internal storage status via the settings menu. When external storage is inserted, internally stored logs automatically transfer to it, ensuring no data loss.
Regardless of external storage use, the GX device continually attempts to reconnect to the VRM Portal and upload any stored logs. Even with significant backlogs, data will be transmitted once internet connectivity is restored. Data transmission is compressed, significantly reducing bandwidth usage compared to continuous transmission.
Storage Device Requirements
Supported file systems: FAT (12, 16, 32), exFAT, ext3, and ext4.
MicroSD cards (SD and SDHC types) up to 32 GB typically come pre-formatted with FAT12, FAT16, or FAT32 and can be used immediately. Avoid reformatting them to unsupported file systems.
Manually Transferring Datalogs to VRM
For GX devices without permanent internet connectivity, data can be manually uploaded using a computer:
On the GX device, go to Settings → VRM and select Eject storage. Always eject storage devices properly to avoid data loss or corruption.
Remove the storage device and insert it into an internet-connected computer.
Open a web browser, and go to the VRM Portal.
Log in and navigate to the Installations menu:

Click Upload GX file and follow the on-screen instructions (note the max file limit of 200MB):

After uploading, delete the file from the storage device before re-inserting it into the GX device. While duplicate uploads do not cause issues, it is best to avoid duplication.
Storage space requirement:
Approximately 25 MB per month (with a one-minute log interval), depending on connected devices.
A 1 GB microSD card can hold roughly three years of data, comfortably exceeding VRM's 6-month retention period.
Once full, no additional data is logged.
If multiple storage devices are inserted, the GX device uses the first inserted device. If removed, logging continues internally until new external storage is inserted.
Network Watchdog: Reboot device when no contact
This optional feature (Settings → VRM - disabled by default) reboots the GX device if it fails to connect to the VRM Portal. Configure the "No contact reset delay" to set reboot intervals. For example, setting a one-hour delay causes hourly reboots until connectivity is restored.
13.4. Troubleshooting data logging
This section provides guidance for troubleshooting issues when the GX device cannot transmit data to the VRM Portal.
Initial check
First, verify that the GX device is connected to the VRM Portal and confirm if data transmission is occurring.
Notice
Temporary internet connectivity issues are not a concern. Any unsent data logs will be temporarily stored on the GX device and automatically uploaded once connectivity is restored.
|   |
Required communication for sending data logs to the VRM portal:
For further details, refer to the FAQ Q15: What type of networking is used by the Cerbo-S GX (TCP and UDP ports)? on network requirements. |  |
Troubleshooting Steps
1. Update Firmware:
Ensure the GX device firmware is current (see the Firmware updates chapter for details).
2. Verify Network and Internet Connection:
|  |
3. Check the Connection error status
|  |
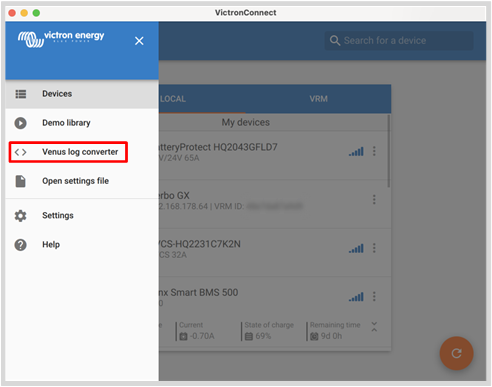
13.5. Analysing data offline (without VRM)
In situations where internet access is unavailable, such as remote installations, data logs can be analysed locally without uploading to the VRM Portal.
|  |
13.6. Access settings for Remote Console & Controls pane in VRM
The level of access to the Remote Console and Controls pane can be configured via the VRM Portal settings menu (Settings → VRM → VRM Portal). By default, full access is enabled, allowing settings to be modified directly via the Remote Console or the Controls pane on the VRM dashboard. For improved security or to reduce data usage, access can be set to Read-only or Off. The table below summarises how each setting affects data transmission, real-time mode, the Controls pane, VC-R, and VRM remote firmware updates, helping you choose the appropriate level for your operational requirements. |  |
VRM portal option | Normal data transmission | Real-time mode(1) | Controls pane (on the VRM dashboard) | New UI on VRM | Classic UI on VRM | VictronConnect Remote and Remote firmware updates in VRM |
|---|---|---|---|---|---|---|
Full (default) | Enabled | Enabled | Enabled | Enabled | Enabled(3) | Enabled |
Read-only | Enabled | Enabled | Disabled | Enabled(2) | Disabled | Disabled |
Off | Disabled | Disabled | Disabled | Disabled | Disabled | Disabled |
(1) Disabling VRM real-time mode can be done on the VRM portal. This can be useful to reduce bandwidth usage on costly connections. (2) Enabled, but it's not possible to change any controls or settings. (3) When the Remote Console feature is Enabled in the GX settings. | ||||||
13.7. Remote Console on VRM - Troubleshooting
Follow these steps to resolve Remote Console issues on VRM:
Confirm VRM portal logging functionality. See Datalogging to VRM and Troubleshooting data logging. Without this; Remote Console on VRM will not work.
Check that VRM Portal access is set to "Full" or "Read-only" (Settings → VRM → VRM Portal). Refer to Access settings for Remote Console & Controls pane in VRM.
Update the GX device to the latest firmware version.
After restarting, confirm the VRM Online Portal menu connection status shows "No error". If an error persists, review step 3 in the Troubleshooting data logging section.
Verify your web browser can access the following URL:
https://ccgxlogging.victronenergy.com/ - A 403 Forbidden or 405 Method Not Allowed error confirms HTTPS connectivity is working correctly.
Click the link to check. Note that seeing an error message means everything is functioning correctly. If you encounter a timeout or any other browser error, there may be a firewall blocking the connection.