 Add this page to your book
  Remove this page from your book
  Manage book (
 Help
Help Table of Contents
Venus OS: Root Access
1. Introduction
This document explains how to access a GX device via SSH, or straight on the Serial Console, with the root user. It also covers customizing and hardening a GX device against nonauthorised access.
This document is part of the Venus OS developer documentation. The main document is the Venus OS wiki on github.
Do note that, while we try to maintain to provide all mentioned functionality in this document, the used commands and functionality may change with future updates.
2. Understanding the partition layout
The chapters below refer to the rootfs, data partition, /data and so forth. Before getting into that, first a short explanation.
The disk on a GX device, as well as the SD-card of a RaspberryPi after installing Venus OS on that, is split in to multiple partitions:
- boot. Normally invisible, except for RaspberryPi when inserting it in another computer
- rootfs1. First copy of Venus OS, when active, mounted at
/ - rootfs2. Second copy of Venus OS, when active, mounted at
/ - data. User settings and log files, mounted at
/data
Why are there two rootfs-es?
Venus OS employs a so-called dual boot system. This is to allow for safe and reliable software updates. It works by maintaining two copies of the operating system, one active and one standby. For example, when rootfs1 is the active one, and an update of Venus OS is executed, then the new version is installed on the other partition, rootfs2. And once completed, that one is marked as the active one, GX device is rebooted “into” rootfs2.
3. Warning about modifying Venus OS
1. Changes can be lost during an update of Venus OS
Changes made to the rootfs will be lost in case of a firmware update. That is because updates on Venus OS are image based, and as a result the complete rootfs is overwitten during an update.
Of course it is always possible to disable automatic firmware updates. Also there is a data partition (/data), which will be left alone in the image updates, and as such can be used to, upon boot, (re-)install certain changes onto the active rootfs. More details on that below.
2. It is possible to brick your GX device
For those unfamiliar with the term: Bricking means rendering it useless and unrecoverable. Chances of this are small (depending on what you do), but its certainly possible. And if not fully bricked, then at least in a state from which there is no documentation nor support on how to recover.
Note that a solution to this is to do Venus OS experiments on a RaspberryPi rather than a real GX device. The advantage of a raspberrypi is that you can always start from scratch, by re-imaging the sdcard. And the other is that it (the pi) is a low cost device. more information on that.
The factory reset procedure, as documented in the normal user manuals of the GX devices, removes everything from the data partition, except for the factory installed files. This will recover from issues caused by problems on the data partition, such as it being full or invalid settings or custom scripts.
But it will not recover from all possible mistakes that can be made. Some examples:
- if you accidentally remove files crucial for the boot process, either on the boot partition or the rootfs, then the device won’t boot anymore. The above mentioned factory reset feature depends on at least certain parts of the system booting up properly. More specifically, it depends on the linux init process.
- if you remove the files in /data/venus, then -depending on the production date- you might have to restore those manually which might require serial console access. See below. Why does this depend on the production date? Thats because somewhere in 2021 we started writing all factory data to a different place (an eeprom) to make it more robust.
4. How to obtain root access
4.1 Set access level to Superuser
To set the root password, first set the access level to Superuser.
- Go to Settings, General
- Set the Access Level to User and installer, the password is
ZZZ - Highlight Access Level (don't open the select page, ie. make sure you are in the General Page, not the Access Level page)
- Press and hold the right button of the center pad until you see the Access Level change to Superuser. Note: when working from the Remote Console using the Classic UI, you need to use the right key on your keyboard. Pressing and holding the right button with your mouse won't work. When using the New UI, select, drag down and hold down the entire list of the Access & Security menu entries for five seconds, and until you see the Access level change to super user.
Now you have access to the super user features.
Note that on a touchscreen, such as a Cerbo GX + GX Touch, there is no “right button”. Instead, drag the menu down and hold it down for five seconds. Or, use Remote Console.
4.2 Create a temporary root password
Go to Settings → General → Set root password. And create a temporary root password.
Note that the root password will be reset by a firmware update. The reason is that the passwd file is on the rootfs, which is fully replaced by an update. More info here.
Our advice is to create a complex root password. But use it to login only the first time, and then install a public ssh key(s). Thereafter login with the keys. If key authentication works, you can
safely disallow root logins with a password with echo 'root:*' | chpasswd -e .
The password needs to be 6 characters long, minimum.
Note that the root password is stored on the rootfs, causing it to be marked as modified. This is normal, and visible in the UI like this:
ssh keys are installed on the data partition, and therefore don't require having a rootfs that is marked as modified.
4.3 Enable sshd and log in
To login via ssh, enable SSH on LAN (Settings → General). On Venus versions before v2.40, you need to enable Remote Support, which also enables sshd. More info on Remote Support here.
To the login, enter the ip address of the GX device in a ssh client. Most Linux and Mac users will simply do this from the command line:
ssh root@192.168.1.23
And a very commonly used client for Windows is Putty. For more info, look around on the Internet, there is plenty information available.
4.4 Installing ssh keys
Using a ssh key for authentication, instead of a root password, has the advantage that it isn't lost during a firmware update. The keys are stored on the /data partition.
First set the root password (once), use that to login, and then copy a public ssh key to ~/.ssh/authorized_keys.
sshd works with three authorized keys files:
~/.ssh/authorized_keys← you can use this freely~/.ssh/authorized_keys2/usr/share/support-keys/authorized_keys
The third file contains the keys we use for Remote Support login.
4.5 Play time! Start executing commands
5. Customizing a GX device
5.1 Hooks to install/run own code at boot
Everything, except for information on /data, will be wiped after an update.
Therefore, the trick to make changes & modifications survive an update, is to put your (patch)files on /data, make them be (re-)installed automatically on startup.
If the files /data/rcS.local or /data/rc.local exists, they will be called early (rcS) and late (rc) during startup. These scripts will survive upgrades and can be used by customers to start their own custom software. Implementation details in this commit.
Also if venus-data.*.{tar.gz,tgz,zip} is found on removable storage (usb stick, sd-card) when booting, it will be unpacked into /data. Implementation details in this commit. Added per Venus v2.30~28. Use this to for example make a USB stick that installs the modifications. You can combine multiple files on the device; they will be run in alphabetical order.
That venus-data file has one extra feature: if the archive contains rc/* files, it will extract those first. And if there is a file called rc/pre-hook.sh it will run this before unpacking the rest of the archive. Similarly, if there is a file called rc/post-hook.sh, then that file will run this after the unpacking of the archive. For details, read the code in the /etc/rc5.d/S30update-data.sh file.
You can draw further inspiration from here, where the code resides to generate files for making backups of the /data partition, resetting Node-RED and SignalK and more scripts.
You can test the 'update' with
/opt/victronenergy/swupdate-scripts/check-updates.sh -update -force
which will install the same version again, but in the other rootfs.
For details of the used update mechanism, see here: https://github.com/victronenergy/venus/wiki/swupdate-project
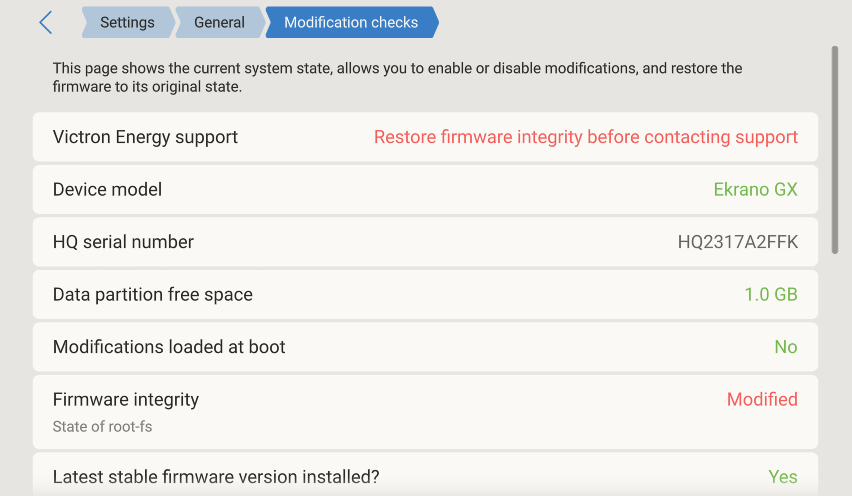
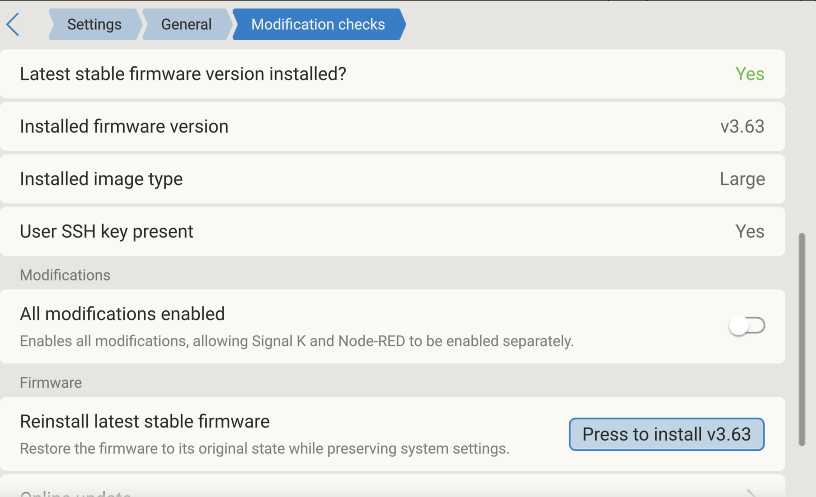
User setting that enables and disables modifications
In the Settings → General → Modification checks menu, there is an option called “Modifications enabled”. This is set to enabled by default.
When set to disabled, the GX renames the /data/rc.local to /data/rc.local.disabled, and similar for rcS.local. It will do this at every boot, as long as the Modifications are disabled.
Here is a screenshot that section of the menu:
5.2 Read-only rootfs and available disk space
5.2.1 Read-only rootfs
By default, the rootfs is mounted read only. Also, by default, it only has 5% of free space, while the partition in which its installed is actually larger.
The recommended method to (a) mount it as read/write, and (b) expand it to use all of the available space in its partition, is by running /opt/victronenergy/swupdate-scripts/resize2fs.sh.
Here is a short overview of the three ways mount the rootfs as read/write:
- temporally: issue the command
mount -o remount,rw /(which holds until the next reboot or issueingmount -o remount,ro /) - semi-permanent: issue the command
/opt/victronenergy/swupdate-scripts/remount-rw.sh(which holds until the next firmware update) - permanent: adding one of the above commands to
/data/rc.local(which holds permanently)
5.2.2 Always prevent running out of diskspace
When doing modifications, make sure both the data partition and the rootfs do not run out of space. We don't design or test for that situation.
With regards to the size of the data partition, thats easy to check using the df utility. But not so for the rootfs:
After logging into a GX device, and checking the free disk space on the rootfs (! that is not the data partition), you might get a bit disappointed at first. Don't worry about that, there will always be only 5% of free space, but thats not the actual free space:
The reason for this is that a firmware update replaces the full filesystem on the rootfs, as an image. And its then not by default expanded to the full available space of the partition.
To expand it, run /opt/victronenergy/swupdate-scripts/resize2fs.sh. It will expand the filesystem to use all of the available space.
Also this remounts that rootfs as read-write.
For actual available diskspace on our GX Devices, see https://github.com/victronenergy/venus/wiki/machines.
To see what resize2fs.sh is doing, without having to log into your Venus OS, see it also here.
Note that a firmware update will replace all of the rootfs, as also explained above. Which implies that you'll need to run resize2fs.sh again after doing a firmware update.
In the New UI, you can see available disk space on the data partition in the Settings → General → Modification checks menu.
5.3 Creating a patch file
As mentioned before, the recommended way of customising Venus OS is by applying patch files. This section describes how to make and apply a patch.
You start by making a copy of the original file and modifying it to accommodate your changes. In order to create a patch file containing the changes you’ve made, run the following command:
diff -u OriginalFile UpdatedFile > PatchFile
In order to patch the original file with your changes, you can use the below command:
patch OriginalFile < PatchFile
For more advanced features please check the manual page of diff and patch.
In this thread, there is an example of how to make a patch file to change a certain setting in the GX, and how to apply that at boot. To make it survive a firmware update: https://community.victronenergy.com/idea/201826/lets-define-a-local-ntp-server.html
5.4 Adding or modifying services
Changes made to /service will not survive a reboot. The
reason is the /etc/rcS.d/S10overlays.sh script, which copies over the files
from /opt/victronenergy/service/* to /run/overlay/service and bind mounts
that under /service. So in order to have changes survive a reboot, you need
to change the service under /opt/victronenergy/service/* instead of under
/service.
Further details here: https://github.com/victronenergy/venus/wiki/howto-add-a-driver-to-Venus#installing-a-driver-that-doesnt-depend-on-a-serial-port
6. Hardening a GX device
6.1 Limit physical access to the device
The first thing to keep in mind is that we as Victron Energy always want an end-user with physical access to the device to be able to gain access to the device again after he has himself accidentally locked out.
So the best solution to keep people from tampering with a Venus device is to block physical access to the device. We do not give specific recommendations regarding that, but a compact server rack with key protection seems to be safe enough in most cases. You can also add an alarm on the digital input of the Cerbo that will ring as soon as the door of the rack opens.
People with enough time, knowledge and for example an angle grinder on their hands will always be able to get in. But you will probably be able to tell if people did get access to the device. Also keep in mind that extra physical security will also give extra hassle for the people that are allowed to get the physical access to the device.
6.2 Disable touch on the attached screen
There is a feature that allows disabling the touch feature on the GX Touch display.
This allows mounting the GX Touch where it is visible by the operators of the system; and at the same time prevent them from using that to elevate their access.
Details per GX device:
- Ekrano GX: a digital input can be configured to be used for this. Wire it to a momentary-push button, that shorts the input (grounds it).
- Cerbo GX + GX touch: a digital input can be configured to be used for this. Wire it to a momentary-push button, that shorts the input (grounds it).
- Venus GX: has no screen, not relevant.
- Color Control GX: will not get this feature.
Inside Venus OS, this is handled by the setting /Settings/Gui/TouchEnabled under com.victronenergy.settings. Which can be scripted with the dbus -y command. See Limiting digital access for an example on how to do that.
Note that this setting only disables touch/mouse control. On the remote console you are still able to control the device with keyboard input. That is also true if you plugin an external USB keyboard. With the keyboard it is also possible to toggle the /Settings/Gui/TouchEnabled setting by pressing the Pause/Break key key. So if you need this feature to be switched on, make sure that the USB ports are not accessible.
6.3 Limiting digital access
When securing the device, it is also advised to disable the Wi-Fi access point, bluetooth and other non-essential services on the device. The below list should be treated as a starting point and can be extended up on:
- Disable remote touch control
- Disable bluetooth
- Disable Wi-Fi Access point
- Set Access level to User
- Disable LAN SSH
- Disable LAN remote console (VNC)
- Disable Modbus TCP
- Disable MQTT (via SSL, plaintext and VRM)
If you have multiple devices to harden, here is an example of how to automate the process in a scriptable way. Note that we might change those commands, or names and locations of those settings. Therefore, make sure to be careful to check for example the exit code of such script, as well as visually confirm that all works as expected:
  #!/bin/bash

  items="
  Disable remote touch control;com.victronenergy.settings;/Settings/Gui/TouchEnabled;0
  Disable bluetooth;com.victronenergy.settings;/Settings/Services/Bluetooth;0
  Disable Wi-Fi AP;com.victronenergy.settings;/Settings/Services/AccessPoint;0
  Set access level to User;com.victronenergy.settings;/Settings/System/AccessLevel;0
  Disable LAN ssh;com.victronenergy.settings;/Settings/System/SSHLocal;0
  Disable LAN Remote console (VNC);com.victronenergy.settings;/Settings/System/VncLocal;0
  Disable Modbus TCP;Settings/Services/Modbus;0
  Disable Modbus TCP (Plaintext);Settings/Services/MqttLocalInsecure;0
  Disable MQTT on LAN (SSL);Settings/Services/MqttLocal;0
  Disable MQTT on LAN (Plaintext);Settings/Services/MqttLocalInsecure;0
  Disable MQTT via VRM;Settings/Services/MqttVrm;0
  "

  IFS='
  '
  for item in ${items}
  do
    IFS=';' read -r description service path value  <<< ${item}
    echo "# ${description}"
    dbus -y ${service} ${path} SetValue ${value}
  done
There are a lot more settings that can be adjusted this way. Easiest is using
dbus-spy to check which ones you find interesting. Instead of disabling services,
you might want to enable some things too. Just replace the 0 with a 1 to do
that.
6.4 Installing a tamper alarm
By using the digital input(s) of the GX device, you can set the digital inputs as “Burglar alarm”, which can be used to be alerted on tampering events.
Depending on the need, you might want to switch to a silent alarm under General → Audible alarm
(service: com.victronenergy.settings, path: /Settings/Alarm/Audible).
You can decide whether the input should be treated as an alarm condition, whether the labels should be inverted, and whether the logical levels should be inverted.
- To swap the labels attached to the alarm, set Inverted to on.
- If a logical low input (0V) should be considered a positive condition, set Inverted alarm logic to on.
6.5 Hardening multiple devices
If you have a lot of Venus devices to modify, probably the easiest way is to
start with using a per-device specific password for the remote console, which
only you can can generate. Combining that with a substring from something like
/opt/victronenergy/venus-eeprom/eeprom –show serial-number | sha256sum is a
fairly secure start.
Later replace that by something more strong and store it in your vault. Use the USB stick to put your public ssh keys on the GX device so you can gain remote access.
7. Connecting on the serial console
The serial console offers a straight connection from your computer. Not relying on TCP or anything else.
Its an alternative to connecting to the commandline over ssh.
Connecting to the serial console requires a USB interface, ie a USB to serial cable with proper pin-out. For example this one: https://www.adafruit.com/product/954.
The serial consoles on all GX devices are configured to 115200 baud.
7.1 Color Control GX
All GX Devices have a dedicated serial console, except for the CCGX. Therefor its documented on a separate page:
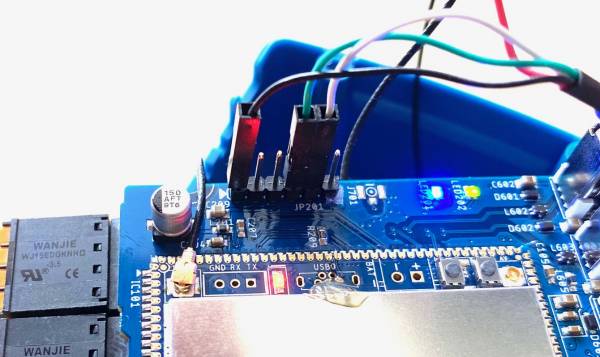
7.2 Cerbo GX
The serial console is located on the CPU board, header JP201. GND is pin 1, RX and TX are pins 4 and 5. Here is a picture showing a ADA Fruit Serial Console cable connected to it.
Make sure not to connect the red wire.
7.3 Venus GX
The serial console is located on the base-board, and can be accessed through the slot between that board and the Ethernet connector on the beaglebone-board.
- White: TX of the Beaglebone - connect to RX on your cable
- Black: ground
- Green: RX of the Beaglebone - connect to TX on your cable
Make sure not to connect the red wire.
Here is a picture showing how, also using the adafruit serial console cable as referenced above:

7.4 GX Card / Nanopi
The GX Card is the PCBA inside the MultiPlus-II GX and EasySolar-II GX product ranges. This photo shows the card, when unmounted from these inverter/chargers.
Maybe the pins are also accessible without dismantling it, maybe not. Note that all this is at your own risk, as everything on these pages is.
The serial console is the pinheader on the right of the photo. In the photo, there is an Adafruit serial console cable connected.

7.5 Octo GX
The serial console is located on the base-board, and can be accessed with the top-board unmounted. With the serial console cable connected the top-board can be put back on again.
- Black: ground
- NC
- NC
- Green: RX of the Beaglecore - connect to TX on your cable
- White: TX of the Beaglecore - connect to RX on your cable
- NC
Make sure not to connect the red wire.

7.6 Ekrano GX
Getting to console on the Ekrano GX is not that easy. The pins are located between the network and USB connector on the back of the device.
- Black: ground
- NC
- NC
- Green: RX of the Ekrano GX - connect to TX on your cable
- White: TX of the Ekrano GX - connect to RX on your cable
- NC

7.7 Nucleo GX
The pins are located after the VE.Can 2 ports.
- Black: ground
- NC
- NC
- Green: RX of the Nucleo GX - connect to TX on your cable
- White: TX of the Nucleo GX - connect to RX on your cable
- NC
