 Add this page to your book
  Remove this page from your book
  Manage book (
 Help
Help This is an old revision of the document!
Table of Contents
Changing NMEA2000 instances
1. Introduction
Instances are used in an NMEA2000 network to identify multiple similar products connected on the same network.
As an example, take a system with two battery monitors (one for the main battery bank, and another for the hydraulic-thruster bank) and also a Quattro inverter/charger. All three of those devices will send their battery voltage measurements out on the canbus.
For the displays to show these values at the right place, they need to know which voltage belongs to what battery.
Before going ahead and change instances, please make sure to first study the NMEA2000-out chapter in the GX manual.
How can I change the instances?
This document describes three options:
- Use Actisense software & hardware. Can change both the device- and data-instances
- Use Maretron software & hardware.
- From the commandline of a GX device. Note that this is a software developer trick. Not for any day use.
Device instance, data instances and other instances
There various types of instances. Please make sure to study the NMEA2000-out chapter in the GX manual before continuing.
In summary, and as per NMEA2000 specification, it should not be necessary to change a data instance such as the DC instance.
Required hardware
Changing the device instance requires an usb-canbus adapter to link the CAN-bus network to your computer:
- For Actisense, see the Actisense NGT-1
- For Maretron, see their USB100
Related information
For more detailed information, see also the FAQ in our Data communication whitepaper.
And the main NMEA2000 integration guide.
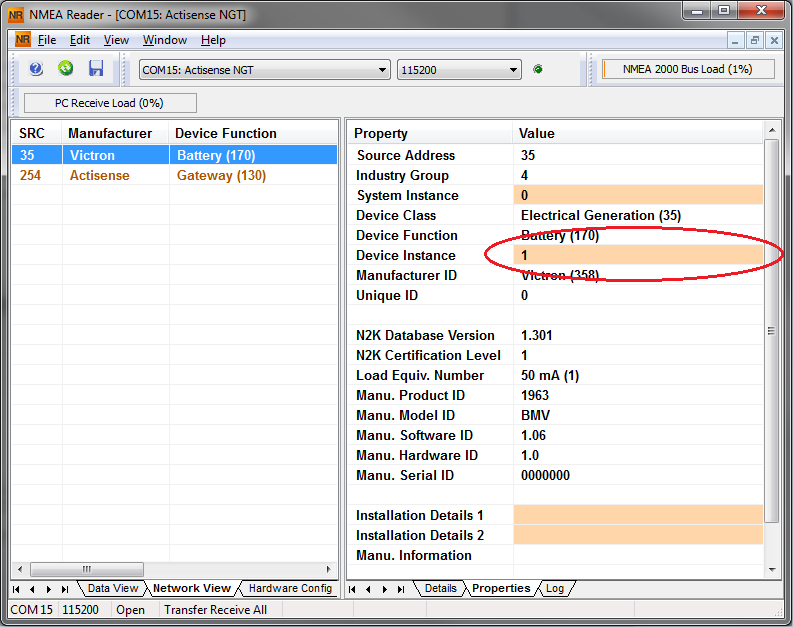
2. Changing the device instance with Actisense
Note: make sure to use a recent Actisense driver. Otherwise the instance might not ‘stick’.
Changing a device instance:
- Open Actisense NMEA Reader
- Select the network view (tab selection is at the bottom left)
- Select the product whose device instance you want to change
- Select the properties tab at the bottom right and change the device instance
3. Changing a data instance with Actisense
Changing a data instance:
- Open Actisense NMEA Reader
- Select data view (tab selection is at the bottom left)
- Right click the PGN:

- And change the value:

Notes for BMVs, Lynx Shunt and the Lynx Ion + Shunt:
- The Battery Instance and the DC Detailed instance are the same value. Changing one of them, will also change the other one.
- Since the BMV sends out two voltages, the main voltage and the aux- or starter-voltage, it comes preconfigured with two battery instances: 0 and 1. When you want to change that to 1 and 2, change the 1 into 2 first, and then the 0 into 1, as they cannot be the same.
4. Changing Instance Using Maretron N2KAnalyzer
Maretron understands that it is sometimes difficult to know whether a particular product uses device instance or if it uses data instance to uniquely identify itself on an NMEA 2000 network. For this reason, Maretron uses a term called “Unique Instance” where the N2KAnalyzer software tool automatically determines if a particular device uses device or data instances.
Open N2KAnalyzer and make sure that the “Unique Instance” column is turned on (i.e. checked) using the Setup>Columns menu item.

Within the N2KAnalyzer main window, any cell with a white background can be edited by clicking in the cell and typing in the desired value. You can see from the following screen shot that a few parameters have a white background including Label and Installation Description #1. To change a devices instance, click in the Unique Instance cell for the device you want to change and type the new number followed by a carriage return. If the particular products accepts the instance change, you will see the new instance number reflected in the cell. You can also use a tool within N2KAnalyzer to check that all products on the network are uniquely instanced. Use the Analyze>Instancing menu to verify correct overall system instancing.

5. Changing the DeviceInstance from the CCGX command line
Instead of using Actisense or Maretron software, it is also possible to change the device instance from the Color Control shell. To get root access, follow these instructions: Venus OS: Root Access
Once logged into the shell, follow below instructions. Note that the example shown changes the device instance of a Skylla-i. The device instance of a VE.Can connected MultiPlus or Quattro can be changed as well. It will show as com.victronenergy.vebus.socketcan_can0_di0_xxxx.
Step 1. List the devices:
root@ccgx:~# dbus -y
com.victronenergy.bms.socketcan_can0_di0_uc10
com.victronenergy.charger.socketcan_can0_di1_uc12983
It shows a Skylla-i (the charger). di1 in the name means that it is currently on DeviceInstance 1.
Step 2. Change it, for example, to 4:
root@ccgx:~# dbus -y com.victronenergy.charger.socketcan_can0_di0_uc12983 /DeviceInstance SetValue %4
retval = 0
Step 3. Wait a few seconds, and double check:
root@ccgx:~# dbus -y
com.victronenergy.bms.socketcan_can0_di0_uc10
com.victronenergy.charger.socketcan_can0_di4_uc12983
Device instance changed successful!
DISQUS
~~DISQUS~~