This is an old revision of the document!
Table of Contents
Setting up your PC as a CCGX development environment
This page explains setting up a cross compiling environment for the CCGX. Cross compiling means that the software is built/compiled on a different system (your computer) than the one on which it is executed (your CCGX).
Notes:
- rebuilding the whole rootfs and image from scratch is something entirely different, explained here: https://github.com/victronenergy/venus
- this page assumes your host pc / virtual runs linux
- it is often faster to do most development and debugging of software on your pc first. So no cross-compiling required at first. See here.
- when looking for ordinary packages, such as git, gdb, or something else, as opposed to your own development, make sure to have a look at all pre-compiled and available packages too. Login to the ccgx and run this command to see available packages:
opkg list
- another alternative: compile on the ccgx itself. Use opkg to install git, make and gcc, then checkout whatever source you want to compile. Easier than cross compiling, but can be a bit slower :)
To cross compile, you need to setup an SDK, which contains the gcc compiler, as well as all header files and other setup of the CCGX.
More info about what you are installing here: http://www.yoctoproject.org/bulk/devday-eu-2014/ypdd14-hudson-sdk.pdf
BASICS - command line cross-compile
Start with the basics: cross-compile a project from the command line. This example has been made on Ubuntu.
Then replace dash with bash:
sudo dpkg-reconfigure dash (and choose NO)
Then install all the prerequisites. For (X)Ubuntu do:
sudo apt-get install gawk wget git-core diffstat unzip texinfo gcc-multilib build-essential chrpath socat libsdl1.2-dev xterm
For other distros, see the Yocto documentation for the requirements.
Install the SDK
The SDK includes the gcc compiler for the ARM processor, as well as all the needed libraries and header files.
First, download the latest sdk here. It will be a file ending with .sh, for example “venus-eglibc-i686-arm-toolchain-qte-v1.40.sh”. And the name must contain Danny. Not Jethro. There is no need to worry about it not being the same version as the latest available CCGX firmware version. Using the latest SDK available will be fine.
Then install it. It will ask where you want to have it installed, make sure to install the ccgx sdk in its default location!. And, in these examples, make sure to replace v1.40 to the version you downloaded:
chmod u+x ./venus-eglibc-i686-arm-toolchain-qte-v1.40.sh
sudo ./venus-eglibc-i686-arm-toolchain-qte-v1.40.sh
Make a symlink /opt/venus/current
sudo ln -s /opt/venus/v1.40 /opt/venus/current
Now to use this SDK, the following command is to be executed in the terminal where you also call make or start qtcreator. This has to be done every time, but you are free to automate it of course:
source /opt/venus/current/environment-setup-armv7a-vfp-neon-ve-linux-gnueabi
Cross compile your first project
Create a file helloworld.c with the following content:
#include <stdio.h>

int main()
{
	puts("hello world");
	return 0;
}
The following is needed to compile above for a ccgx
# first setup the environment:
. /opt/venus/current/environment-setup-armv7a-vfp-neon-ve-linux-gnueabi

$CC helloworld.c -o helloworld
The resulting binary is now called helloworld. This is an ARM executable, this can be checked with
file helloworld
This should report something like: helloworld: ELF 32-bit LSB executable, ARM, EABI5 version 1 (SYSV), dynamically linked (uses shared libs), for GNU/Linux 2.6.16, not stripped
Cross compiling QT projects
QT projects, which are projects using 1 or more QT libraries, rely on the qmake engine. Compiling a projects works like this:
# first setup the environment:
. /opt/venus/current/environment-setup-armv7a-vfp-neon-ve-linux-gnueabi

# change directory to the location of the qmake file (.pro extension)
cd <path to project file>

# Run qmake to create a makefile. Use the qmake supplied with the SDK!
/opt/venus/current/sysroots/i686-ve-linux/usr/bin/qmake <project file>.pro

# Build the project
make
LUXURY - now that you have done the basics, go for the IDE
Now that you have successfully compiled a project from the command-line, time for the next step.
0. Install QT Creator
sudo apt-get install qtcreator (or take latest from qt website)
To start QTCreator, start a new terminal, and execute the command
source /opt/venus/current/environment-setup-armv7a-vfp-neon-ve-linux-gnueabi
And then start qtcreater: make sure to start it from the same terminal where you typed source /opt/venus/… !
qtcreator
1. Configuring QT Creator
1.1 Add the cross-compiler
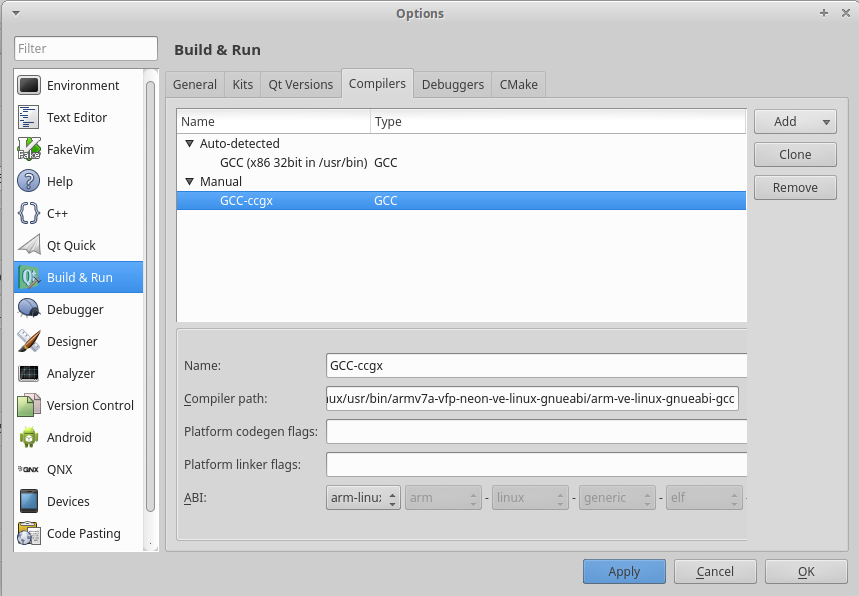
Goto Options→Build & Run→Compilers, and press Add. Select GCC as the type. And point it to:
/opt/venus/current/sysroots/i686-ve-linux/usr/bin/armv7a-vfp-neon-ve-linux-gnueabi/arm-ve-linux-gnueabi-gcc
Result will look like this:
1.2 Add the debugger
Same screen, but one tab to the right: Debuggers. Click add and point it to:
/opt/venus/current/sysroots/i686-ve-linux/usr/bin/armv7a-vfp-neon-ve-linux-gnueabi/arm-ve-linux-gnueabi-gdb
1.3 Add the Qt version
Same screen, but then one tab to the left, Qt Versions. Point it to
/opt/venus/current/sysroots/i686-ve-linux/usr/bin/qmake
1.4 Prepare your CCGX
- set your own root password on the CCGX in Settings→General→Set root password. More info here.
- enable the ssh daemon on the ccgx: Settings → General → Remote Support → Enable.
- install gdbserver: login to ccgx with ssh, and run opkg install gdbserver
root@ccgx:~# opkg install gdbserver
Installing gdbserver (7.5-r0.0) to root...
Downloading http://updates.victronenergy.com/feeds/ccgx/1.0/release/armv7a/gdbserver_7.5-r0.0_armv7a-vfp-neon.ipk.
Installing libthread-db1 (2.16-r17+svnr20393) to root...
Downloading http://updates.victronenergy.com/feeds/ccgx/1.0/release/armv7a/libthread-db1_2.16-r17+svnr20393_armv7a-vfp-neon.ipk.
Configuring libthread-db1.
Configuring gdbserver.
1.5 Add the device to qtcreator
Add device, see screenshot.

1.6 Add a Kit
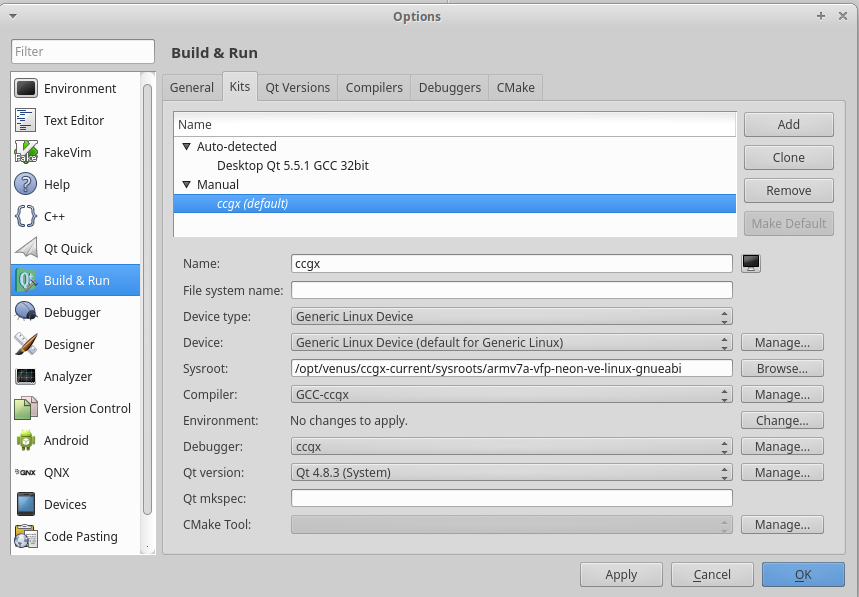
Next add a new kit:
- select the Compiler, Debugger and Qt Version which you have created in the previous steps.
- select a sysroot: /opt/venus/current/sysroots/armv7a-vfp-neon-ve-linux-gnueabi
End result will look like this:
1.7 Try it
Now you are ready to start compiling. Open a QT project file (.pro extension) and chose the CCGX kit, and chose Build→Build Project. If you get an error message 'c: Command not found', you probably forgot to run the environment script before starting QT Creator.
After a successful build deploy the executable to the CCGX (Build→Deploy project). Note that it is not possible to overwrite an executable that is currently running. So, for this gui example, make sure to first stop the gui on the ccgx:
svc -d /service/gui
Cross-compile run:
Executable on device: /opt/color-control/gui
1.8 Notes
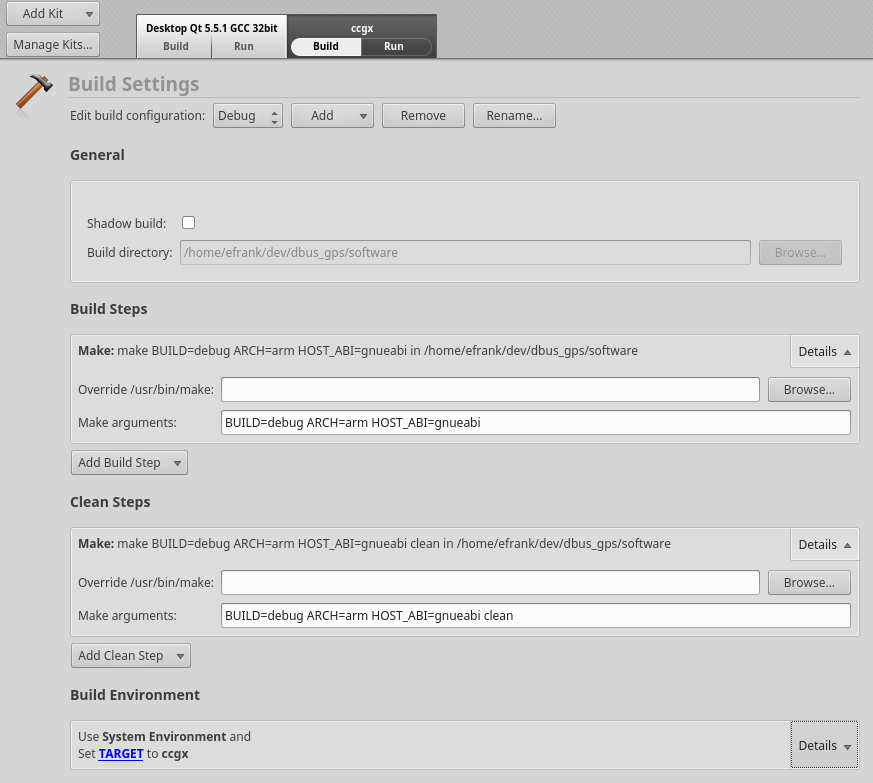
When working on a velib project, make sure to change these settings in the Kit:
- Remove qmake from build steps in the kit
- Disable shadow build
- Add ARCH=arm HOST_ABI=gnueabi to the Make arguments of the build steps
- For the debug build, also add BUILD=debug
- Add the same to the clean steps
And if you are going to build release builds with qtcreator, do more or less the same for that build config.
End result will look like this:
More bits and pieces that might come in handy
Mount CCGX file system locally
To save yourself some time copying files back and forth between your PC and your CCGX, for example while editing Python code, use sshfs to mount the CCGX drive to your local machine:
  mkdir ~/rem
  sshfs root@ccgx:/opt/color-control ~/rem
Use fusermount -u PATH to unmount it again. or just reboot your machine.
Mounting a ubifs image
To get the right tools in ubuntu, install mtd-tuils:
sudo apt-get install mtd-utils
Info can be found on this page: http://pjankows.blogspot.nl/2012/01/how-to-mount-ubi-image.html
However, don't use mtdram, but use nandsim.
sudo modprobe ubi
sudo modprobe nandsim first_id_byte=0x20 second_id_byte=0xac third_id_byte=0x00 fourth_id_byte=0x15
sudo flash_erase /dev/mtd0 0 0
sudo ubiformat /dev/mtd0 -f ubi.img
sudo ubiattach -p /dev/mtd0
sudo mount -t ubifs /dev/ubi0_0 /mnt/ubifs/
Developing and running on your PC instead of immediately on the target
Developing, running, debugging a module on your (Linux) PC is often much faster than first having it uploaded to the CCGX everytime you want to run it. And the good news is that it is perfectly possible.
Most of our modules will run perfectly on a pc: localsettings, dbus_gps, dbus_modbustcp, dbus_fronius, etcetera. Even the gui runs on a pc, but that is a bit more difficult since it needs some changes which we made to the qt libraries.
Most -perhaps even all- of our D-Bus implementations (C, Cpp, Python, etc) automatically choose the Session D-Bus instead of the System D-Bus which is used on the ccgx. This is done at either compile- or run-time. To see what is going on on the D-Bus, use the DBusCli command-line tool. Make sure to omit the -y commandline parameter. Tips and tricks for command line D-Bus access here.
For some modules you'll need to run localsettings on your pc. Github repo including explanation of what it is is here. Look for localsettings on this page for instructions on setting it up. Note that it shouldn't be necessary to change the dbus config files! Since it will be using the (open) session dbus, and not the system dbus which is usually locked down.
DISQUS
~~DISQUS~~