 Add this page to your book
  Remove this page from your book
  Manage book (
 Help
Help This is an old revision of the document!
−Table of Contents
AC-coupled PV with Fronius PV Inverters
This document describes how to setup Energy-storage, Off-grid/Micro-grid and Backup systems with AC-coupled PV, using Fronius PV Inverters. For Fronius information on the same subject, see their MicroGrid flyer.
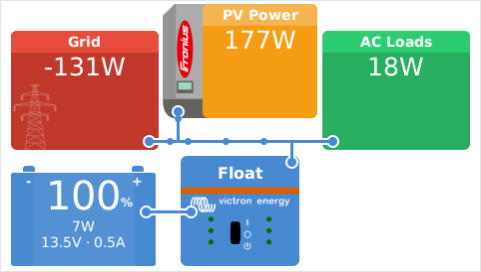
The Victron system monitor, the Color Control GX includes built-in Fronius monitoring.

Frequency shifting
To make sure that the Fronius PV inverter works well with Victron inverter/chargers, both must be configured with the right 'frequency shift settings':
- The Fronius PV Inverter must be set to Setup MG, short for Micro-Grid.
- For off-grid systems, load the Multi or Quattro with the PV Inverter support Assistant
- For on-grid / energy-storage systems, load the Multi or Quattro with the ESS Assistant. Read information about ESS in the design-installation-manual.
And the 1:1 rule must be adhered to.
Fronius / Victron specifics
This is a very easy setup. The Fronius Setup Microgrid has been developed in close cooperation with Victron. During commissioning, set the PV Inverter to Setup MG50 (or Setup MG60 for 60 Hz systems). Everything is then pre-configured. The Setup MG settings match the default Victron Assistant settings.
Compatible inverters are:
- Fronius Primo (1~, 3 kW up to 8.2 kW) → Software fro27140.upd or higher (see FAQ Q5!)
- Fronius Symo (3~, 3 kW up to 20 kW) → Software fro27140.upd or higher (see FAQ Q5!)
- Fronius Eco (3~, 25 kW or 27 kW) → Software fro27140.upd or higher (see FAQ Q5!)
- Fronius Agilo (3~, 75 kW up to 100 kW) → Software update19.tl or higher
- Fronius IG Plus V (1~, 2~, 3~, 2.5 kW up to 12 kW) → from IGF 5.0.66 on with settings according to the Victron recommendations
For new systems the Symo and Eco inverters are recommended for 3~ applications. The Primo inverters are recommended for 1~ applications. Please note that all these inverters are transformerless and therefore PV-Modules that require pole-grounding (on the Plus or Minus pole) cannot be connected.
The use of Fronius Galvo inverters is not recommended anymore for new applications - the Fronius Primo is the best substitute and offers higher efficiency, wider DC voltage range, two MPP trackers and many other features.
When setting up a system, always update both the Fronius and the Victron devices to their latest firmware versions. For the latest Fronius firmware and information how to update use this link: Fronius firmware update
Setting up the Fronius with Setup MG50/MG60
When not pre-ordered with a MicroGrid setup, follow these steps:
- Make sure that the Fronius PV inverter is updated to at least the firmware version mentioned above. See Inverter list above.
- After making the inverter operational according to the manual, select the language and after this the country specific setup.
- Here choose MG50 or MG60 depending on the system frequency.
- Ready to start up.
Setting up the Victron Multi or Quattro
- After connecting the MultiPlus or Quattro with the battery, you can now connect a computer through the VE.Bus (in combination with the Victron interface MK2USB) to configure the system with the latest version of the software VE.Configure.
- Go to the tab Assistants:
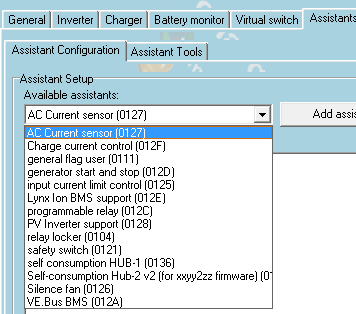
- Add one of the Assistants that regulate output frequency:
- PV Inverter support
- Note that it is not necessary to change the default settings in the Assistant.

- Complete the rest of the Assistant and write the new settings to the MultiPlus or Quattro.
Table for settings for 50Hz and 60Hz frequency
| State | 50Hz | 60Hz | . |
| Start | 51.0 | 60.2 | Hz |
| Minimum | 52.7 | 62.7 | Hz |
| Disconnect | 53.0 | 63.0 | Hz |
More information on adding Assistants is here.
Remote system monitoring
The Victron system can be monitored through Victron VRM Portal if a Color Control GX is present at the site. The Fronius PV inverter data can be integrated into the Color Control GX and therefore also in the VRM portal. So the VRM portal is the recommended monitoring platform also for AC-coupled installations.
However, also Fronius offers an equivalent monitoring solution. The Fronius portal is called Fronius Solar.web. The PV system data can be transfered to the portal if the inverter is equipped with a Datamanager 1.0 or Datamanager 2.0.
The usage of both portals in parallel is possible.
A video instruction how to set up the Datamanager 2.0 + Solar.web can be found here.
Zero Feed-in
It is possible to make a Zero feed-in system with Victron & Fronius. The Venus device will the control the Fronius output power. See the ESS manual, chapter 2.1.3 Fronius Zero feed-in for details.
Frequently Asked Questions
Q1 Why doesn't the frequency settings in the Multi and the Fronius need to be the same?
The first two frequencies do not need to be the same since the Multi actively regulates.
Q2 I have an Fronius IG inverter (not Plus), can that work?
No, the IG inverters cannot be made to work in a MicroGrid system. The appropriate substitute for an IG 30 is the GALVO 2.5-1 or an IG Plus 25V-1 (depending on the desired DC voltage range).
Q3 The system is locked to 53 Hz and does not resume
See here.
Q4 Can I use the Fronius Smart Meter?
No, when using a Fronius PV Inverter in a Victron system it is not possible to use the Fronius Smart Meter.
Use any of the Victron supplied Energy Meters instead.
Q5 How can I get the Fronius firmware that improves flickering?
Fronius has a special firmware available, on request, that fixes light flickering issues that occur on certain installations under certain circumstances.
For Fronius PV inverters produced after 2018-week 16, contain the flicker-fix already straight from production.
To update earlier and/or already installed PV Inverters, contact Fronius Tech Support for the file. The required file is fro29130.upd. Which works for all snap-inverter models (Primo, Symo and Eco). There is no, and will be no, fix available for Fronius Galvos.
DISQUS
~~DISQUS~~