 Add this page to your book
  Remove this page from your book
  Manage book (
 Help
Help Table of Contents
Victron & Exide
This combination depends on Venus OS v2.90 or above, which is scheduled to be released later in 2022. Or the latest beta (see Venus OS - Beta testing).
The combination of Victron products with the Exide battery has been tested and certified by the R&D departments. The combination is actively supported by both companies.
Compatible models:
- Sonnenschein Module Pro LIBM0480050-G01 as of firmware v1.10
1. Introduction
1.1 Compatible Victron products
All 48V Multis and Quattros. And always a GX device is necessary in the system, since that has the canbus port which is used for the (required!) communication between the ESS battery and the Victron system.
2. GX device needed
To use the Exide ESS in Victron system, it is necessary to use a GX-device such as a Color Control GX, a Venus GX or a Cerbo GX. The GX device needs to run at least firmware v2.90. It is recommended to always use the latest Firmware version for the GX device.
3. Wiring of communication cables
A cable for the CAN-bus connection ships with the battery. This cable has only CAN-L and CAN-H connections and no ground wire. The side of the cable with pins 7 and 8 should be plugged into the GX device, and the side with pins 1 (CAN-L) and 2 (CAN-H) goes to the battery.
Exide batteries come with a CAN-bus terminator already installed/supplied. When assembling the battery from individual modules, remember to terminate the CAN-bus on the last module, using the supplied terminator. In most cases, this is already done in the factory.
Without properly connecting this cable, the battery will stop charging/discharging after several minutes. Also, the battery will not show up on the display of the GX device.
4. VEConfigure settings
4.1 General tab
- Check the “Enable battery monitor” function
- Set the battery capacity to the total capacity of the battery: the Ah capacity per module multiplied by the number of battery modules.
- The other parameters (“State of charge when bulk finished” and “Charge efficiency”) can be left to their default setting: They have no effect in this type of installation.
4.2 Charge Settings
Charger tab
| Parameter | Setting |
|---|---|
| Battery type | Lithium |
| Charge curve | Fixed |
| Absorption voltage | 51.0 V |
| Float voltage | 50.8 V |
| Absorption time | 1 Hr |
Note: make sure to double check the float voltage after completing Assistants, and if necessary set it back to 50.8 V.
4.3 Inverter Settings
In the Inverter tab of VEConfigure
| VEConfigure Inverter Parameter | Setting |
|---|---|
| DC input low shut-down | 42V |
| DC input low restart | 45V |
| DC input low pre-alarm* | 45V |
* The pre-alarm setting is dependent on your preference and on site specific requirements. You may wish for this to be activated earlier in an off grid situation to allow time to start a backup generator.
4.4 ESS System Settings
If you are using the battery as part of a grid connected ESS system, please review the ESS Quickstart guide and Design and Installation Manual.
The settings that are specific to the EXIDE battery in the VEConfigure ESS Assistant are below:
Select the externally managed Lithium battery option

| ESS Parameter | Settings |
|---|---|
| Sustain voltage. | 45V |
| Dynamic cut-off values | set all values to 43.5V. |
| Restart offset: | 1.2V (Default) |
Due to the reliability of the grid supply and the behaviour of the sustain voltage threshold in ESS; you may wish to suppress the low voltage pre-alarm warning so that it does not trigger every day on its regular deep cycle. See ESS FAQ Q5 - about suppressing the low-voltage alarm.
5. GX device Configuration
- Select the CAN-bus BMS (500 kbits/s) CAN-profile in the GX device. Menu path: Settings → Services → CAN-profile. Note that this changes the function of a VE.Can port: it is not possible to connect both VE.Can products and an Exide battery together on a Color Control GX. It is possible on the Venus GX.
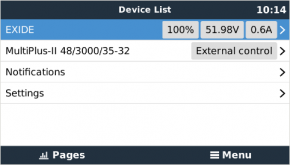
- After properly wiring and setting up, the Exide ESS will be visible as a battery in the device list:
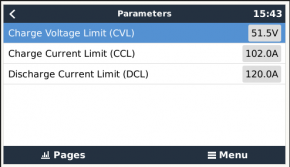
- The parameters option within the battery page shows the actual battery charge and discharge limits:
Next, go to Settings, DVCC, and configure as follows:
| Venus Settings → System Setup Parameter | Value |
|---|---|
| DVCC | ON |
| Shared Voltage Sense | OFF |
| Shared Temperature Sense | OFF |
6. MPPT Settings
In normal operation the MPPT charge characteristics are governed by the GX device via DVCC, with instructions from the connected EXIDE battery.
This section presumes familiarity with VictronConnect
The settings below can be set as a precautionary measure, should the MPPT ever end up in standalone mode.
| MPPT Parameter | Setting |
|---|---|
| Battery voltage. | 48V |
| Absorption voltage | 51V |