ac_current_sensor:start
Book Creator
 Add this page to your book
Add this page to your book Book Creator
 Remove this page from your book
Remove this page from your book  Manage book (
 Help
Help Table of Contents
AC Current sensor

Introduction
Use the AC Current sensor to measure and visualise the solar production of a PV Inverter. The measurements will be visible on the GX device and on the VRM Portal.
The sensor is a simple external current sensor, which measures AC Current. Together with the voltage measurements is calculated into Apparent Power (VA) and Energy (kWh). The sensor can be wired to either the AUX input or the Temperature-input of Multi and Quattro inverter/chargers.
The AC Current Sensor is one out of multiple options to visualise the solar yield in a Victron system. See here for an overview.
Specifications
| Power range | 1.5 kW | 3 kW | 5 kW | 7 kW | unit |
|---|---|---|---|---|---|
| Power step size Approx depends on input voltage (230V AC) | 9 | 17 | 30 | 35 | W |
| Power step size Approx depends on input voltage (120V AC) | 4.5 | 8.5 | 15 | 17.5 | W |
| Max measured Current | 8 | 16 | 25 | 30.5 | A |
| Max Input current | 9 | 18 | 30 | 40 | A |
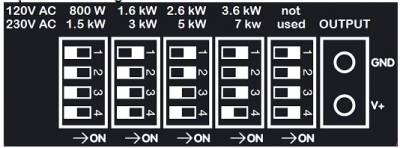
| Dipswitch | all off | 1 | 1,2 | 1,2,3 | |
| Max # of sensors in one system | 9 | ||||
| Protection category | IP54 | ||||
Multi and Quattro hardware requirements
- The Multi or Quattro needs to have the new microprocessor: make sure that the 7 digit firmware version number, as written on the microprocessor, starts with 26 or 27. Old, and therefore incompatible, control boards will have a firmware version starting with 19 or 20.
- The TEMP-sense input of all Multi’s and Quattro’s is suitable for the AC Current Sensor.
- The AUX-input however is not, see serial number list below to check your hardware.
- The Multi or Quattro needs to be connected on the VE.Bus port of the Color Control GX: readout will not work when connected on the VE.Can port using a VE.Bus to VE.Can interface cable.
- On the Multiplus-II hardware revision 0 to 8, the AUX input is on the RJ12 connector, pin 1 and 5. Refer to appendix A of the Multiplus-II manual. In later revisions the AUX input is available as a normal terminal again.
- This AC Current sensor (CSE000100000) should not be confused with the specific Current Transformer 100A:50mA accessory for MultiPlus-II (part number CTR110000500).
Installation
- Pull one of the AC wires of the PV inverter through the AC Current sensor.
- Connect the sensor to the AUX or TEMP-sense input of an Inverter, Multi or Quattro in the same phase as being measured by that current sensor.
- Configure the power range with the dipswitches. Select the power equal or higher than the maximum expected power. For example, with a 4kW PV installation, the correct dipswitch setting is 5kW.
- Multi-phase installations: add one AC current sensor for each phase of the PV inverter. Wire it to the Multi in the same phase.
Configuration
- Make sure the firmware in the inverter/charger is 2xx or later. Instructions here.
- Parallel and three-phase systems: configure parallel or three-phase operation first.
- Then use the VEConfigure3 to add and configure the 'AC Current sensor’ assistant.
- Parallel and three-phase systems: add the assistant to each Multi or Quattro that has an AC Current sensor connected to it.
- Whilst the minimum required firmware in the GX device is v1.30, we require running on a more recent version.
- Select the correct profile on the GX device: Settings → System setup.
Compatibility list
| Supported models | AUX input | TEMP input | |
|---|---|---|---|
| Product code | Description | Minimum SN# | Minimum SN# |
| PMP123021010 | MultiPlus 12/3000/120-50 - 230V | HQ1352 | All serial numbers |
| PMP123021102 | MultiPlus 12/3000/120-50 120V | HQ1322 | All serial numbers |
| PMP243021010 | MultiPlus 24/3000/70-50 230V | HQ1350 | All serial numbers |
| PMP243021102 | MultiPlus 24/3000/70-50 120V | HQ1347 | All serial numbers |
| PMP245021010 | MultiPlus 24/5000/120-100 230V | HQ1326 | All serial numbers |
| PMP485021010 | MultiPlus 48/5000/70-100 230V | HQ1326 | All serial numbers |
| _ | |||
| QUA123020010 | Quattro 12/3000/120-50/50-230V | HQ1332 | All serial numbers |
| QUA125020000 | Quattro 12/5000/220-100/100-230V | HQ1347 | All serial numbers |
| QUA125021100 | Quattro 12/5000/220-100/100-120V | HQ1329 | All serial numbers |
| QUA243020010 | Quattro 24/3000/70-50/50-230V | HQ1341 | All serial numbers |
| QUA245021010 | Quattro 24/5000/120-100/100-230V +50A aux. | HQ1326 | All serial numbers |
| QUA243020010 | Quattro 24/3000/70-50/50-230V | HQ1341 | All serial numbers |
| QUA245021010 | Quattro 24/5000/120-100/100-230V +50A aux. | HQ1326 | All serial numbers |
| QUA248020010 | Quattro 24/8000/200-100/100-230V +50A aux. | HQ1333 | All serial numbers |
| QUA483021100 | Quattro 48/3000/35-50/50 120V | HQ1329 | All serial numbers |
| QUA485021010 | Quattro 48/5000/70-100/100-230V +50A aux. | HQ1330 | All serial numbers |
| QUA485021100 | Quattro 48/5000/70-100/100-120V/60Hz +50A aux | HQ1341 | All serial numbers |
| QUA488020000 | Quattro 48/8000/110-100/100 230V. | HQ1327 | All serial numbers |
| QUA481030010 | Quattro 48/10000/140-100/100 230V +50A aux | HQ1326 | All serial numbers |
| QUA488020000 | Quattro 48/8000/110-100/100 230V | HQ1327 | All serial numbers |
| QUA481030010 | Quattro 48/10000/140-100/100 230V +50A aux. | HQ1326 | All serial numbers |
| _ | |||
| PMP243021014 | Multi-G 24/3000/70-50 | All serial numbers | All serial numbers |
| PMP245021014 | Multi-G 24/5000/120-100 | All serial numbers | All serial numbers |
| PMP485021014 | Multi-G 48/5000/70-100 | All serial numbers | All serial numbers |
| _ | |||
| Other models | All serial numbers | All serial numbers | |
DISQUS
~~DISQUS~~
ac_current_sensor/start.txt · Last modified: by guy_stewart