4. Configuration
The inverter is ready for use with the standard factory settings (see the Technical specifications chapter).
The inverter can be configured using the VictronConnect app. Connect using a smartphone or tablet via Bluetooth or using a computer via USB and a VE.Direct to USB interface).
Warning
Settings may only be changed by a qualified engineer.
Carefully read the instructions before changes are made.
4.1. AC output voltage and frequency
The inverter is set by default at 230Vac 50Hz.
The AC output voltage and frequency can be set to a different value according to the table below.
AC output voltage range | Frequency range |
|---|---|
Between 210Vac and 245Vac | 50Hz or 60Hz |
4.2. ECO mode and ECO settings
The inverter is equipped with ECO mode. ECO mode is activated via the VictronConnect app, the inverter main switch or push button (depending on inverter model).
When the inverter is in ECO mode, it will reduce its power consumption by approximately 85% when there are no loads connected to the inverter.
When the inverter is in ECO mode, the inverter will switch to search state when there is no load or a very low load. While in the search state, the inverter is off and will switch on every 3 seconds for a short period (adjustable). If the inverter detects a certain size load (adjustable) the inverter will go back to normal operation mode. Once the load drops below a certain level, the inverter will go back to ECO mode.
Below table indicates the default settings and setting range of the ECO parameters:
Parameter | Default value | Range |
|---|---|---|
Wake-up power | 60VA | 0VA - inverter rating |
Shutdown power | 50VA | 0VA - inverter rating |
ECO mode search interval | 3s | 0 - 64s |
ECO mode search time | 0.16s | 0.08 - 5.00s |
Note
Note that the required ECO mode settings are heavily dependent on the type of load: inductive, capacitive, non-linear. Adjustment for specific loads may be needed.
4.3. Low battery alarm and charge detect settings
The inverter has two different types of low battery shutdown modes:
Low battery shutdown based on battery voltage. This is the "low battery shutdown" voltage.
Low battery shutdown based on battery voltage as a function of battery load. This mode is disabled by default. See next chapter Dynamic cut off for more information.
Once the inverter has shut down due to a low battery (regardless of the mode):
The inverter will restart again once the battery voltage has increased above the "low battery restart and alarm" level.
The inverter will clear the low battery alarm once it detects the battery is being charged. This is the "charge detect" voltage.
Battery voltage | Low battery shutdown | Low battery restart & alarm | Charge detect |
|---|---|---|---|
12V | Default: 9.3V Range: 0-100V | Default: 10.9V Range: 0-100V | Default: 14V Range: 0-100V |
24V | Default: 18.6V Range: 0-100V | Default: 21.8V Range: 0-100V | Default: 28.0V Range: 0-100V |
48V | Default: 37.2V Range: 0-100V | Default: 36.6V Range: 0-100V | Default: 56.0V Range: 0-100V |
4.3.1. Dynamic cut off
The "Dynamic cut off" feature makes the low battery shutdown protection a function of the battery current drawn from the battery in relation to the battery voltage.
When a high current is being drawn from the battery, a lower cut off voltage threshold is being used, for example 10V. And similarly, when the battery is only being discharged slowly, a high cut off voltage is used, for example 11.5V.
In this way, a voltage drop, caused by the internal resistance in the battery, is compensated so that the battery voltage becomes a much more reliable parameter to decide when to stop discharging the battery.
The "Dynamic cut off" feature is most useful for batteries with a high internal resistance, like OPzV and OPzS batteries. It is a bit less relevant for GEL and AGM batteries and perhaps even irrelevant for lithium batteries. The below graph shows the discharge ratio versus battery voltage curve for the different battery types. You can see that the lithium curve (LiFePO4) is nearly flat compared to the OPzV and OPzS curve.
The curve can be adjusted in the VictronConnect app.
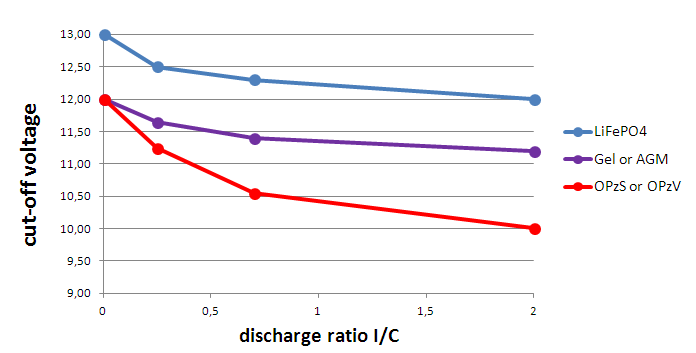 |
Discharge ratio versus battery voltage graph for different battery types
Important
Do not use the "Dynamic cut off" feature in an installation that also has other loads connected to the same battery. In these systems the battery voltage might drop because of other loads connected to the battery. The dynamic cut off algorithm in the inverter can not take those other loads into consideration and will shut down the Inverter too early with an under voltage alarm.
VictronConnect settings
The "Dynamic cut off" feature is disabled by default.
Enable the "Dynamic cut off" feature to use and configure it.
Select the battery type. Choose between: OPzV/OPzS, GEL/AGM, LiFePO4 or Custom.
Enter the battery capacity.
Enter the voltage for the various discharge currents. These values have already been set to the generic voltages that belong to the specific battery type that was selected earlier. Change these settings only in case they need adjustment and you know what you are doing, or in case a custom battery is being used.
 |
VictronConnect app showing the "Dynamic cut off" settings
4.4. Programmable relay
The inverters are equipped with a multi-functional relay that by default is programmed in the normal operation mode. The different relay modes can be summarized as follows:
Inverter (default setting)
Relay closed during normal operation, and opened when the inverter has switched itself off in alarm, has been switched off by a user and also opened (of course) when there is no power available on the terminals, ie. battery disconnected. In ECO mode, the relay will be closed both when searching for a load and when fully on, ie. load detected. Use this option when you want the relay to signal that there is power available on the output of the inverter.
Alarm
As above, but then the relay also opens when there is a warning. For example because the battery voltage dropped to the cut-off value, or when loaded to the point where it will almost shut down due to overload. In ECO mode, the relay will be closed both when searching (no load) and when fully on (load detected), except when there is a warning.
Use this option when you want the relay to signal that it is time to do something (charge the battery, reduce the load, and so forth), in order to prevent a power outage.
Low battery
Relay on during normal operation. The relay will switch off once there is a low battery warning. It will remain off in case the inverter shuts down due to low voltage, and will only switch back on again once the inverter is operational and the battery voltage is above the pre-alarm reset level. Use this option for load shedding, or to automatically start a generator. Note that this can only be considered a poor-mans generator start/stop. For more and better options, see the generator start/stop paper.
Fan
Relay is off, unless the fan inside the inverter is running. Use this option to switch an external fan, for situations when the inverter is in a small enclosed space.
Off
This option sets the relay in the OPEN position. Use this option if you do not plan to use the relay function.
4.5. Firmware update
The firmware can be updated in the inverter product settings:
Navigate to the inverter settings by clicking on the cog
 symbol in the right top corner.
Click on the 3 dot
 symbol in the right top corner.
Choose "Product settings" from the menu.
The firmware section will display the firmware version and a button to perform a firmware update.
4.6. Reset settings to default
The inverter settings can be set to default in the following way:
Navigate to the inverter settings by clicking on the cog
symbol in the right top corner.Click on the 3 dot
symbol in the right top corner.Select "Reset to defaults" from the menu and the settings will reset to default.