Add this page to your book
  Remove this page from your book
  Manage book (
 Help
Help Table of Contents
Remote VE.Bus firmware updates
1. Introduction and limitations
1.1 Introduction
This feature allows remotely updating the firmware of Victron inverter as well as inverter/charger. Applicable to systems that have a GX device installed, and being internet-connected to the VRM Portal.
The inverter/charger is the heart of a Victron power system. Also, certain types of installations require extra preparations. Therefore, before continuing, make sure to fully understand the process.
This procedure includes migration of the settings.
There is no limitation on the type of system: single unit systems, parallel, split-phase, three-phase and also large systems of 6, 9 and more inverters can all be updated remotely using this feature.
It is not required to keep your Victron equipment updated to the latest firmware version. Stable systems should be left with their current firmware. Firmware updates should only be done when it is recommended to fix an issue you are experiencing, or add a new feature that is required by the installation.
1.2 Limitations and requirements
- Minimum already installed VE.Bus firmware version must be 426
- There must be no VE.Bus BMS connected to the VE.Bus network, and also no Digital Multi Control (DMC) panel. See section 2.2 for more information.
- In case of a Color Control GX (CCGX), it must have serial number HQ1707 or newer: see FAQ Q2 for how to check this.
- In case of another GX Device, ie. a Cerbo, Venus GX, or otherwise, there is no minimum hardware version - they all meet the requirements.
- Venus OS firmware must be 2.65 or later.
- The
Fullaccess setting, which is on the GX device menu → Settings → VRM Online Portal → VRM Portal must be enabled.
2. Preparations
2.1 Make sure to switch off AC-Coupled PV Inverters
An AC-Coupled PV-Inverter is a PV Inverter connected to the AC out of the Victron Inverter.
To make sure no overcharging occurs, disable AC-Coupled PV Inverters. For example by having someone local to the system disconnect its solar input, or if it has an on/off switch: switch it off. Alternatively, perform the firmware update when the sun is down, in the evening or night.
The reason for having to do this is that the system will start-up while configured in factory defaults, and then doesn’t regulate PV Inverter output to manage the charging.
2.2 Disconnect VE.Bus BMS and/or Digital Multi Control
It is not possible to update a VE.Bus inverter, or inverter/charger in case there is also a VE.Bus BMS or Digital Multi Control (DMC) connected to the VE.Bus network. This exception does not apply to a MultiPlus or Quattro with VE.Bus BMS V2. In such systems, a remote firmware update of the VE.Bus inverter or inverter/charger is possible.
Error 734, “Cannot update with DMC or VE.Bus BMS connected” will be shown during the process when attempting to update such system. No settings or firmware is altered at the time, the system will remain operational.
To update such system remotely, first get someone local to temporarily unplug the RJ-45 connection on the VE.Bus BMS and/or the DMC. Note that the inverter will switch off when doing that. And that it then might be necessary to provide an alternate power supply for the GX device as it will lose power.
2.3 Systems where the internet connection will be lost while inverters are off
During the firmware update, the Victron inverters will be off. This is OK, as this remote firmware update process is designed to perform all critical steps without requiring an internet connection:
- the current settings are retrieved *before* powering down the inverter
- the new firmware is uploaded to the GX Device *before* powering down the inverter
It might be necessary to perform a few additional steps after the update, see FAQ below.
NOTE: we're currently still improving this use case. Once completed, the VRM Portal will keep trying to connect for a reasonable time compared to the number of devices that need updating. Which it will do in a manner where its clear for the user that there is no reason (yet) to worry. All this will be completed before official release. The FAQ entry will stay in case something does go wrong.
2.4 Be 100% sure that the GX Device is not powered by the inverter
Though normally not recommended, and also rather unusual, some systems have their GX Device powered on the output of the Victron inverter, with an AC Adapter.
Such system cannot be firmware updated remotely. Attempting to do so will leave the inverter off in bootloader mode with all LEDs flashing. And the system unreachable, since the GX Device is powered down.
Careful: this is not automatically verified in any way.
Testing this on site is easy: switch the inverter off. In case the GX Device remains powered: OK. If not, not OK.
2.5 Have the latest VEConfigure Tools
The latest version available on our website includes the necessary features. If you start VEConfigure or VE.Bus System Configurator while connected to the internet, it will automatically check and update itself when necessary.
Not having the latest version of VEConfigure Tools installed will result in an error when opening the file.
3. Step by Step Procedure Video
The inverter/charger is the heart of a Victron power system. Before continuing, make sure to fully understand the process.
This video demonstrates the process:
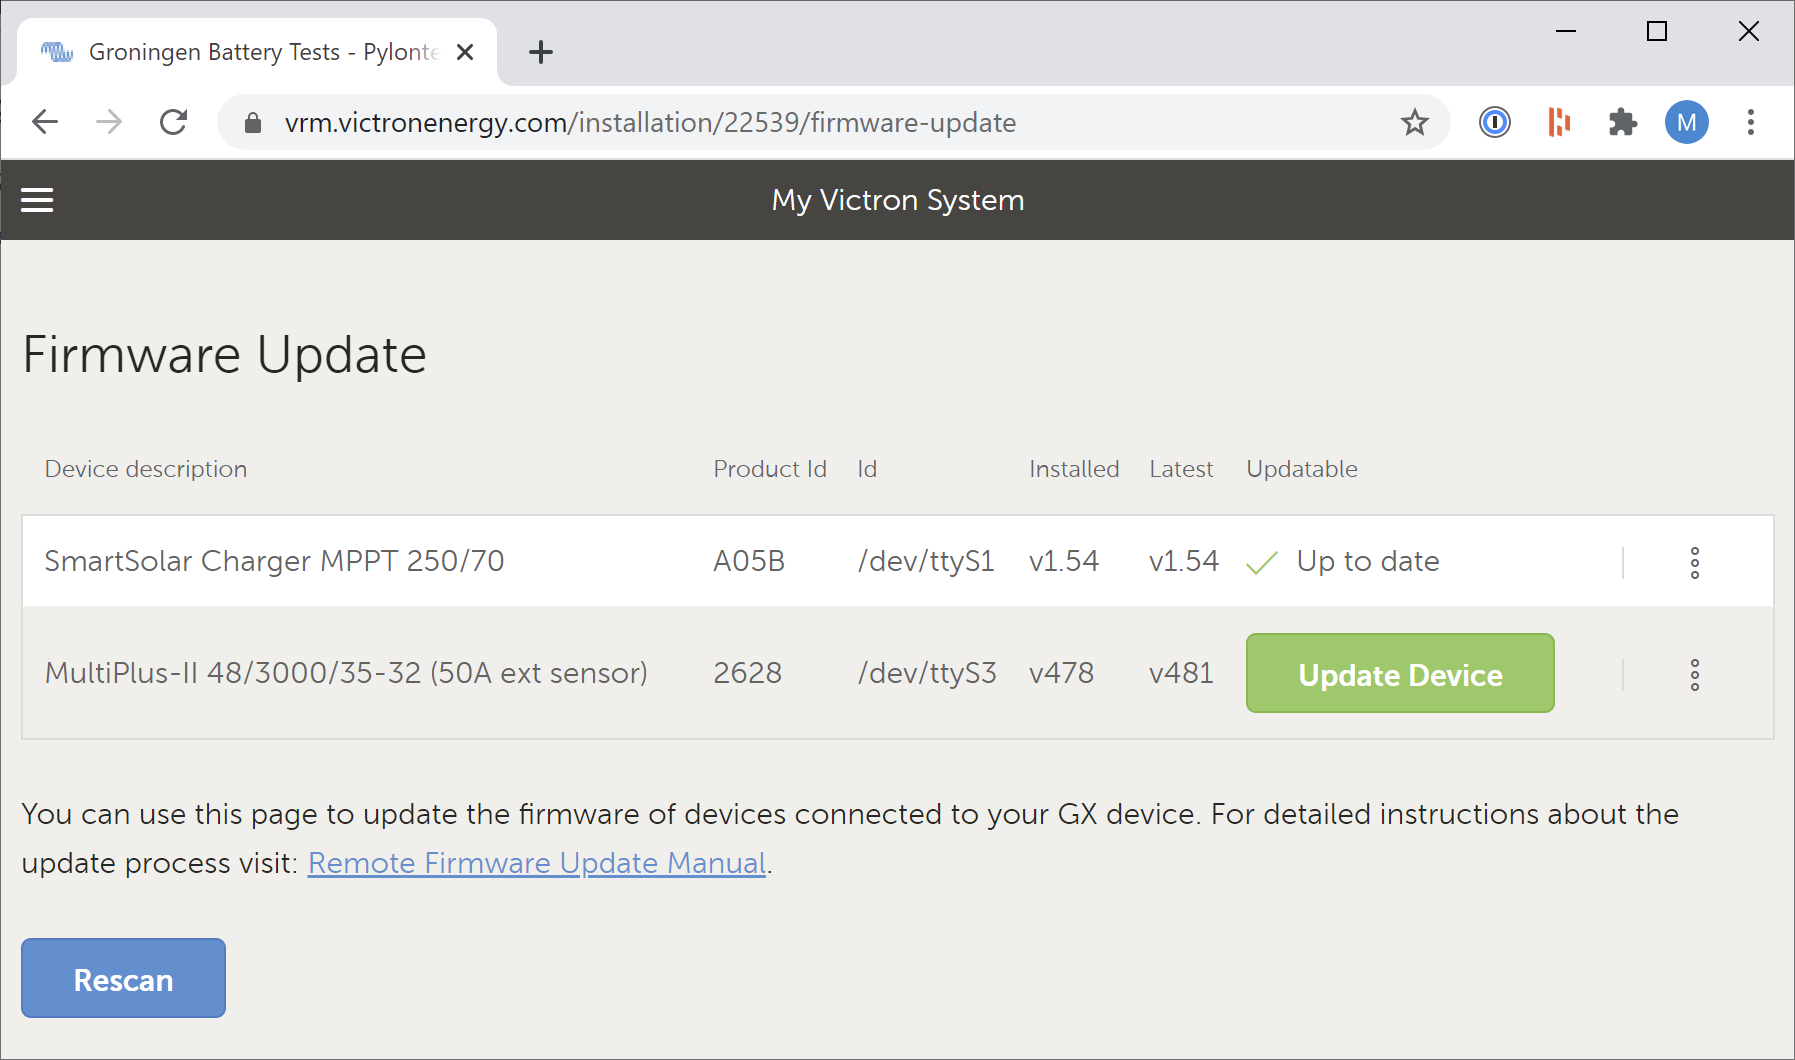
3.1 Checking installed version
In the VRM Portal, go to the Device List page, and click the Firmware update button at the bottom of the page. The system will now search for connected devices and once completed show the result:
3.2 First stage - retrieving current configuration & doing the update
Once the command is given to update the firmware, this is what happens:
- The new firmware file is uploaded to the GX Device.
- The configuration is retrieved from the VE.Bus system.
- The inverter is switched off and its firmware is updated. In case the internet router is powered by the inverter, the connection to the installation will now be lost until the update is completed. This is OK: this mechanism has been designed to handle such installation.
- After the firmware update is completed, the inverter is switched on again. The settings will have been reset to their defaults. And, to prevent overcharging, all charge voltages have been set to the nominal battery voltage, being 12V, 24V or 48V. This effectively disables the charger. Note that this works a bit different for systems with a managed battery, usually connected via a CAN-Bus. For such systems, the system will be charging, within limits as provided by the BMS.
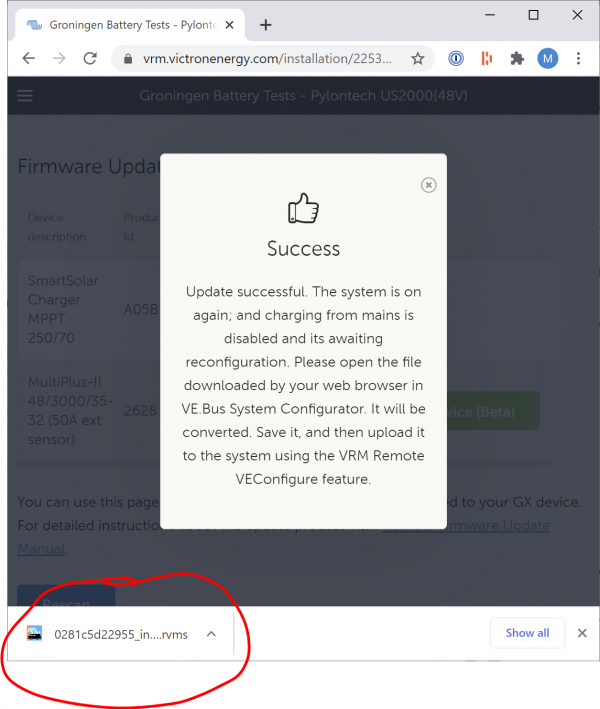
Now, the inverter is powered up, configured with default settings. In case the internet was lost, it will recover which might take a while to fully reconnect all systems. Once restored, the new settings template is retrieved from the system and will be available for download in your web browser.
At this point, the web browser shows below message. Note the downloaded settings template on the lower right:
3.3 Second stage - converting and restoring configuration
Make sure you have the latest version of the VE.Bus configuration tools installed.
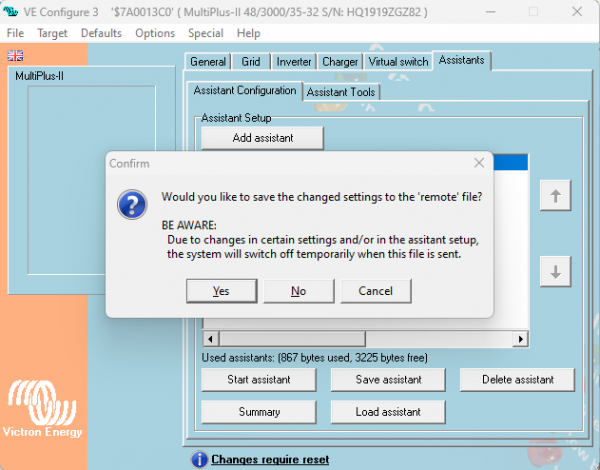
The settings template will need to be converted. It should be a .RVMS file in your download folder (it is saved during the update procedure). Open it by double clicking. If the VE.Bus tools are correctly installed, it will then open in VE.Bus System Configurator, and prompt you about the conversion.
Close VEConfigure (X on upper right of the window), which will automatically prompt saving that converted file:
Now upload the converted file. On the VRM Portal, go to the Device List → Remote VEConfigure menu → 'Upload' the converted file.
This step will restore the charge voltage and all other configuration settings as they were programmed prior to the firmware update.
5. Error codes & trouble shooting
Error 733
This error is generated by the updater logic on the GX device. It show the reason why a firmware update failed. The Error 733 message box will contain an error message with or without a code.
The most common reasons are:
| Message | Description |
|---|---|
| vbdup failed with exit code 54 | Failed to start Update. The file has an incompatible version number. Please update your Venus OS version to the latest version |
| vbdup failed with exit code 111 | The bootblock is incompatible this version of the updater. Please update your Venus OS version to the latest version |
| vbdup failed with exit code 123 | One or more firmware file(s) supplied do not match the connected device models. |
| vbdup failed with exit code 129 | The supplied firmware is below the minimum allowed firmware version. (Downgrade to this firmware version is rejected) |
Error 1342 - Not updatable
This errors shows in case either the minimum installed firmware is from before 426, or there is a CCGX installed which has too old hardware.
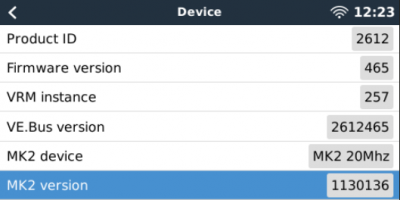
The already installed firmware version can be see here, the encircled number must be above 426.
How to check if the CCGX is new enough, see FAQ Q2.
VEConfigure tools File corrupt error
Most likely you are opening the file in the wrong way: double click the file to open it.
Or, the installed version is too old. See above for minimum required VEConfigure / VE.Bus System Configurator tools version.
mk2vsc-45 - Uploaded file does not contain settings data for the connected unit
Each inverter/charger has a unique numeric (serial) number; installed during production. This error shows in case the file sent was made for a different unit.
Note that this error should never occur, error 47 or 48 will happen instead.
mk2vsc-46 - Uploaded file does not match model and/or installed firmware version
To remotely update a systems settings, the full seven digit number in the file must match the system, worded differently:
- its not possible to take settings from a 3kVA and then upload it to a 5kVA model.
- its not possible to store settings from a system having version 479. Then update that system to 481, and then restore the settings by uploading that earlier saved file. Instead, use the merge function, see elsewhere in this manual.
mk2vsc-47 - More than one unknown unit detected
This error applies to systems consisting if multiple units, ie. parallel-, split- or three-phase systems.
Each inverter/charger has a unique numeric (serial) number installed during production. This error shows in case two or more units in the system have serial number different from the file sent.
In case one unit of such a system must be replaced, that can be done. The steps involved are:
- Read the configuration of the whole system (or use an existing Remote VEConfigure file)
- Physically replace the failed unit
- Write the configuration. At this step the system will automatically detect that a previous device is missing, and it will discover a new device with an unknown serial number. It will assume that the new device is a replacement, and write the settings accordingly.
- (optionally) Read the new configuration file and store in your records.
Note that before starting above, make sure to update the new unit to the same version of VE.Bus firmware, which unfortunately can’t be done remotely.
Solution: go onsite and use VE.Bus Quick Configure or VE.Bus System Configurator to reconfigure the system.
mk2vsc-48 - Updating a single unit with another unit's settings is not possible, even if they are of the same type
Each inverter/charger has a unique numeric (serial) number; installed during production. This error shows in case the file sent was made or a different unit.
There is a way: for the system that you want to configure, first do a Remote VEConfigure download, then open that file by double clicking it. Now in the menu of VEConfigure use Load settings option, and select the file of the system whose settings you want to copy.
mk2vsc-55 - File section not found
Error mk2vsc-55 can happen for two reasons. In case it happens while doing a remote firmware update, it typically the first one:
1) After the firmware update, but still during stage 1, something went wrong. For example VRM lost connection to the site for too long because of bad internet. The firmware update will have completed, but an extra step is necessary to migrate the configuration from before the firmware update. See FAQ Q3 for details.
2) The uploaded file is for a different product type. The model number, for example 2659, does not match.
Note that from Venus OS v2.66 onwards, this error will not occur. Errors 45, 46, 47 and 48 have replaced it.
mk2vsc-59 - file uploaded before merging in VE.Bus System Configurator
This error can show after uploading a settings file to the system using Remote VEConfigure. The error shows when the settings template made during a Remote firmware update was uploaded without first opening that in VE.Bus System Configurator.
Solution:
- instead of uploading the file, open it on your computer with VE.Bus System Configurator. Typically done by simply double clicking the file.
- VE.Bus System Configurator will now process file the, and show a message when completed.
- finally, save it by closing VE.Configure. And upload the resulting file, which name will by _merged.rvms.
6. FAQ
Q1: What happens if the internet connection goes down during the process?
That depends. If it goes down only for a while; and then recovers within a few minutes after the Inverters are started up again; all will be fine.
In case the internet outage is for another reason and/or takes too long, then this is what happens:
The firmware update will complete without a problem. And the system will start-up again in the mode as described in chapter 3.
What will go wrong is the process in which the old settings are converted and then made available for upload to the system.
To recover, see FAQ Q3.
In case you're wondering how this can work without internet: thats because first the current configuration is retrieve from the system, then the new firmware file is being uploaded to the system. And only once thats done and checked for file integrity, the actual firmware update starts.
Q2: How to see if a CCGX hardware version matches the required minimal version
There are a few ways. One is by checking the serial number, it must be HQ1707 or newer. 17 is for 2017, and the 07 is the week number. The serial number is printed on a label on the back of the GX Device, and in some cases also visible on the VRM Portal, in the Device List.
The other way is in the UI (either on the CCGX itself, or through Remote Console). Go to the Device List, then into the Multi or Quattro menu, then to the bottom, Device submenu, and scroll all the way to the bottom.
Here you'll see this menu:
It needs to say MK3. Above screenshot is from a CCGX which hardware is too old to perform remote VE.Bus firmware updates.
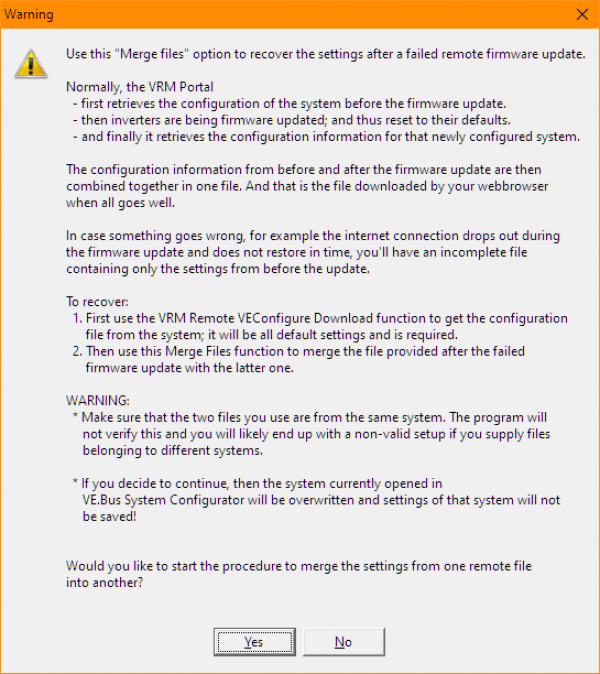
Q3: Merging files: how to recover the old settings when something went wrong
- In VRM → Device List → Remote VEConfigure, and there click download.
- Use the merge function in VE.Bus System Configurator: