 Add this page to your book
  Remove this page from your book
  Manage book (
 Help
Help This is an old revision of the document!
Table of Contents
Venus OS Large image: Signal K and Node-RED
(DRAFT - THIS DOCUMENT IS ABOUT NOT YET COMPLETELY FINISHED FUNCTIONALITY)
1. Introduction
1.1 Venus OS Large, Node-RED and Signal K server?
This manual documents Venus OS Large, an extended build of Venus OS, that adds Node-RED and Signal K server.
Node-RED is a tool for connecting hardware devices, APIs and online services in new and interesting ways. It provides a browser-based editor that makes it easy to wire together flows. With it, one can for example program a functionality such as activating a relay based on a temperature measurement. Or make far more complex algorithms, tying relays, measurements, or other data available from Venus OS or elsewhere together. All without having to write real source code, as Node-RED calls Low-code programming for event-driven applications.
Also Node-RED features a fully customisable dashboard, viewable in a webbrowser - both locally but also remotely, via the VRM Servers.
Signal K server is aimed for yachts, and multiplexes data from NMEA0183, NMEA 2000, Signal K and other sensor inputs. It makes all that data available for Apps, such as WilhelmSK, a highly customizable boat instrument display. The Sailing with Signal K blogpost on our website is a great read for more information and ideas.
1.2 Status and where this development is going
Currently, these images are available as beta versions. They work well, several users are using this without any issues; and are super happy with the provided functionality.
The remaining work are mostly small improvements, clean ups and testing.
There will be two flavours of Venus OS to install:
- the normal one as we've been building for years now. With all normal & supported functionality.
- the large flavour. All the same as the normal one, but with addition of Signal K & Node-RED.
Switching between them will be easy: a simple switch in the gui. Updating will be easy as well, the online updates will work, just like they do now for the normal images.
For now not that easy yet: installing and updating is done using the offline install method: with usb stick or sd-card.
Why not keep it all in one like it has been until now? To save download and install time for the (vast majority) of users that will not use these features. These new features increase the download (& installed) size enormously, and also they are really cool; but do not fall within normal Victron support. Which is why we want to keep them separate.
More details of the development status here:
2. Where to find support
There is and will be no official support on the functionalities included in this image. For support, turn to the Modifications Space on Victron Community.
3. Requirements
3.1 GX Device compatibility
A compatible GX device:
- Cerbo GX
- Venus GX (serial number HQ1842 or later, or upgraded to the large partition layout - more information in Appendix A)
- Octo GX
- MultiPlus-II GX
- EasySolar-II GX
The CCGX and CanVU GX are unfortunately not able to run Venus OS Large.
Venus OS large is also available for certain RaspberryPi models. Installation files below, and installation & other raspberrypi specific instructions here.
3.2 CPU & Memory resources
Both SignalK as well as Node-red are rather resource intensive software applications to run on the GX Device. From a CPU usage point of view as well as RAM memory.
Ofcourse, how intensive depends on what kind of flows (node-red) or how many messages & handling of them (SignalK) happens in the system.
From a GX device point of view, from the support models the Venus GX is the one with the least resources. Running both SignalK and Node-RED at the same time will be “pushing it” to say it simply.
Cerbo GX is already much faster, as it has a dual core CPU as well as much more RAM.
More details about CPU & RAM differences are in this document: https://github.com/victronenergy/venus/wiki/machines.
When running out of RAM or CPU, the device will slow down. And eventually also reboot by itself due to the watchdog.
3. How to install
Step by step instructions
- Step 1. (For Venus GX-es with a serial number below HQ1842 only) - first perform the procedure as explained in Appendix A below. Warning, that procedure can only be carried out by technical skilled persons.
- Step 2. Disable Auto updates. See Settings → Firmware → Online updates in Remote Console.
- Step 3. Download the latest Venus-OS Large image from the last comments on this issue.
- Step 4. Install that file using the GX Offline install method. Requires a USB-stick or Micro SD-Card.
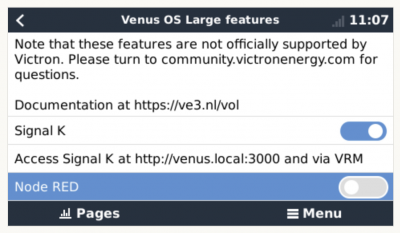
- Step 5. Verify that the image was successfully installed: go to Settings → Services, and check that Signal K and Node-RED are now available to enable.
- Step 6. Enable either Signal K or Node-RED. Note that though its possible to enable both, doing so on a Venus GX is “pushing it”, the system might become slow. Installer access level is required to enable/disable these servers, see Settings → General.
- Finished. The Venus OS Large image has now been installed successfully. Continue in either the Node-RED or the Signal K chapter below.
Venus OS Large menu:
Special note for the RaspberryPi
Unfortunately, simply installing the .swu file on your already installed image won't work, since the partitions are too small. You'll need to, at least once, reflash the image to an sdcard. There after you can use the .swu files for updates again. Both the image to flash to an SD-Card as well as the .swu file are available in above link.
4. Node-RED
4.1 Introduction
Node-RED is a tool for connecting hardware devices, APIs and online services in new and interesting ways. It provides a browser-based editor that makes it easy to wire together flows. With it, one can for example program a functionality such as activating a relay based on a temperature measurement. Or make far more complex algorithms, tying relays, measurements, or other data available from Venus OS or elsewhere together. All without having to write real source code, as Node-RED calls Low-code programming for event-driven applications.
Also Node-RED features a fully customisable dashboard, viewable in a webbrowser - both locally but also remotely, via the VRM Servers.
A good tutorial on how to work with Node-RED is here: https://nodered.org/docs/tutorials/first-flow.
The Node-RED editor is at http://venus.local:1880/. For some systems, you'll have to replace venus.local by the ip-address.
The username is “admin”, the password is the remote console password.
4.2 Installing extra nodes
Node-RED comes with a core set of useful nodes, but there are many more available from both the Node-RED project as well as the wider community.
For example nodes that give access to weather data, or with timer functionality, and so forth.
You can search for available nodes in the Node-RED library.
The Victron Pallette and the Dashboard pallette come pre-installed.
Read the Adding nodes to the Pallette - guide by Node-RED to learn how to install and manage node pallettes.
To install new nodes/pallettes requires a working internet access.
Palettes will be installed on the data partition on the GX Device. Which means that they will remain installed when updating Venus OS to a new version.
it is possible to remove self-installed palettes.see the remove button in the palette manager.
its not possible to remove pre-installed nodes; it is possible to disable them.
When installing a newer version of a palette than what is pre-installed in Venus OS, node-red will use that newer version.
Todo add what happens if user has a palette self installed and Venus OS then comes with a newer version pre-installed.
Make sure that there is always 30MB of free space remaining on the data partition. TODO: how can a user see that? Also mem usage / mem free & some cpu stats would be nice to see. Maybe with a dashboard & flow? ;o)
4.3 Controlling relays
GX Device relays
Controllable, make sure to configure them to be Manually controlled.

MPPT Relay
Note that while there is a Victron node that offers to control the relay in a solar charger (only large solar chargers have a relay!), its currently not workable since VictronConnect does not offer the required “Manual control” option in the list of selectable Relay modes for the MPPTs. This will be fixed at some point.
BMV Relay
Currently not possible, the driver in Venus OS doesn't support controlling it. This will be fixed at some point.
Multi & Quattro Relays
Includes alarm relays as well as the AC-out 2 relay: its not possible to control those; and there is no plan to make them controllable from within Node-RED.
5. Signal K
5.1 Introduction
5.1.1 Why have Signal K on your GX Device?
By adding Signal K, the GX device becomes a data hub for all marine electronics on your yacht. For example audio, boat speed and wind data, and more. The Signal K is the interface between all those devices and protocols on one side, and mobile Apps on phones, tablets and the alikes on the other. Note that SignalK itself is not a visualisation tool, its purpose is purely to gather all the data and make it available for web- phone-, and tablet-apps for the visualisation.
Also, there are SignalK plugins to forward the data to influxdb & Grafana.
Popular Apps compatible with Signal K:
- Wilhelm SK - WilhelmSK is a highly customizable boat instrument display available for iPhone, iPad, Apple Watch and AppleTV.
- … (welcome to add more here)
5.1.2 Instruments compatible with Signal K
- All Victron products that can be connected to a GX device
- NMEA0183 and NMEA2000 GPS data, AIS data, Wind Temperature and other environmental data, tbd
- Engine data available on NMEA2000 and SAE 1939
- Fusion Stereo
And many more.
5.1.3 What is Signal K ?
Signalk-server is a software application that, in the context of this manual, runs on your GX Device and interface to all Victron protocols and more. It uses plugins, and there is a large community of enthusiasts around it, making it one of the most flexible and complete pieces of software that understands the plethora of protocols of all different manufacturers that make marine electronics.
For more information on Signal K, read the Signal K website. And our blog post of a while ago.
Note that Signal K is not a Victron project. At Victron, we a great fans of sailing, open source as well as community driven projects. And Signal K is a perfect example of such project. And when running on a GX Device its a perfect marriage.
5.1.4 Signal K - the data format
Strictly speaking, Signal K is not software but a data format. And Signalk-server is the name of the software.
This section explains the rationale behind the data format.
Signal K is a modern and open data format for marine use. Its goal is to
- create a shared data model for marine related data - make marine related data easy to access, handle and build applications on
The shared data model allows you to handle the data in a uniform way independent of how the data is produced. In practice this means that you can refer to your battery voltage with `electrical/batteries/1/voltage` and not care where data came from: Victron BMV, NMEA 2000 bus or some other voltage sensor.
Easy access means that you can use modern standards like HTTP, WebSockets and JSON that are in widespread. There is a wealth of knowledge and skilled people are easy to find, with no special marine related knowledge needed to get started.
In Venus OS it brings all the data available in the GX system, including NMEA 2000 data, to a single data model and programming interface.
5.1.3 Considerations on how to install Signal K
The type of install described in this document, running Venus OS including SignalK, has these advantages: TODO elaborate. Doing this was born out of a wish to make SignalK more mainstream, less of a rapsberrypi / hobbieists/tinkerers product.
The other common type of SignalK install, installed on a RaspberryPi running Raspbian, has the advantages of more flexibility, and ease of installing extra components such as Grafana or Influx. The disadvantage is that you are basically setting up a Linux computer yourself, which you’ll also have to maintain yourself. Whereas the Venus OS type is more of a complete product; no need to bother about keeping individual components up to date and worrying about their compatibility.
There is no one right way for everyone to do this; the best solution will depend on the requirement.
For raspberrypi owners, note that its very easy to try both methods and change between them: simply have two sdcards.
5.2 Where to find support?
As above already introduced, use the Modifications space on Victron Community. As an extra, for Signal K we recommend the Victron channel in the SignalK Slack.
Do not contact normal Victron support for any help on SignalK. Its based on community support, not official support.
5.3 Signal K details
TODO: remove these versions, and replace by a link to the change-log.
And instead add information on what specifics we do in the Signal K install.
- Signalk-node version is 1.18.0
- Victron Venus Plugin, v1.10.0
5.4 First use & configuring
Step 1. Opening the dashboard
Open a web browser, and go to the SignalK Dashboard by navigating to http://venus.local:3000.
Further documentation about that is … (some link to signalk-node documentation?)
Step 2. Configure serial connections
Use this to, for example, configure a USB-connected NMEA0183 connection in SignalK. To do so, go to the dashboard (http://0.0.0.0:3000), and there to Server → Connections.
Make sure to not add a connecting using any of the built-in serial ports (/dev/ttyO0, /dev/ttyO2, /dev/ttyO4, /dev/ttyO5). These are the VE.Bus- and VE.Direct ports on the Venus GX, and it is not necessary to configure them in SignalK. Data from any devices there connected is already available in SignalK, by means of the “Victron Venus Plugin”; see Dashboard → Server → Plugin Config.
Note that once configured in SignalK, for example a USB-serial port, that port is no longer normally available in Venus OS. For example, when plugging in a USB-GPS; and then adding a connection for its corresponding tty in the SignalK, makes for that GPS to be no longer be recognised and available in Venus OS.
Step 3. Configure can-bus connections
For the Venus GX, SignalK comes pre-configured with a NMEA2000 listener for the VE.Can ports, its named “n2k-on-ve.can-socket”, and uses the canboatjs.

Note that, to keep that operational, that port must be configured as a 250kbit VE.Can & NMEA2000 port in the Remote Console.

Step 4. Adding Signalk Plugins or Webapps
TODO: explain & warn about data partition size & space (since thats where plugins are installed by signalk on Venus OS). Filling up the datapartition can corrupt Venus OS. More information about data partition on Venus OS here: https://github.com/victronenergy/venus/wiki/data-partition
5.5 Signal K FAQ
Q1 How to best handle & install a GPS
You want the data available in SignalK and in Venus OS, so that it gets to VRM. And preferably a quality GPS.
USB GPS Dongle
Plugging it into the GX Device will make it be recognised automatically; within Venus OS itself as well as in SignalK, using the victron venus plugin. No need to configure anything.
NMEA2000 GPS
Connect it to the GX Device on the canbus port. Consider using our VE.Can to NMEA2000 cable to go from the NMEA2000 Micro-C cables to the RJ-45 on the GX Device.
In Venus OS v2.60, support for NMEA2000 GPS-es was added.
Signal K can then get it in two ways: directly from the NMEA2000 canbus in case thats configured as a data provider in Signal K. And via the native Venus OS functionality through the Victron-signalk-plugin.
Conclusion (untested), when using a NMEA2000 GPS, it will be available to both Venus OS and Signal K.
Part of a NMEA0183 network
Tbd. Actually a NMEA0183-network is probably something that doesnt exist: you can't have NMEA0183 in a network, its point to point.
6. Remote access via VRM
6.1 Node-RED flow editor and Signal K
It it possible to access Node-RED flow editor and Signal K remotely via VRM - the interface and functionality is identical to access via LAN (ie. via http://venus.local:1880 or http://venus.local:3000) .
Step by step instructions
- Step 1. Log into/open the regular VRM 'dashboard' or 'advanced' page for the site

- Step 2. Modify the URL to include /proxy/ after the site URL ID number (note that the last / is required)
As an example: https://vrm.victronenergy.com/installation/12345/proxy/ where 12345 is the unique site URL ID

- Step 3. Click on the Node-RED or Signal K button in the Proxy relay screen; depending on location and the speed of internet connection, there may be a short delay while loading


- Step 4. The Node-RED flow editor or Signal K interface screen will appear

6.2 Node-RED Dashboard/User Interface
It it also possible to access the Node-RED dashboard/User Interface remotely via VRM - the interface and functionality is identical to access via LAN (ie. via http://venus.local:1880/ui)
Step by step instructions
- Step 1. Follow steps #1 to 4 in section 6.1 above in order to 'open' the remote connection
- Step 2. The 'new' proxy URL needs to be modified to include /ui after …..victronenergy.com
As an example: https://12345-nodered.proxyrelay3.victronenergy.com/ui where 12345 is the unique site URL ID

- Step 3. The Node-RED dashboard/user interface screen will appear

Appendix A - Repartitioning Venus GX flash memory
The Venus GX has sufficient flash memory to run the Venus OS Large image. But up until end of 2018 it was produced with a partition layout not suitable to run large versions of Venus OS. This appendix explains how to self update the partitions to the new format.
Perform this procedure only when connected via Ethernet port.
Do not use the built-in WiFi AP to performing this procedure. The AP will not work half way the procedure. Similarly, any WiFi (client-) configuration will be wiped after running the installer. Therefore, as said, make sure to be able to connect on the LAN port before starting this procedure.
WARNING: this procedure is available and documented here for the benefit of users that are technical enough to perform it. In order to make it possible for them to upgrade their Venus GX to make it compatible with the large version of Venus OS. Victron offers no support or warranty on this. Running the installer is not something Victron normally asks end-users to do, its for in the factory.
It is impossible to brick the device using this procedure. Its always possible to run the installer again. But, to make the device operational again, also the files must be restored, if anything then with other contents.
Venus GX-es with serial number HQ1842xxxxx and later already have the new partition layout from the factory.
Requirements
- An SD Card
- Computer skills
Note that a USB stick will not work. Installer images can only be ran using an SD Card.
Step A. Enable and obtain root access
See these instructions.
Step B. Secure factory files
Copy below four files to your computer.
- /data/venus/serial-number
- /data/venus/wpa-psk
- /data/venus/part-number
- /data/conf/vrm_auth_token.txt (don't worry if that does not exist, then skip it).
Below commandline instructions show how to do that on linux from the commandline. For Windows try Mobaxterm, or WinSCP. Putty won't work, its not for transferring files. There is Putty SCP (PSCP), as well, but then you need to know how to handle the commandline in Windows. We recommend using the other two.
Procedure on Linux:
mkdir my-temp
cd my-temp
mkdir conf
mkdir venus
scp "root@192.168.178.122:/data/venus/*" ./venus/
scp "root@192.168.178.122:/data/conf/vrm_auth_token.txt" ./conf/
Background information on the factory files
The first two are needed for the built-in accesspoint to work. Without them, the script that should start it is in an endless loop.
Third file is not used anywhere (at this moment), but easy enough to recreate by hand as well.
Fourth file: without it the system won't be able to send data to VRM anymore. Either make sure to keep that file, or after having booted the new version, go to the VRM Portal, Settings → General. And scroll to the bottom. There will be an option to reset the token. This option is only visible after the portal has received data from the reflashed device.
Step C. Run the installer image
First, download the latest official installer image.
Then, write it to an sdcard (tip: use BalenaEtcher, see Google)
Finally, run the installer by inserting the sdcard containing the installer, and then power up while pressing the small recessed button on the right of the long green connector with, for example, a paperclip.
There is a bi-color LED on the other side of the same long green connector, indicating the status:
- off, no image found
- red blinking, busy
- green on, done
- red on, error
Side info: see here for more details on installing an image.
Once done, reboot the device.
After the boot (30 to 60 seconds) the LED will be slow blinking green. Indicating that the WiFi access point is off (as expected). More information about the LED operation is in the Venus GX manual. Now, re-obtain yourself root access to continue. Note that all settings will be wiped by the installer:
- you'll need to go to Remote Console on LAN, then change access level again, enable ssh, change root password, and then login.
- As warned above, you’ll need to do this on the LAN port. The built-in WiFi access-point will be disabled, and any previously configured WiFi (client-) configuration will be lost as the installer will have wiped all settings.
Step D. Restore the files
Again, this is how to do it on Linux:
scp ./conf/vrm_auth_token.txt "root@192.168.178.122:/data/conf/"
scp ./venus/* "root@192.168.178.122:/data/venus/"

# reboot
ssh 192.168.178.122 reboot
Once completed, the WiFi access point will be operational again.
Step E. Install Venus OS Large
Now, the Venus GX has been repartitioned, and has a certain version of the normal Venus OS installed. Next step is to install the large image. Refer to the Installation instruction chapter above.