 Add this page to your book
  Remove this page from your book
  Manage book (
 Help
Help This is an old revision of the document!
Table of Contents
GX LTE 4G - Manual

1. Introduction
1.1 Product description
The GX LTE is an accessory for GX-devices. It is a cellular modem, supporting 2G, 3G and 4G technologies. It provides a mobile internet for the system and connection to Victron Remote Management (VRM) portal. See also the GX LTE Product Page on our website.
There are three models:
| Part number | Name | Region |
|---|---|---|
| GSM100100400 | GX LTE 4G-E | For EMEA/Korea/Thailand |
| GSM100200400 | GX LTE 4G-A | For North America |
| GSM100300400 | GX LTE 4G-SA | For Australia/New Zealand/South America |
More information about supported frequencies and bands are in chapter 7.1
It requires a SIM card of the Mini-SIM format; and connects to the GX-device with an included 1 meter USB cable.
The GX LTE includes a built-in GPS receiver. When the optional GPS antenna is installed, the system can be tracked as well as Geo-fenced on the VRM Portal.
Watch this video to learn how to connect using LAN, WiFi, and the GX GSM, which is the same with the GX LTE:
1.2 Antennas and accessories
A small indoor LTE antenna is included. As an option we also sell an outdoor LTE antenna:
- GSM900100400 - Outdoor 4G GSM Antenna
GPS: The GX LTE includes a built-in GPS receiver. With the optional GPS antenna installed, the system can be tracked as well as Geo-fenced on the VRM Portal. The required accessory is the GSM900200100 - Active GPS Antenna for GX LTE.
Photos and specifications in the antenna chapter.
1.3 Compatibility
The GX LTE can be used with any of the GX Devices.
The GX LTE requires Venus OS v2.60 or newer to be installed on the GX Device.
1.4 When to use a mobile router instead
The GX LTE provides an internet connection for the GX-device only. There is no option to share the internet to laptops, phones, or other devices.
For installations where more devices need internet, such as a yacht or RV, consider installing a mobile router instead. More information here.
2. Installation
Mount the device and connect the antenna. Consider using the outdoor antenna when installing the GX LTE in a closed metal enclosure or car or van.
Insert the SIM card. You will need to eject the SIM card tray with a pen or other pointy object. Be aware that the SIM card tray sits slightly recessed inside the unit. Be sure to push it all the way in.
Connect the GX LTE to the GX-device with the supplied USB cable. Use a USB hub if all USB sockets are already in use.
Connect DC power supply (8 to 70 VDC). A 1.4M wire is included, with M10 lugs and an inline XXX A fuse.
After power-up, the blue LED will be solid blue. Next, once it has registered on a network, it will start blinking slowly. Finally, when it has established the internet connection, it will be blinking fast.
3. Configuration
When using a SIM card with its SIM-pin security disabled, the system will work without further configuration.
Setting a SIM pin helps reducing the risk of the SIM card being stolen and used. Use a mobile phone to set the SIM pin, and there after configure it on the GX-device.
Settings → GSM modem → PIN code

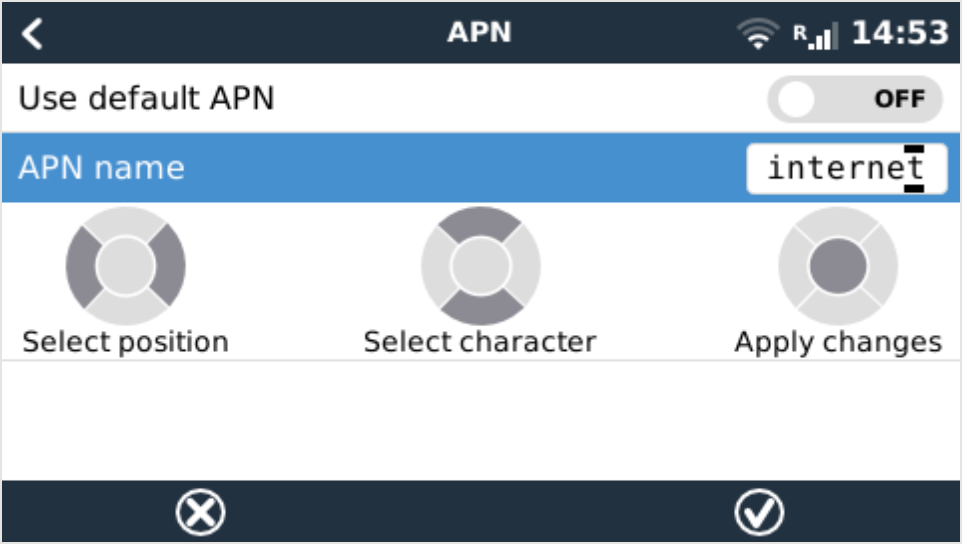
Some mobile networks require manual configuration of an APN specially when roaming. Contact your operator.
APN name can be configured in Settings → GSM Modem → APN.
Automatic recovery when disconnected
When installing the GX 4G LTE in an area that you expect continuous internet coverage, you should enable the “Reboot device when no contact” option in the VRM menu of the GX device. This will automatically reboot the GX device, as well as power cycle the GX 4G LTE, when the transmission of data to VRM has failed for the configured time.

Note that if you are leaving internet service coverage areas (such as an RV on the move, or a boat leaving dock to go to sea) then it is recommend to disable this setting, so that your GX is not rebooting itself for no reason. Or set it, for example, to a two hour time-out. And accept a reboot every two hours when underway.
4. GPS
When the optional antenna is added; the position will be visible like this:
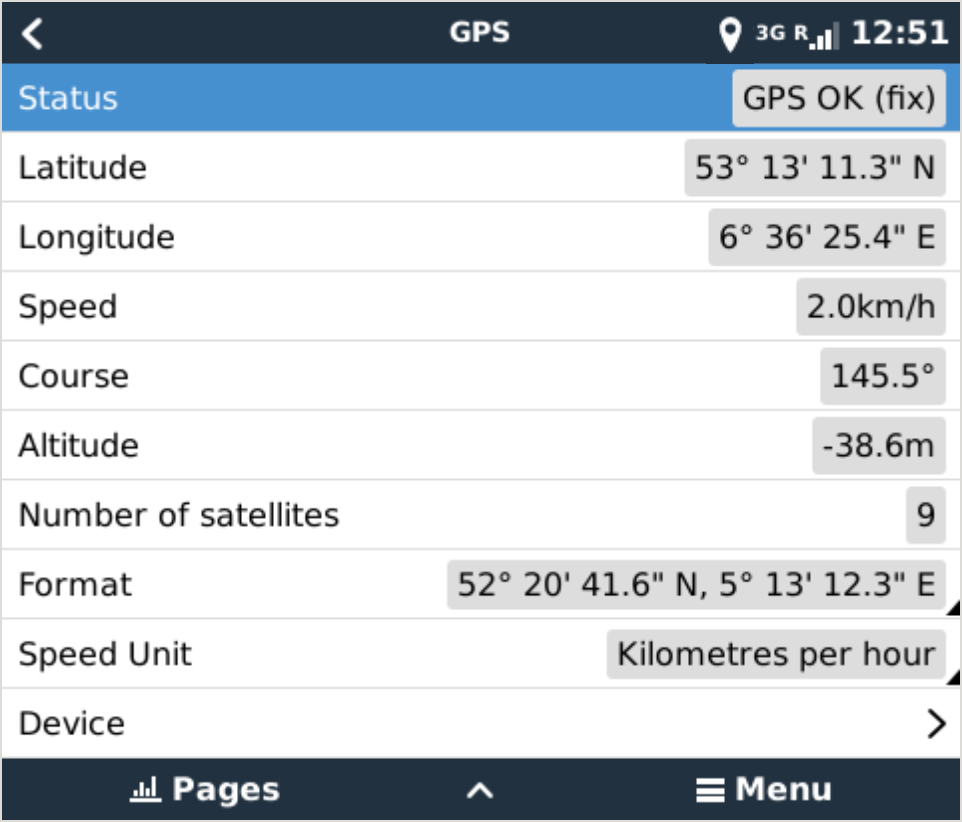
Also the position is sent to the VRM Portal.
5. Status
Status Bar
Cellular modem status can be checked at a glance by looking at the status bar.
| Icon | Details |
|---|---|
| | Cellular modem is connected to network, but not to the internet (no data connection). Either on purpose, because an ethernet or WiFi connection is available. |
| | Cellular modem is properly configured, the 4G/3G/E/etc icon reflects that the cellular modem internet connection is in use and what type of connection is applied. |
 | WiFi is available and its internet connection is in use. WiFi has priority over cellular connection. |
| | SIM PIN code is required. |
| | Roaming, only informative. To use internet connection while roaming it needs to be enabled in Settings → GSM modem → Allow roaming. |
SIM Status
| Status | Description |
|---|---|
| Ready | SIM card is installed properly and registered to the network |
| SIM not inserted | SIM card is missing or not inserted properly. SIM tray might hang out a little. |
| PIN required | SIM card requires 4 digit PIN for unlock. |
| PUK required | SIM is locked due to wrong PIN inputs. 8 digit PUK is required to release the lock state. |
| SIM failure | SIM does not respond - might be broken |
| SIM busy | SIM is in busy state |
| SIM wrong | Type of SIM is not supported |
6. Trouble shooting
There are many reasons for a modem internet connection to not work. Carefully go through each step of this trouble shooting guide. Make sure to start at the first step. When asking for help, make sure to mention each step taken and the result.
| Step | Details | |
|---|---|---|
| 1 | Power | Check that the blue LED is either lit continuous or blinking |
| 2 | USB connection | The modem must be connected to USB, and visible in the Settings → GSM modem menu |
| 3 | Simcard status | Check the SIM Status in the menu, it must show “Ready”. It will show “SIM not inserted”, or “PIN required”, or “PUK required” and more related errors when there is a problem. Please refer to the SIM Status list for details. |
| 4 | Signal strength | 1 bar minimum for VRM logging, 2 or 3 bars are necessary for a working remote console |
| 5 | Carrier registration | Check that a name of a Cellular provider is visible in the “Carrier” field. If it is not, check signal strength and otherwise contact your simcard provider and/or insert the simcard in a phone to double check its operation and subscription status. |
| 6 | Internet connection | Verify that the Internet shows “Online”. Reasons for the system to not go “Online” whilst properly registered on the Network are: 1) APN not configured, contact the network operator for details. 2) The network is a different one than the home network (ie. roaming), and the setting to permit Roaming is disabled. 3) Signal strength is strong enough to register on the network, but not to open the data connection to the internet. |
| 7 | Connection to VRM Portal | Verify that the VRM Portal menu shows a recent last connection time. See Settings → VRM Portal. For more details, see the VRM Connection troubleshooting chapter of the GX Manual. |
An outdoor antenna typically increases received signal by 15 dB to 25 dB.
Note that Ethernet and WiFi connections have priority over the cellular connection. Even when the available Ethernet or WiFi connection does not have a good connection to the internet. There is no automatic detection in place which in such case switches over to the GX LTE. In more technical language: when the cellular data connection is active, it is configured with a high routing metric. This way, the Linux kernel prioritises Ethernet or Wifi when these are available.
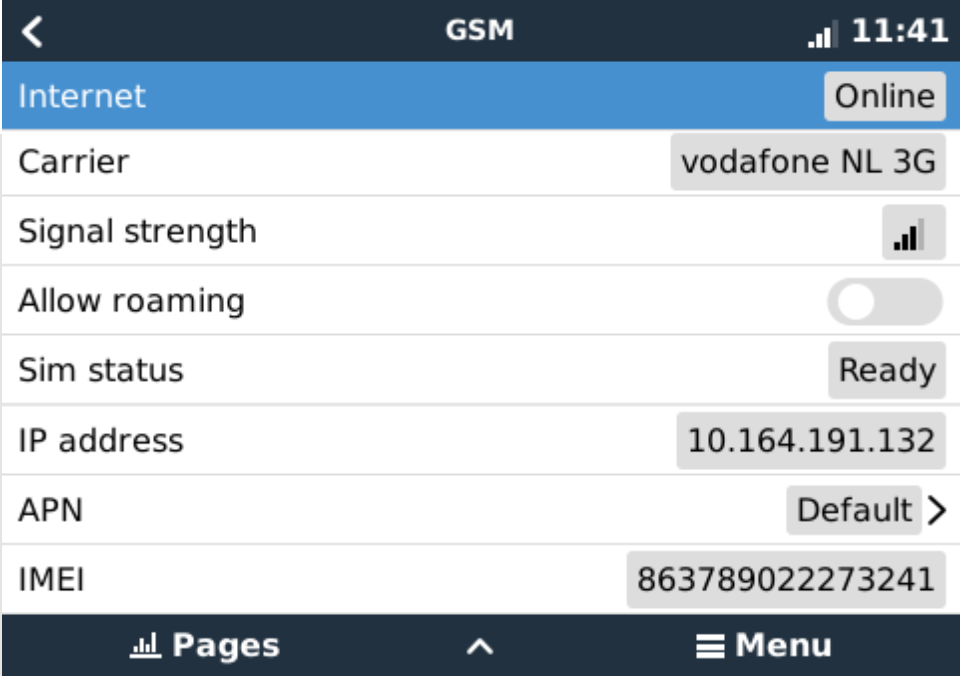
This screenshot shows how all details look when everything is OK:
What to do if the GX LTE 4G is not staying connected?
Enable the “Reboot device when no contact” configuration setting in the VRM menu of the GX device. That will reboot the GX (and with it the GX LTE 4G) automatically if the internet connection is not available.
7. Supported Frequencies
7.1 Available models & their supported frequency bands
| Part number | Name | Region | Used module | Supported LTE Bands |
|---|---|---|---|---|
| GSM100100400 | GX LTE 4G-E | EMEA/Korea/Thailand | SIMCom SIM7600E | 1, 3, 5, 7, 8, 20, 38, 40, 41 |
| GSM100200400 | GX LTE 4G-A | North America | SIMCom SIM7600A | 2, 4, 12 |
| GSM100300400 | GX LTE 4G-SA | Australia/New Zealand/South America | SIMCom SIM7600SA | 1, 2, 3, 4, 5, 7, 8, 20, 28, 40, 66 |
For more details, please refer to the SIM7600X Comparison Table.
7.2 Notes regarding regional coverage
A good reference to check frequencies is 4G world Coverage Map. Note that the page also contains 2G and 3G information, which is on its GSM World Coverage link on the top.
8. Technical Data
| Outer dimensions (LxWxH) | 106×42.5×22 mm (Drawing) |
|---|---|
| Voltage range | 8..70 VDC |
| Power draw | 2.5 W while 2G/3G data transfer <1.0 W in idle mode +0.4 W if GPS is enabled |
| Recommended fuse size | 500 mA @ 12 V 250 mA @ 24 V 100 mA @ 48 V |
| Wire gauge (power cable) | 0.5..1.5mm² / AWG 28..16 |
| Antenna connector | Type SMA Female |
| SIM card | Regular Mini SIM |
9. Accessory / Antennas
Outdoor 2G and 3G GSM Antenna
This antenna can be used with the GX LTE 4G, for 2G, 3G as well as 4G bands.

| Part number | GSM900100100 |
|---|---|
| Mounting option | Screw Mount |
| Cable Type | Rg-316 |
| Cable Length | 0.25 m |
| Connector | SMA Male Straight |
| Frequencies | 800/900/1800/1900/2100 MHz |
| Signal Gain | 3 dbi |
Outdoor 4G GSM Antenna (not yet available)
This antenna is optimised for 4G frequency bands, and as such will have slightly better reception on the 4G network. This model is not available yet, expected availability is 2021 Q1.
Mean while, if the 2G / 3G variant doesn't provide enough signal quality in an installation, the solution is to contact a local supplier of GSM antennas. All necessary information, including a link to the used cellular modem (Simcom) is available in this manual.
| Part number | GSM900100400 |
|---|---|
| Mounting option | Screw Mount |
| Cable Type | tbd |
| Cable Length | tbd |
| Connector | SMA Male Straight |
| Frequencies | tbd |
| Signal Gain | tbd |
Active GPS Antenna

| Part number | GSM900200100 |
|---|---|
| Mounting option | Magnet |
| Cable Type | Rg-174 |
| Cable Length | 3.0 m |
| Connector | SMA Male Straight |
| Frequency | 1575.42 MHz |
| Impedance | 50 Ω |