 Add this page to your book
  Remove this page from your book
  Manage book (
 Help
Help This is an old revision of the document!
Table of Contents
Victron & AXIstorage Li 7S / 9S
The combination of Victron products with the BMZ ESS 7.0 battery has been tested and certified by the R&D departments. The combination is actively supported by both companies. The AXIstorage 7S/ 9S is identical with the BMZ ESS hardware and software and therefore also compatible.

1. Introduction
1.1 Compatible Victron products
All 48V Multis and Quattros. And always a Color Control GX is necessary in the system, since that has the canbus port which is used for the (required!) communication between the ESS battery and the Victron system.
1.2 Notes
- AXIstorage batteries can only be used in a Victron ESS installation installation that uses the ESS Assistant.
- Paralleling multiple AXIstorage ESS batteries to expand capacity is possible. Contact AXIstorage for more information.
- Derating, based on the dynamic AXIstorage ESS charge- and discharge limits:
- Minimum CCGX version is v1.72
- The derating mechanism is not very precise yet. In other words, do not expect a discharge limit of 30A to result in a precise discharge of 30A.
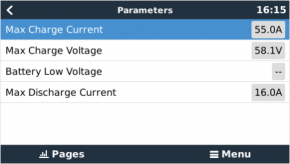
- Actual charge- and discharge limits are visible in the Parameters page. See screenshot below in Chapter 4.
- AXIstorage batteries and MPPT Solar Chargers with a VE.Can communication port cannot be both connected to the CCGX, because of different canbus speeds. Use Solar Chargers with a VE.Direct comm. port instead.
1.3 System diagram

2. Wiring of communication cables
To use the AXIstorage ESS in Victron system, it is necessary to use a Color Control GX. The Color Control GX takes care of sending the necessary canbus keep-a-live message to the ESS battery. Without it, the battery will open its internal emergency relay after 10 minutes.
A special RJ-45 cable is necessary to connect the battery to the Color Control GX. Pinout:
| Function | VE.Can RJ-45 | AXIstorage RJ-45 |
|---|---|---|
| GND | Pin 3 | Pin 2 |
| CAN-L | Pin 8 | Pin 5 |
| CAN-H | Pin 7 | Pin 4 |
Place a VE.Can terminator in the empty socket on the CCGX
3. VEConfigure settings
3.1 General tab
- Check “Enable battery monitor”
- Set the battery capacity to 121.5 Ah
- The other parameters (“State of charge when bulk finished” and “Charge efficiency”) can be left to their default setting. They are not used in this setup.
3.2 Charger tab
| Parameter | Setting |
|---|---|
| Battery type | Lithium |
| Charge curve | Fixed |
| Absorption voltage | 60.75 V |
| Float voltage | 60.00 V |
| Absorption time | 1 Hr |
Note: make sure to double check the float voltage after completing Assistants, and if necessary set it back to 60.00 V.
3.3 ESS Assistant
Select the fourth battery type:

Then:
- Sustain voltage: 50.0V
- Do not change the dynamic cut-off values, they have already been set correctly after selecting the lithium battery type.
- Same for the restart offset: do not change that.
4. Color Control GX Configuration
- Select the CAN-bus BMS (500 kbits/s) CAN-profile in the CCGX. Menu path: Settings → Services → CAN-profile. Note that this changes the function of a VE.Can port: it is not possible to connect both VE.Can products and a AXIstorage battery together.
- After properly wiring and setting up, the AXIstorage will be visible as a battery in the device list:

- The parameters option within the battery page shows the actual battery charge and discharge limits:
DISQUS
~~DISQUS~~