 Add this page to your book
  Remove this page from your book
  Manage book (
 Help
Help This is an old revision of the document!
Table of Contents
Hub-1 - Policy 'Connected to mains, no feedback'
This policy is intended of backup systems, with DC-coupled solar installed. Use it to make use of excess solar power: as soon as the batteries are full, AC loads will be co-powered with solar power. Power stored in the batteries will only be used to power the loads during a grid failure.
To keep the text short, 'Multi' is used to describe the VE.Bus system. It can also be a Quattro, or multiple Multis or Quattros in a parallel-, split- or three-phase system. 'MPPT' is used to reference one or more BlueSolar MPPT charge controllers installed in the system.
Installation & configuration
- Safety: it is required to have either internal or external anti islanding detection. Internal detection is enabled if a compliant grid code standard is selected, see the Grid tab in VEConfigure3.
- VE.Bus to VE.Can interface cable is supported but not required. When installed:
- the Assistant will reduce output power of the MPPT in case of an Li-Ion high cell signal/balance.
- the MPPT will not follow its own charge algorithm. The Assistant will actively control the output voltage of the MPPT instead.
- there will never be a state mismatch (ie Multi in ‘absorption’ and MPPT in ‘float’)
- When the VE.Bus to VE.Can interface cable is not used one must make sure that:
- the MPPT voltage during float for Li-Ion must be 13.6V (For Lead it must be anything > 13.5V)
- for optimal use of solar power make sure that the absorption time of the MPPT is exceeds the absorption time of the Multi.
- Lithium systems: (as always) connect the BMS to the MPPT solar chargers, to stop charging the batteries during a high cell condition.
- Install a BMV-700 Battery Monitor to get proper state of charge. The internal battery monitor of the Multi will not work correctly for dc-coupled systems.
- Install a Color Control GX to get full local and remote system monitoring.
- The battery capacity, although displayed on the VEConfig settings summary screen in the assistant, is irrelevant when choosing this option. For this reason, the assistant will not ask for it.
How it works
- The system will always be connected to the grid, unless there is a power outage.
- During a power outage, the Multi will power the loads from the battery, until the Low DC voltage disconnect set-point has been reached. This set-point is configured on the Inverter tab in VEConfigure3.
- After a power outage, grid and solar will be used to charge the batteries. By default, charging from solar power is not prioritized over charging from the grid, as the goal is to recharge the batteries as fast as possible and be ready for the next power outage. Permanently reducing the amount of power that is used for charging from the grid is possible: reduce the maximum charge current in VEConfigure3 on the charger tab. For systems where more flexibility is desired, see the Advanced section below.
- Once batteries are fully charged (Multi switches to float), excess solar will be used to power AC loads as soon as the total AC load exceeds 50 Watt. In this process the DC voltage will drop to 13V / 26V / 52V for lead batteries and 13.4V / 26.8V / 53.6V for Lithium batteries. These voltage are chosen such that the battery will not be discharged, while being low enough to take power from the MPPT charger and use it to power the AC loads.
- Input current limiter (Power Assist):
- Setting an input current limit works as usual, and can be used to do peak shaving.
- When necessary, the charge current will be reduced to prevent going over the limit (Power Control)
- When reducing the charge current is not enough to stay within the configured input current limit, the Multi will use power from the batteries to partially power the loads (Power Assist)
- Absorption phase is not skipped during charge, in contrast to the other polices in Hub-1. Because of this, and also because the grid will be used to charge the battery, there is no automatic maintenance charge needed. To do an equalization charge, trigger it manually by toggling the front switch on the Multi. Note that enabling (automatic) equalization on the MPPT might not always work: when there are AC loads, the Multi will take the extra power from the MPPT and use it to power AC loads, instead of letting the MPPT perform its equalization phase.
- This policy can be used in single-, split and three phase configurations. The Hub-1 Assistant must be loaded in all phase masters or, in case of using a VE.Bus BMS, in all devices. The easy way is just to load it in all devices. If it is not needed in a device, you will get a notification about that.
- Note that solar power will only be used to power the loads when the Multi is in float. The loads will be powered from the grid during the bulk and absorption phase.
Advanced: changing charge current from grid based on Battery SOC
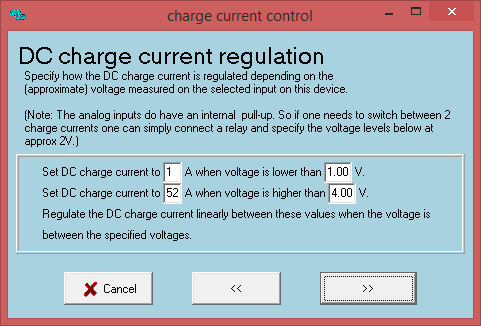
The 'Hub-1 Connected to mains, no feedback policy' can be combined with the 'Charge current control' Assistant to get operational control over the power used to charge the battery from the grid. Wire a simple on/off switch to one of the Aux inputs of the Multi, and you can then configure two charge currents, one which will be used when the switch is open, and one which will be used when the switch is closed. Remember that it is not allowed to disable the charger: do not enable the option 'Disable the charger when charge current should be zero'.
As an alternative to a simple on/off switch, it is also possible to connect the Multi Aux input to the relay of a BMV, and configure that to close when (for example) the SOC is below 80%. That way, it is possible to fast charge the batteries, using the grid, when the battery is below 80%. And above 80% use no or limited charge power from the grid and rely on excess PV power for charging.
DISQUS
~~DISQUS~~