
Good evening! After lots of hours designing, programming, testing by many people involved, I can now announce CCGX v2.00: an upgrade packed with new features and improvements. There are two highlights:
First of all the user interface has been improved: the overview better adopts to the installed system. And behind each entry in the device list, you can now see the main parameters.
Secondly, v2.00 marks the release of ESS. Short for Energy Storage System, it is the result of all experiences learned from the Hubs. We have combined all options in one, simplifying setup and configuration. Also, ESS has several new features, and it is much easier to understand how it works and why it is doing what it is doing. Most of the Hub-1 and Hub-2 policies are now deprecated for new installs, as is the Hub-4 Assistant. For exact details see the Comparison chapter in the ESS manual.
Besides those two major changes, there is more:
- improved genset start/stop
- remotely restarting a Multi or Quattro system if it has locked out
- eliminating the need for a BMV in simply Multi + MPPT solar systems
- better LAN/WiFi network stability
- improved CCGX firmware update mechanism
- and still more
Note that, unlike previous versions, v2.00 will not automatically install itself. This ‘one time’ upgrade procedure is explained here.
Now with all that out of the way, get a coffee or tea and start reading. There is so much news that even after all the time spent writing this blog post, I am still not entirely sure if everything is covered properly!
There has been a webinar around ESS. View the youtube recording.
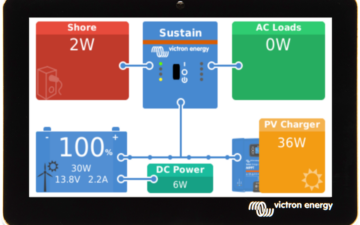
Improved overviews
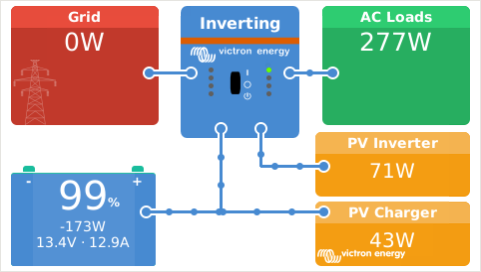
The overview can now show both MPPT Solar Charger power and PV Inverter power at the same time.
Example of a system where all loads and PV Inverters are connected to the output of the Multi:
Example or a grid parallel system, with all options:
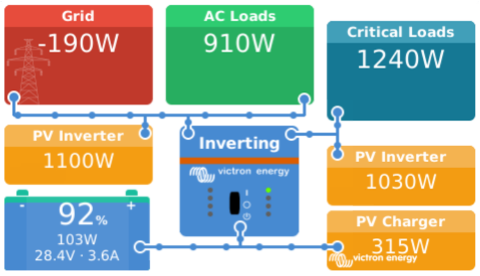
And the LEDs on the Multi in the middle blink now, mimicking the LEDs on the front of the unit.
Improved device list
In the device list you can now see the main state of each device, saving extra button presses:
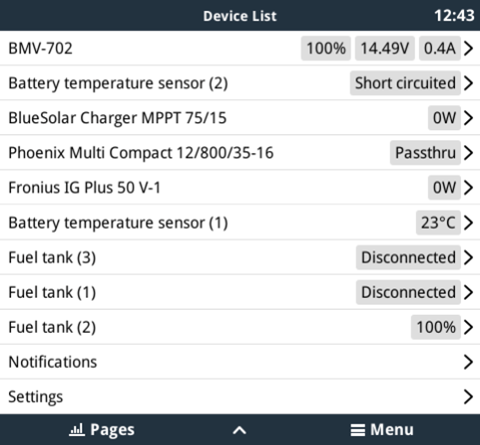
You may have noticed the temperature sensors and three fuel tanks: this screenshot has been taken from a Venus GX, a new product on which we’ll explain more next year.
ESS Systems
Short for Energy Storage System, ESS is a combination of standard multipurpose Victron products, together configured for ESS. In the system, there must at least be one inverter/charger and also the CCGX. The Multi or Quattro is configured with the ESS Assistant.
ESS can:
- work with Energy Meter (like Hub-4 did), or without (like Hub-1 and Hub-2 did)
- feed power from MPPT Solar Chargers back to the grid (like Hub-1 did) or not, if you don’t want that.
- use (part of) the battery to optimise self-consumption. Or not, and just always keep the batteries charged.
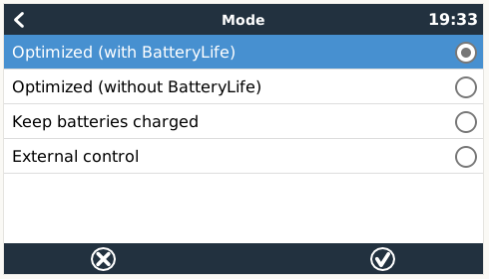
Here is a screenshot of the full menu:
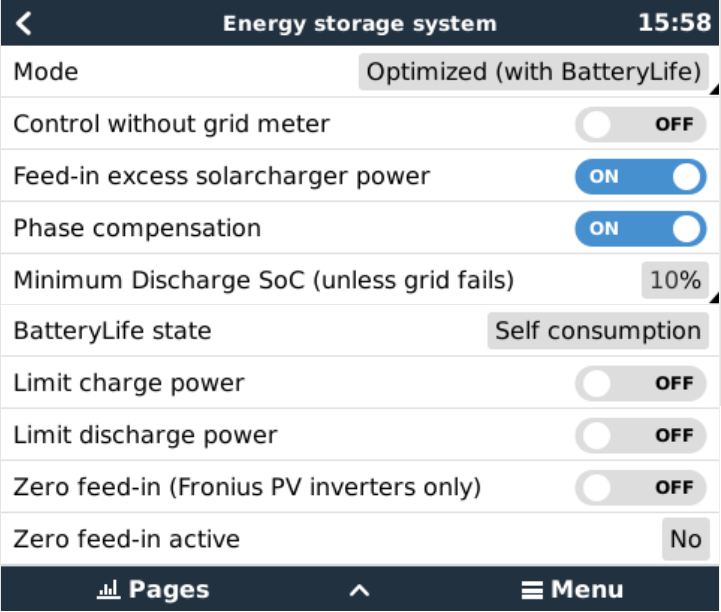
And here is one showing the four mode options:
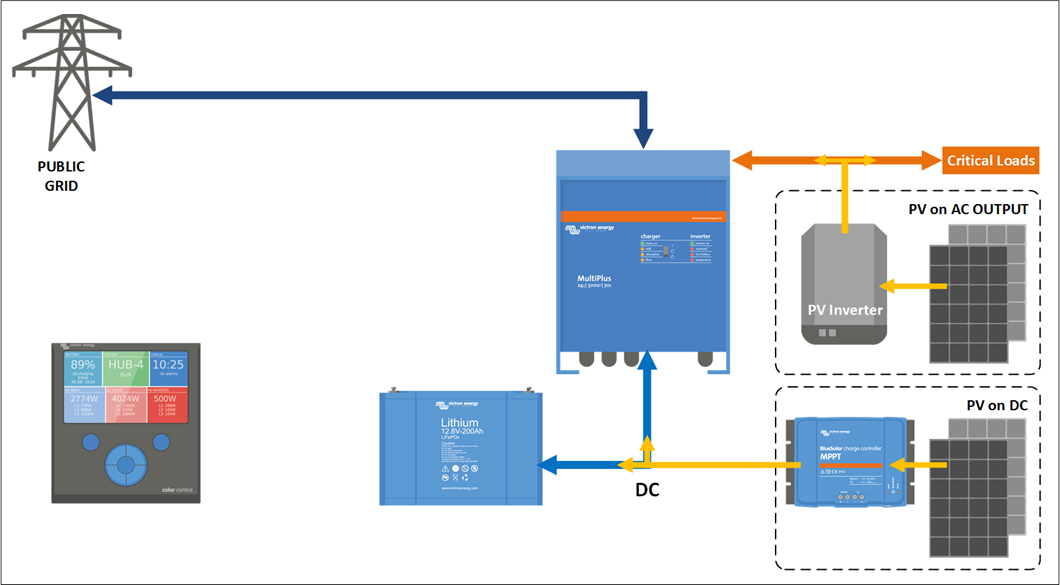
Next, a diagram of an ESS installation without Grid meter. Showing both possible locations to add PV into the system:
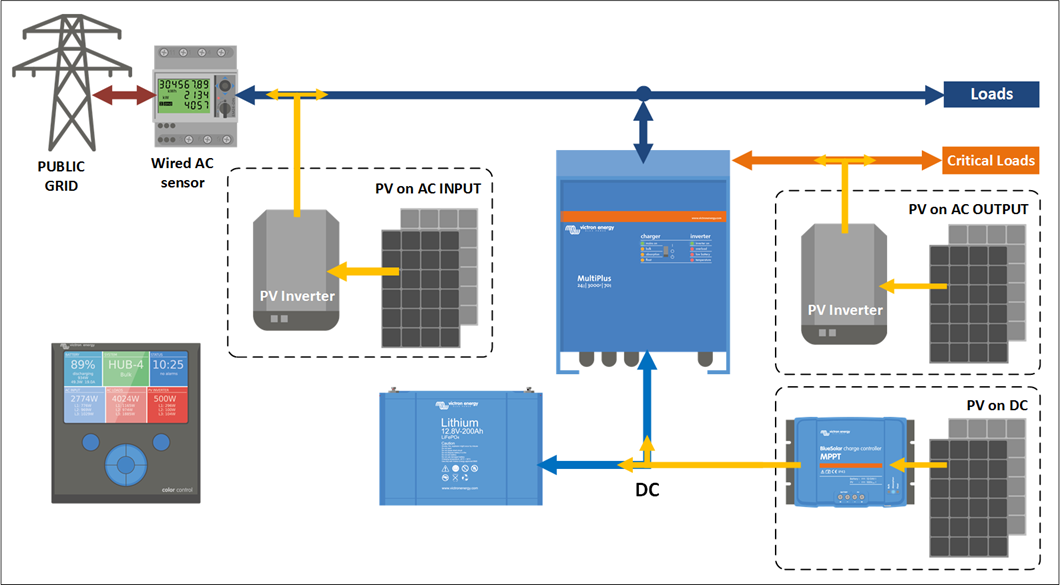
And last, a diagram showing ESS including a Grid meter, which adds yet one more location to add PV into the system:
Study the ESS Manual for more information.
Overload or temperature alarm with phase information
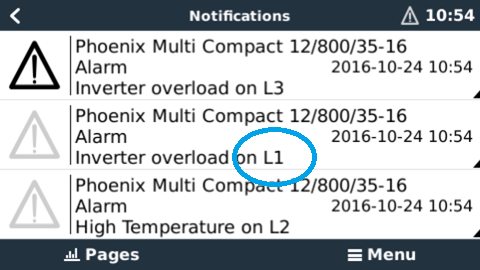
This is really handy when diagnosing issues on split and three-phase installations. The phase information is also visible on the VRM Portal and alarm emails.
Also, the high DC ripple alarm is now shown per phase.
Remotely restart a Multi or Quattro system after it locked out
Use this option to restart a system once it has locked itself out. This means it’s no longer required to switch all units off one by one and then switch them back on again by using the rocker switches on the Multi or Quattro.
Also, using Remote Console, this can now be done remotely!
Further improved CCGX synchronisation options
1: removed the Synchronize VE.Bus SOC config option
This user setting has been removed: there is no need to set it manually as the CCGX will now activate it automatically when it detects that there is a Multi or Quattro installed, and an external battery monitor.
2: eliminated the need for a BMV in a simple Multi + MPPT solar system
To get proper state of charge reading for the battery, it used to be necessary to install a BMV for systems with MPPT Solar Chargers. Not anymore: the CCGX will continuously inform the Multis or Quattros about the MPPT charge current, which is then used in the SOC algorithm.
It is not necessary to enable this feature: it is automaticall
3. Synchronisation mechanisms are now visible
Above two explained mechanisms, as the Solar charger voltage control one (used by ESS and Hub-1), are now visible in the System setup menu:

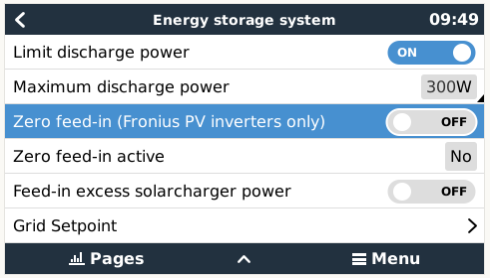
ESS – Zero feed-in with a Fronius PV Inverter
The ESS system can control the Fronius Power Reduction feature, resulting in a nice zero feed-in system. Herewith, it is no longer necessary to use the Prevent feedback option of the Hub-2 Assistant. By staying connected to the grid, instead of switching back and forth to inverter mode, flickering of lights, and also the occasional (avoidable) overload shut down are now eliminated.
Before I go on and explain how to set this up with a Fronius, first I’d like to discuss doing this for other brands of PV Inverters: I have come across several installations where Hub-2 with “prevent feedback” is used, and were having problems. Lately, I started to take a step back: instead of diving into the details; I first asked why the system is setup like that? Two often heard reasons are:
- “The utility doesn’t pay me for the feedback”
Well, so what? If they do allow it, while not charging you for feedback and also not disconnecting you, please just let the PV Inverter do its feedback. The system will be more stable: no switching back and forth to inverter mode. - “Even for small systems I prefer a PV Inverter over an MPPT Solar Charger”
Though everyone is free to prefer one solution over another, I do recommend strongly to reconsider: technically, preventing feedback of a PV Inverter by going into inverter mode and starting to frequency shift, can be done. But the technologies used, switching back and forth to inverter-mode and altering AC frequency, are not ingredients that help in creating a stable and smooth running power system. While that (a stable and smooth running power system) is what the end-user of such a system is used to.
This is how the settings on the Fronius need to look:
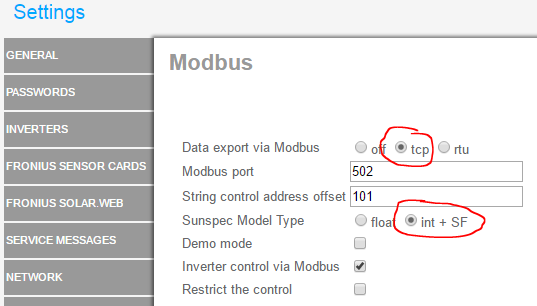
Notes:
- Minimal required Fronius firmware version is 3.7.1-5
- After boot of the CCGX, it might first charge the battery with ~500W for a minute or so.
- If the Int + SF setting is not available in the Fronius PV Inverter, you need to update its firmware to a more recent version. Contact Fronius.
The feature can be enabled in the menu Settings -> Energy storage system.
Once up and running, the Fronius entry in the Device list shows the actual power limit of the inverter:

Generator start/stop improvements
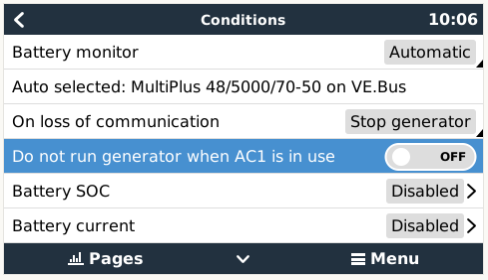
There is a new feature: “Do not run genset when AC 1 is in use”. It is intended for backup systems, with a Quattro, having mains on AC in 1, and Genset on AC in 2. When this option is enabled, the Genset will only be started after a mains failure. And in the case of a mains failure, the Genset will automatically be stopped again as soon as the mains is restored.
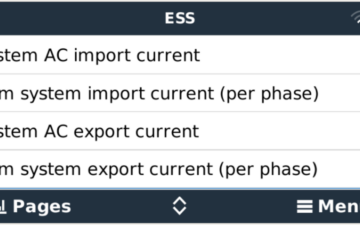
Also, there are now multiple measurements for the AC load condition that can be selected. There are three options to choose from:
- “Total consumption” <- This is the value that was used in previous versions
- “Inverter total AC out”
- “Inverter AC out highest phase” <- Much better for split- and three-phase installations
Improved CCGX firmware update stability
- It now updates the full file system, instead of bits and pieces.
- Fixed the issue that the device could be ‘bricked’ during the firmware update process: no matter when you cut the power, it will always recover. No more “my Color Control GX only shows the blue logo, what should I do?” complaints.
- Download updates via https instead of http: more secure.
- Better user interaction: the GUI now properly warns that a download and install has started. Also, it warns that the device has initiated a reboot.
And there is more. Let me take you through the updated menus one by one. First of all the new Firmware update menu:
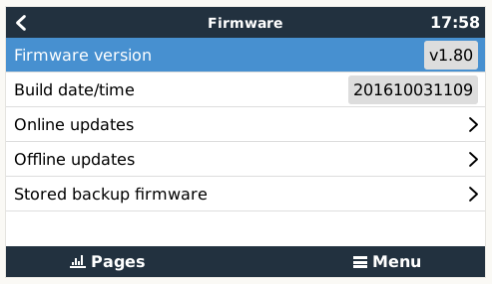
It looks a bit different. The top two lines still show the currently installed firmware version and its build date. Going into the Online updates menu show this page:
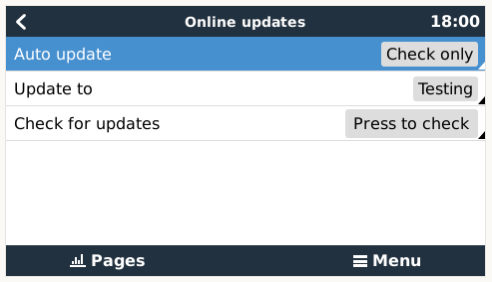
The first setting, Auto update, has three settings:
- Disabled
- Check only (New!)
- Check and update
Taking a step back, there is another new feature: Offline updates. Use that menu to install a new version from a microSD card or USB stick. Simply insert the card or stick that holds the new file. Also, what needs to be placed on the card/stick is just one file, recognisable by the .swu extension.
And one last new item, the Stored backup firmware:

With this feature, you can go back to the previously installed firmware version at the flick of a button.
More changes
- Modbus-TCP changes
- Added many new fields: all the fields of com.victronenergy.system, which are the values shown by the GUI. This makes it a lot easier to always obtain, for example, the system battery state of charge from the same registerid. System information is available at unitid 0.
- Add control of the relay, registerid 806, unitid 0
- Add VE.Bus Overload, Overtemp & ripple alarms per phase
- Add VE.Bus disable PV Inverter (works with ESS Assistant and with PV Inverter Support Assistant)
- Add VE.Bus temperature and volt sense alarms
- VRM Portal: Add tank level data
- Add 9600 baud to the supported USB GPS baud rates.
- Fix a bug that made it impossible to switch the inverter on from the boat & motorhome overview.
- Add feature to GUI to manually control the relay, and do the same from ModbusTCP
- Fix motor drive temperature missing from the GUI and VRM Portal
- Fix motor drive RPM missing from the GUI
- Improved functionality in the Network page on Windows as well as other systems that use upnp: clicking the icon now leads to the Remote Console on LAN page.
- Add the new Multi models: 500VA and 800VA
- Improved Ethernet and WiFi Networking stability
- Improved Phoenix inverter page: Show AC power, Remove AC voltage decimals, Prevent displaying negative AC current.
- Notifications: Show the number of active notifications on the menu item
- Renamed Wired AC Sensors to Energy meters: Energy meter is our new name for the Carlo Gavazzi meters.
- GUI: also show VE.Bus temp. sense and volt. sense alarms
- Add Czech to the list of available languages. Thank you Jiri Zeman from Neosolar!
- More small stability improvements and other fixes
How to update to v2.00
Unlike previous updates, v2.00 can not be installed from the internet. Instead it needs a one time manual upgrade. After this, future updates can be installed automatically from the internet once again.
Conclusion
That was it. Welcome to leave comments below in the Disqus system.
Have a good night, Matthijs


